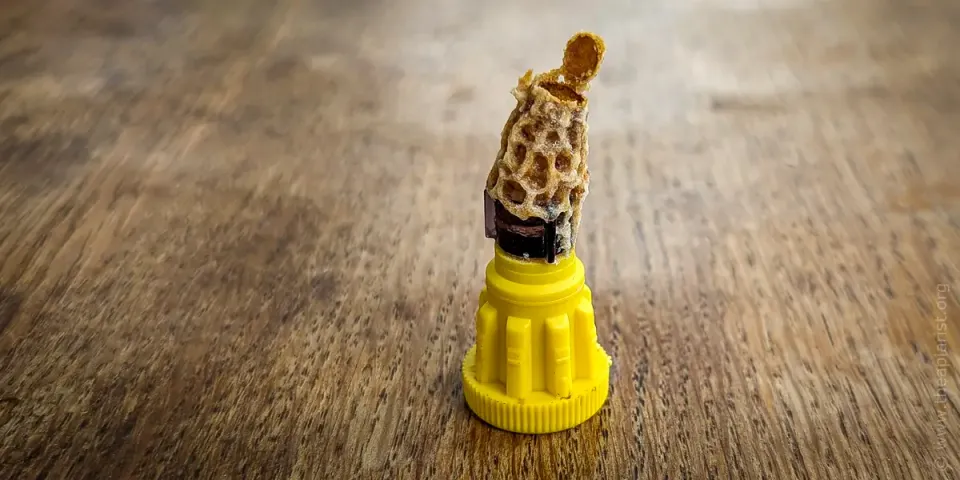
‘Grafting’ is the transfer of selected larvae from a donor colony into artificial cups from which new queens will be raised. It is probably the aspect of queen rearing that beginners find most daunting in prospect – perhaps not surprisingly as it involves manually moving a less-than day-old larvae (about the size of a comma in 12 pt. Times New Roman font) to a new location. However, it’s a lot easier to do than to describe, is easy to practice and you can tell if you’ve been successful within 24 hours.
In my opinion the preparation and maintenance of the cell raising colony and the use of mini mating nucs both require more skill than actually grafting the larvae for queen rearing.
Things that are needed for successful grafting
- a source of suitable larvae
- good lighting and good eyesight (help is available with both)
- a grafting tool of some sort
- a cell bar frame with cell cups to transfer larvae into
- a warm, damp cloth and somewhere to sit
Source of suitable larvae
There are essentially two criteria that are important here – the age and the genetic quality of the selected larvae. The first of these is straightforward – you need to use larvae that are as young as possible, perhaps 12-18 hours after hatching from the egg. How do you determine the age of the larva? The easiest way is to choose the smallest larvae possible from a frame containing brood in all stages. Because the queen generally lays in rings you’ll usually find the smallest larvae right next to the oldest eggs on the frame. Fresh eggs stand up from the bottom of the cell, older eggs lie horizontally. Look around the cells containing the horizontal eggs. Suitable larvae are the same size as an egg, or perhaps even fractionally smaller. These larvae are so small they haven’t yet adopted the fully curved ‘c’ shape.

Keep good records
One of the reasons to rear your own queens is to have bees with the characteristics you want. This is the genetic quality of the starting material. This means you need to keep records of the behaviour of your colonies, scoring them for desirable or undesirable traits. This can get very complicated, but doesn’t need to be. In addition to general aspects of colony health (chalkbrood, viral diseases, Varroa levels) I keep records of temper, following and running on the frame as my primary interest is working with bees that are docile and easy to handle. Temper and running are scored on a simple 5 point scale and I use colonies with consistently the best scores for grafting. Following is scored as a simple yes/no … and any that score yes are re-queened.
Good lighting and good eyesight

Specs
Suitable larvae are small and you need to be able to see them clearly. You need both hands free, so do not rely on a magnifying glass. Buy a cheap set of strong reading glasses. Don’t be self-conscious about this … style doesn’t matter (anyway, you probably wouldn’t be a beekeeper if you worry too much about appearance) but strength does. Check the strength you need by looking for commas on a page in a standard paperback book, probably at a closer distance than you would read a book. I don’t need reading glasses for reading, but have +2.5 dioptre glasses for grafting.
Good lighting is critical. Don’t rely on the sun for this … you’ll inevitably be grafting on dull overcast days at some point. Get a battery powered LED head torch as used by campers. Ideally get one with at least 4 white LEDs and 2 red LEDs. The white ones are usually divided into two highly directional ones, and two providing general illumination. Use them all on together. You’ll need the red LEDs later …
Grafting tools

Use size 00 or 000
There are all sorts of tools available for grafting, ranging from the cheap and cheerful – and nearly ubiquitous – Chinese grafting tool to very expensive cranked, left or right hand-specific specialist items with exotic wood handles. Try a range of different types (at least the affordable ones) to see which you get on with best. However, I recommend you first try a 00 sable artists brush. Of all the grafting tools I’ve used, this is by far the easiest in my view. Protect the bristles using the sleeve stripped from a short piece of electric flex when it’s not in use.
Cell bar frame
You can make artificial wax cups from melted beeswax and a rounded dowel former. Far easier though are the plastic cups available from beekeeping suppliers like JzBz. Better still are those provided as part of the Nicot Cupkit system, consisting of a dark brown spigot, a cream coloured socket, translucent brown cups and a ‘hair roller’ cage. These are available separately from suppliers like ModernBeekeeping and are inexpensive.
The cell bar frame consists of a standard brood frame with one or two cross-bars to which the cups for grafting are attached. You need to be able to easily access the base of the cups. Therefore either hold the cross bar in place with a single gimp pin at either end (so it rotates), or make the cross bars slot in and out of the side bars.
For the Ben Harden queenright method of queen rearing I usually graft 10-20 larvae in rows of five or ten. Firstly this type of cell raiser isn’t as strong as the sort of three box queenless monstrosities some people use, secondly I can only conveniently get about a dozen or so queens mated at any one time.
Attach the spigot firmly to the cross-bar with gimp pins. Push-fit the socket onto the spigot and push the cell cup into the socket. If you have two cross-bars and intend to use the hair roller cages to protect the sealed cells make sure there is enough ‘headspace’ to fit them easily – remember the bars will be covered with bees when you do this. Probably the best way to achieve this is to have the cross-bars rotate along their axis.
Are you sitting comfortably … ?
The goal of grafting is to move good larvae from the cell in which the egg was laid into a new artificial cell, without damaging or chilling the larva. To do this you need to work quickly, carefully and efficiently. Find somewhere to sit near the donor hive that it is in light shade. Take a stool or folding chair to sit on and a piece of thin wood to lay in your lap on which the cell bar frame and the frame with larvae can be placed. Take off your veil. Make sure the things you need are close to hand – a hive tool or scalpel, your grafting tool of choice, glasses and head torch. Lay a damp cloth across the board to keep both the frame with larvae and the grafted larvae in a humid environment. I usually leave the cloth hanging over each end of the board, and fold these ends over to protect the frames.
Grafting in practice
Retrieve the acclimatised cell bar frame from the cell raising colony. Don’t bother putting anything in its place – you’ll be returning it within 30 minutes or so (but do close the hive up). Go through the donor hive until you find a frame with eggs and young larvae on it. I try and avoid shaking the frame hard, so give it a gentle shake to remove the flying bees, then brush off the adhering nurse bees (again, don’t push the frames together, but do close the colony). Take the frame to the location where you’re going to be grafting. Arrange your glasses and head torch, the wooden ‘table’, damp cloth and cell bar frame. Relax! Find a patch of suitable larvae …
- Arrange the frame with the top bar towards you – that way the cells also slope towards you making it easier to see into the base.
- Cut down the cells using a scalpel or your hive tool – the aim here should be to improve access to the larvae in the base of the cell. I usually simply lever apart a row of cells.
- Working calmly and efficiently pick individual larvae from the donor frame and transfer them to the cell bar frame.
- The precise way you manipulate the larva differs depending upon the particular type of grafting tool in use. If you’re using a paintbrush dampen and straighten the bristles (in your mouth), slide it underneath the larva, lift it out, lower it to the base of the new cell cup and release the larva by gently rotating the brush.
- When you’re not searching for suitable larvae from the donor frame keep it covered with the damp cloth. Likewise, keep the grafted larvae covered other than when you’re transferring them. This way you minimise the chance of them drying out.
- If you have trouble transferring a larva, if you end up rolling it around the cell cup, if it sticks to the side wall or if there’s any doubt at all about it then flick it away, lick the brush again and choose another.
It probably takes 30-45 seconds per larva when they’re easy to find. You can minimise this time by cutting down the wall of a row of cells and then working your way along the row, grafting each in turn. Don’t worry if it takes longer. The more practice you get the more efficient you will become at finding and transferring larvae. An acceptance rate of 80-90% should be expected with a little practice.
Gently return the cell bar frame with the grafted larvae to the cell raising colony. Use minimal smoke … you want the larvae to be accepted straight away and fed with copious amount of jelly. Remember that the cell cups containing the grafted larvae must be vertical.
Don’t forget to return the frame of unused larvae and eggs to the donor colony.
Did they work?
You can (and indeed should) check whether the grafted larvae have been accepted 24 hours after introducing them to the cell raising colony. Open the colony with the minimum use of smoke, gently raise the cell bar frame and look for a 3-4mm wax ‘collar’ around the edge of the plastic cell cup. If you look into the cell there will be a good bed of Royal Jelly with the larva floating on top. Grafts that have not been accepted might have a thin trace of wax around the cup edge, but nothing like 3-4mm.
If the overall acceptance level is low consider grafting again straight away. There is no need to reacclimatise the frame, simply pull out the cell cups and replace them with fresh ones. You even know which frames have day old larvae in them … they’re the ones which had horizontal eggs yesterday.
Amazingly detailed info, I’ll add a link to this from my local association’s e-newsletter.
Thanks Emily … at least give your association a plug 😉 I’ll start queen rearing towards the end of April of the weather-gods are smiling. I’m intending to take some better photos of the grafting process and the resulting cell development.
Ealing 🙂 Best of luck with your queen rearing, fingers crossed for plenty of sunshine.