Hivebarrows and housekeeping

If you're reading this in an email newsletter on Friday evening then something went right.
However, if you received no email, it's Monday afternoon, and you had to search for the site on Google to find this post, then I've clearly still got some work to do.
Moving The Apiarist from Wordpress to a new publishing platform (Ghost) has been a bit of a headache, but I'm hoping that the worst is over and things will now run smoothly.
If I'm right then I can start focusing on beekeeping rather than subscriber lists, broken hyperlinks or related geekery.
But, I'm rarely (ever completely?) right, so - as my better half has never heard me say - “Let's get the housekeeping out of the way first”.
Housekeeping
I've imported all the subscribers that Wordpress would list for me. Frustratingly, this excluded those who signed up via wordpress.com. If you were one of the few hundred that were omitted, then I apologise.
Please subscribe here to ensure you don't miss future posts (assuming, of course, you don't want to miss future posts).
Equally frustratingly, Wordpress only exports email addresses (without forenames or surnames). If you'd - understandably - prefer not to be addressed as 5rr348d@aol.com you can sign in and update your account details.
If you're new to The Apiarist then welcome.
I'm aware a few things remain broken … these include:
- older posts may have thumbnail images with dud links
- legacy comments have yet to be imported
- some
majorminorunsightly formatting issues remain
There's no need to tell me about other things you find {{1}}. If you're reading this on email and wonder what those squiggly brackets are, then please read this note about footnote formatting … or view the post on the web for the fully immersive experience.
OK, enough housekeeping (as I do regularly say) … let's talk hivebarrows.
Moving hives
When you move a hive from one location to another there are two important things to take care of:
- the bees
- your back
The first of these are easy to deal with. It's sensible to move the hives early or late in the day; all the bees will be 'at home' (so you don't lose stragglers) and - importantly - it will be cooler.
If you move a colony on a hot day with inadequate ventilation, they rapidly overheat and - at the very least - get distressed.
At worst, the comb collapses, and it's both an unholy mess and the probable demise of the colony.
If it's warm and/or you are going any distance then remove the roof and crownboard and use a travel screen (a framed bee-tight mesh costing about £23, or - for those of you who like saving money - a 50 cm square of fibreglass insect mesh secured with an eke and a couple of straps. The bees will thank you and so will your wallet {{2}}.

Fit the mesh the day before you move them, and - while you're at it - use a block of closed cell foam to wedge the frames together so they don't shuggle about in transit. Strap everything up, replace the roof, and then they're ready to go as soon as you've sealed the hive entrance (and removed the roof again) the following day.
Mind your back
Hives and supers are heavy. They are also bulky. This combination makes them awkward to lift and carry unless you have a physique like Charles Atlas.
Since my upper torso more closely resembles that of Charles Hawtrey {{3}} I sometimes suffer from minor back strains during the beekeeping season.
During the honey harvest I'll often lift and move 20-30 supers; from the apiary to the car, to the store, to the extracting room etc. At 12-15 kg each, with multiple lifts and carries, it's not unusual to move well over a (cumulative) ton of boxes over a long weekend.
Good technique - straight back, bend your knees - is essential when lifting, but it's the bulkiness of the boxes when moving them from A to B that does the damage.
Carrying anything with your arms extended is tiring and a classic way to damage your back.
But in some ways the supers are easy, assuming they're empty of bees. Any jolting and jarring doesn't really matter. If you stumble and drop one, it creates a mess, but not a disaster.

If you stumble and drop a brood box full of bees (and stores) it's also a mess ... but you'll barely notice that as you (briefly) marvel at the spreading mushroom-shaped cloud of psychotic bees before having to make a run for the hills.
If you're moving boxes any distance and/or over rough terrain it makes sense to use a hivebarrow to 'take the strain'.
Commercial options
Thorne's sell a hivebarrow available in an oh-so-subtle yellow colour. I've not used it or even seen one though I did enjoy their 'easy to assemble' (!) demonstration video.

This hivebarrow is designed for National hives and — I suspect — is only suitable for cedar Nationals with deep recesses on opposite faces of the brood box. I doubt it would 'fit' Abelo poly Nationals or any of the many other “National” variants. Add a comment below if I'm wrong.
It also costs a whopping £96, though this is a small price to pay to avoid a bad back.
However, I think there are cheaper (or much less expensive), more flexible and better solutions to the problem of moving heavy, bulky hives — be they Smiths, Nationals, Langstroths, Layens, or even Warré's — over rough ground.
And, while I'm on the subject of rough ground, the Thorne's hivebarrow has a rather small diameter front wheel which I would expect to cope poorly with tussocky grass or a rutted track.
If you use cedar Nationals and simply need to move hives across your bowling green-like lawn, then I'm sure it would do a great job ... and I love the colour.
Does my bum look big in this?
You may have noticed that beekeeping was, for a time, very fashionable. For the last decade or so it's been a popular hobby, and things really took off during the pandemic.
Nevertheless, although our hobby might be fashionable, the regalia we wear — the baggy beesuit, the veil, the Marigold gloves, the welly boots — is deeply unflattering and fundamentally unfashionable.
I know you can purchase primrose or lilac or biscuit-coloured beesuits … but these are just colourful and unflattering.
In the apiary of course it doesn't matter what we look like. Functionality and practicality trumps everything else. Looking a bit ridiculous is a part of the fun. Feeling well protected inspires confidence and improves your beekeeping.
But you probably take your beesuit off before venturing forth in public; to the petrol station en route home from the apiary, to the supermarket as you drive between apiaries, or the restaurant when delivering honey to the farm shop.
However, if you're anything like me, over time you just stop noticing the strange looks you are getting. Once you're immune to the “What's that weirdo doing?” stares from the uninitiated, once you no longer care what others think, you are ready to progress to the next stage of 'economic and sustainable beekeeping' ... and avoid that bad back.
Dumpster diving
If you want to move hives about easily and cheaply, the place to start is a skip.
Specifically, look for one where the builders are just about finishing the renovations.
The skip might be full to overflowing with stuff.
Don't be shy. Have a good rummage about. Wear something inconspicuous … not your cerise beesuit.
Passers-by might stare, but who cares?
The more valuable things — the inconvenient offcuts of Kingspan insulation, the floppy sheets of 2 mm Correx floor protection, the “that'll surely come in?” pieces of wood — are buried … you should have been checking the skip at least weekly to snag any of those.

But on the very top, the crowning glory, you may be lucky enough to find a cement-encrusted and tatty-looking wheelbarrow.
Remember that the contents of the skip belong to either the builders or the homeowner; don't just help yourself.
Time to negotiate.
I suggest a good starting point is one jar of honey for 'anything and everything I want from the skip'.
The discarded wheelbarrow probably has a hole in the barrow. An over-enthusiastic spade was driven through a rusty corner, or the plastic/polythene cracked when someone dropped half a paving slab in it.
At worst, it might also have a puncture.
The only thing that matters is that the frame of the wheelbarrow is intact and sound. You don't need the barrow, and can get a new inner tube for fiver. If you're really lucky, the cement-encrusted frame will be galvanised.
Rescue it, clean it up, remove and discard the barrow, grease the axle, inflate the tyre, make a gaffer tape handle where the plastic grip is missing.
Game on!
Wheely good
You'll note I mentioned an inner tube in the paragraphs above.
Any wheelbarrow is better than no wheelbarrow, but a wheelbarrow with a fat pneumatic tyre is much better than one with a narrow moulded plastic wheel.
The cushioning provided by a correctly inflated (not over-inflated) pneumatic tyre provides a smooth ride for your bees, and the additional width of the fatter tyre prevents the wheel sinking into the mud.
What about one of those super-fat “ball barrows”, where the front wheel is almost spherical?
Firstly, I'm not sure if those are sold any more; secondly, I've not tried one and so can't meaningfully comment and thirdly, no self-respecting builder would use one so you'll never find one in a skip.

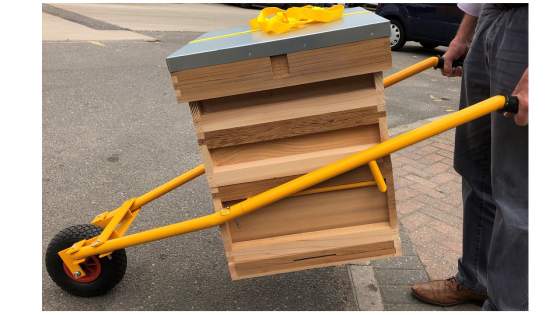
OK, what about one of those two or four wheeled garden carts? I own one of those shown above and, on anything but the smoothest ground, a conventional wheelbarrow is much better for moving hives about.
With just one contact point on the ground — the wheel — you can use your arms/hands to provide lateral balance to the wheelbarrow. There's much less jolting and jarring for the bees.
There's also less to get stuck in the mud.
Finally, only a single wheeled wheelbarrow can be used to transport a hive across a scaffold plank bridge, which is something I've done many times to one of my apiaries (often in the dark).

Of course, this 'unique selling point' might not matter for your beekeeping.
So, just one wheel … a fat, pneumatic one.
Measure twice, cut once
A hivebarrow is a bit of a misnomer.
There's no barrow.
The hive stands on a flat wooden platform attached securely to the frame of the wheelbarrow.
If you're lucky, the barrow attachment point will be conveniently situated, so that you can simply bolt a piece of wood in place of the barrow. If you're unlucky, you might have to create some sort of strong wooden frame on which the platform is attached.
Use your imagination, some lateral thinking and a bit of ingenuity.
Do not under-engineer the platform. Three full supers being wheeled across uneven ground will exert significant stresses to the platform and the attachment points.
I recommend using M8 bolts with nylon/plastic-lined nuts that lock securely in place. Use washers to spread the load a bit.

For the platform I used a 52 cm square offcut of ~20 mm plywood, liberally painted with fence preservative. Rather than recess the bolt heads into the ply (which would have weakened the attachment) I added several parallel strips of 9 mm wood to the upper surface. These stand slightly proud of the bolt head.

In use, you need to strap the hives/supers/paving slabs down using ratchet straps. However, in true 'belt and braces' style, I added a 50 mm front lip to the platform to stop things sliding forward. You only need a lip at the front edge. Don't be tempted to add one to the sides or back — it prevents you moving some things that are wider than the platform, and it makes lifting boxes on or off the hivebarrow more difficult.
Buster
Give your hivebarrow a name. You'll hopefully be together for a long time, and you will grow to appreciate the help it (she? he?) is when you're moving hives about, setting up a new apiary or shifting 500 kg of fondant for your beekeeping association.
Mine is called Buster after the cartoon character from the comic Viz. Over the years he's been invaluable for the more muscular aspects of my beekeeping.

For over 99% of the time Buster sits in the shed gathering dust and spider's webs, but when the heavy lifting starts he has saved me a lot of effort.
I've even used Buster as a temporary hive stand after moving hives late at night. The platform is horizontal when stood on the wheel and legs {{4}} which makes things even easier. I've seen some designs in which the platform slopes (down) from front to back, so making the hive horizontal when it is being wheeled {{5}}. However, I think the design I ended up with is preferable overall.
The laws of physics
Before I return briefly to a bit more housekeeping I should remind you that the laws of physics apply to hivebarrows {{6}}.
In use, the pivot point (the wheel on the ground) is potentially a long way from the centre of mass (the stack of supers on the barrow). Consequently, when the angle between the base and the centre of mass increases, you need to apply lots of torque to keep everything upright.
Torque … meaning shoulder and arm strength.

All this means is that you need to take care not to stack things to high on the barrow. I don't think I'd be comfortable with more than 3 full supers. Even 6 to 8 empty supers exert a lot of rotational inertia.
Take care.
It's also worth emphasising that anything being transported should be securely strapped to the barrow. Use a couple of ratchet straps at 90° to each other — front to back and side to side. Do them up tight.
If the barrow and hive topples over when transporting it across rough ground it will shake the bees up a bit. However, if an unsecured and unstrapped hive topples over it will shake everyone up within 50 metres.
And finally … more housekeeping, though this time it's beekeeping housekeeping.
Melting poly hives … or not?
I've been tidying up old frames, melting out wax and preparing for the season ahead. It's been warm enough to work outdoors, but cool enough that the bees aren't flying much … so ideal conditions to use the wax extractor.
In the dim and distant past I built my own steam wax extractor. It worked, but the hose connections to the steam generator (wallpaper stripper) were dodgy and steam escaped under the edges of the roof. All this reduced efficiency.
I eventually bought an Easi-Steam from Thorne's — just the tray, eke and roof — and sourced some neat brass plumbing fittings to create a steam-tight input connection. It works very well.
I've often wondered if I could use a poly brood box (rather than the usual cedar) when extracting wax.
Maybe you do this already?
Polystyrene (styrofoam) has a melting temperature of 240 °C, well above the temperature of a steam. However, the polystyrene beads used to create hives might soften below this temperature, or there may be other issues with temperature-sensitive glues or fitments.
All of which means it wasn't until earlier this week that I tried using a steam wax extractor and a poly brood box. I chose a Swienty box as I think these are lighter and perhaps softer than the Abelo boxes.

The box survived just fine, though the plastic runners went a little wibbly-wobbly. I might strip them out and replace them with stainless steel.
I'll try an Abelo box next time around if I can find one that's not full of bees.
Nothing ventured, nothing gained.
Please support further articles by becoming a sponsor or funding the caffeine that fuels my late night writing ...

Thank you
{{1}}: I will be checking, I really dislike being told I've got things wrong, and I'm swamped with writing commitments.
{{2}}: This mesh is readily available from Amazon or eBay, is just as secure and will cost well under £1 per hive.
{{3}}: The actor born in 1914, not the one born in 1858 (who was chunkier).
{{4}}: Is that the correct term for the handle extension part of the frame?
{{5}}: Though this depends upon your height and reach.
{{6}}: Newton's rarely mentioned fourth law of motion.
Join the discussion ...