Starter strips
You should expect to replace about one third of the brood frames per season to help offset the build-up of pathogens in drawn comb. The general advice is to “rotate these frames out” of the colony … meaning gradually move them to the outside of the broodnest and then remove them. Obviously you need to replace them and so need new frames every year. Alternatively you could change the frames en masse by doing a Bailey comb change or a shook swarm … again meaning you need more new frames every year. The National Bee Unit have published a document on Replacing Old Brood Comb (PDF ... but AWOL in their 2023 website revision. It'll be there somewhere!). Remember that old, manky, black combs can be used in bait hives.
Scaling up and shelling out
If you only have one or two colonies it’s easy and inexpensive enough to assemble these frames as and when they’re needed. With significantly more colonies it makes sense to build them in winter ready for the season ahead. This is what I do. With the colony numbers I have, a few bait hives, some small scale queen rearing and nuc production I need 100-200 new frames a year.
Based on Thorne’s list prices, 10 DN5 frames and foundation will cost £28.80, 40% of which is the cost of the foundation 🙁 You can reduce these costs significantly by buying ‘second quality’ frames in bulk in the annual (or more frequent) sales†. You can reduce the outlay even further by using foundationless frames and preparing your own starter strips (the ‘guides’ to help the bees build parallel comb). By my estimates, 100 second-quality DN5’s prepared with your own starter strips should cost abut 72p per frame. That’s more like it!
Dodgy foundation
Another reason to consider foundationless frames is potential problems with purchased foundation. There are reports of contaminants (specifically with stearin and palmitic acid) in some foundation that result in a very spotty brood pattern. These have primarily been in Belgium and the Netherlands. However, there’s an international trade in beeswax and you probably cannot be sure where the stuff you purchased originated. There’s an earlier thread on the BKF that also reports foundation problems in the UK.
I’ve always bought premium (though not organic) foundation from Thorne’s, KBS or Maisemore’s and haven’t had any problems. Nevertheless, using foundationless frames means your drawn comb will be as contamination-free as the environment allows.
Waxing lyrical
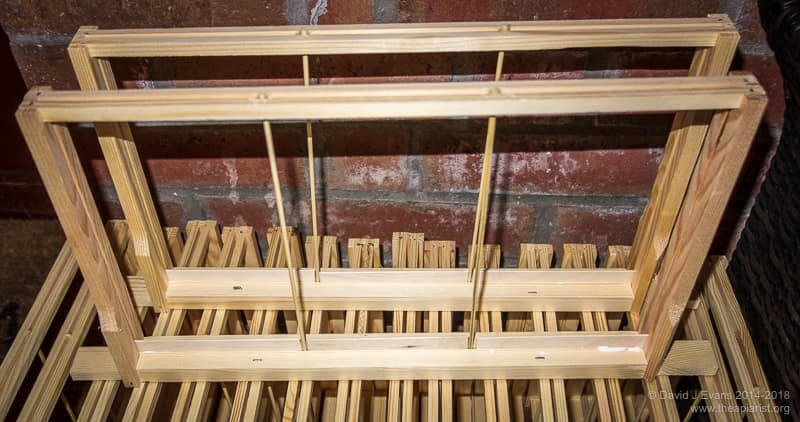
I’ve recently posted a description of how to make foundationless frames using bamboo BBQ skewers to provide lateral structural rigidity. The gaps between the skewers is ~11cm. This was an ideal opportunity to prepare my own starter strips as I wouldn’t need a huge vat of molten wax to make an aesthetically-pleasing full frame-length strip.
You can extract wax from cappings, from brace comb built by the bees and by recycling old frames (though you get less and less wax back as frames are used for repeated brood cycles). I use a homemade (i.e. bodged) steam wax extractor to do this. It’s a smelly and slightly sticky job that’s best done in the winter to avoid the attention of the bees (and neighbours). The wax needs to be filtered to remove the lumpy bits but certainly doesn’t need the preparation required to produce exhibition-quality candles. I’ve previously described how I process and clean recovered wax.
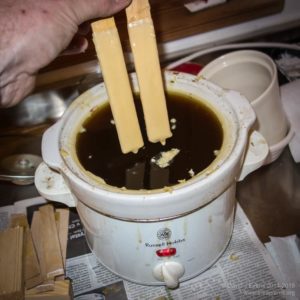
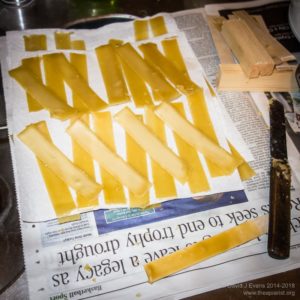
A simple Google search will uncover lots of videos and websites covering the production of starter strips from recovered wax. Many of these are aimed at the top bar hive community, but the process is essentially the same. I’m not going to provide a detailed account here (for reasons I’ll come to in a minute). The principle is straightforward … melt some wax in a container deep enough to make the length of starter strip you need, dip a wooden lath in several times, coating it liberally with melted wax, use a knife to separate the wax from the wooden strip … and repeat … and repeat … and repeat … ad infinitum.
Don’t try this at home
What many of these sites don’t tell you is the following:
- the wooden lath – a simple thin wooden strip of a suitable size onto which the wax is deposited – must be soaked in water before first dipping into the wax. It’s also helpful to dip it briefly in water between starter strips as well.
- the wax must not be too hot. If it is, all you’ll do on the repeated dipping of the wooden lath is melt off the last layer of wax. I found that the wax needs to be at about 75°C.
- it’s a pretty messy business. Cover everything with newspaper before you start. You generate a lot of wax scraps – from the edges of the wooden lath for example. These need to be fed back into your wax melter but a good proportion remains stuck to the knife and your fingers.
- it’s beyond tedious. If you’re making significant numbers the repetition can get pretty boring. I made a hundred or so and was pleased to stop. Make sure you have a good radio programme to listen to …
- the wax strips you make are quite brittle. The typical flexibility you get with sheets of foundation requires rolling the thin wax strips under pressure. Be warned, some of them may crack during subsequent handling.
Frankly, I’m not convinced it was worth doing and it’s unlikely I’ll be doing it again. I’m much more likely to trade in pre-cleaned blocks of wax for premium quality unwired thin foundation which can easily be cut into starter strips‡. You have been warned.
Fixing wax starter strips in place
Whether you make your own or slice and dice a few sheets of embossed foundation you still need to fix these starter strips into the frame top bar. I’ve previously used standard gimp pins, holding the strip of foundation down with the wedge nailed back in position. However, experience shows that these long strips often flex and fall out over time if not quickly used by the bees. This is most obvious in bait hives where – if not occupied by a swarm – you’ll often find the foundation strip has worked loose and is now hanging down.
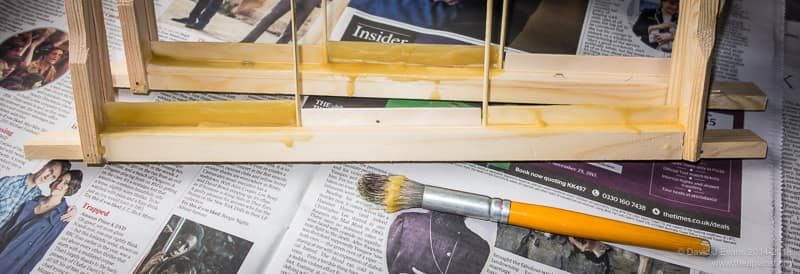
Homemade starter strips may be too brittle to nail in place and are likely to be thinner than embossed foundation strips, so fit less well anyway. Instead, the easiest way to fix any of these wax strips is to place them into the slot in the frame and ‘paint’ a little molten wax down either side of them. This makes a secure joint with the wood.
Lots of lolly
Of course, it’s widely reported that bees don’t need a wax starter strip at all and/or that bees can engineer a much more secure connection between wax and the top bar. So, why bother doing this bit for them? Michael Bush has some excellent information on foundationless frames and is a strong supporter of an unwaxed bevelled top bar or a simple wood strip. The former is more than I could be bothered to produce, but a simple wooden strip is straightforward. Michael Bush suggests that the starter strip needs to protrude about a ¼ of an inch. Tongue depressors (don’t ask) are ideal for this and you can buy them in bulk from eBay if needed. I used a pair of tinsnips to cut them to length and fixed them in place with a few dabs of woodworking adhesive.
Due to the ‘vertical’ bamboo skewers in these frames this is more fiddly than simply fixing a strip of foundation in place. However, if they are as robust as I expect, this is a job that will only need doing once. After use, if the comb is manky and black, it should be a simple matter to melt it out in the steam extractor and reuse the frames.
Experimental evidence
One of the pleasures of off-season dabbling is that you can invest a little time in planning for the year ahead and trying a range of new things to see what works best.
I’m already convinced of the benefits of foundationless frames. For reasons explained previously I’ve prepared some foundationless frames with vertical bamboo skewers this year, rather than horizontally ‘wired’ monofilament. As explained here, I’ve also prepared frames with different types of starter strips.
All of this takes extra work. However, I can justify it in terms of further money-saving, better performance or simply because of the rewarding feeling you get doing something yourself (in order of increasing importance to me).
Nevertheless, if I’m doing extra work, I want to gain the maximum benefit from the time invested. For example, I want to know which type of starter strip works best for me and my bees. I’ve therefore prepared a dozen mixed starter strip frames. One third bare wood, one third wax-coated wood and one third wax starter strips. During the season I’ll pop a few of these into expanding colonies and see which they prefer.
Bevelled … at a cost
Michael Bush likes simple bevelled top bars. Foundationless frames with a bevelled (‘V’-shaped) top bar are sold by Thorne’s. These have no additional monofilament, wire or bamboo supports. I’m not sure how long these have been available and haven’t heard any reports of beekeepers using them. They’re not inexpensive … £19.44 flat or £34 assembled for 10. Newly drawn, unsupported brood comb, particularly when it’s not fully attached to the side bars, is both a thing of beauty and rather delicate. Particularly on a hot day. These frames would certainly need careful handling. I’d be concerned that these might appeal to a relatively recent beekeeper who is attracted by the thought of a top bar hive. An experienced beekeeper would appreciate the fragility of unsupported new comb (and would likely make their own frames anyway). In contrast, a beginner might find themselves with a bootfull of irritated bees.
† But also see the recent comments from Calum on the prices of ready made frames … something around €1 if bought in sufficient numbers.
‡ Thin, unwired, premium-quality foundation from Thorne’s is just over £8 for 10 sheets at the time of writing. That’s enough for about 100 frames using a ~20mm starter strip.

Join the discussion ...