Flour water salt yeast
FWSY
Prompted by the first hard frosts of the year and the end of the beekeeping season, here’s a post that is of only peripheral relevance to beekeeping.
Though since you presumably prefer to eat honey on something, rather than on its own, it’s not completely irrelevant.
Almost two years ago I wrote a post about breadmaking. In the intervening period I’ve baked a lot more bread … probably over 100 loaves. Almost exclusively I’ve been working from an outstanding book by Ken Forkish entitled Flour water salt yeast.
Forkish is an artisan baker from Portland, Oregon. The book, and his YouTube videos that accompany it are an excellent introduction to simple, easy and quick {{1}} methods for producing truly spectacular homemade bread.
Like this …
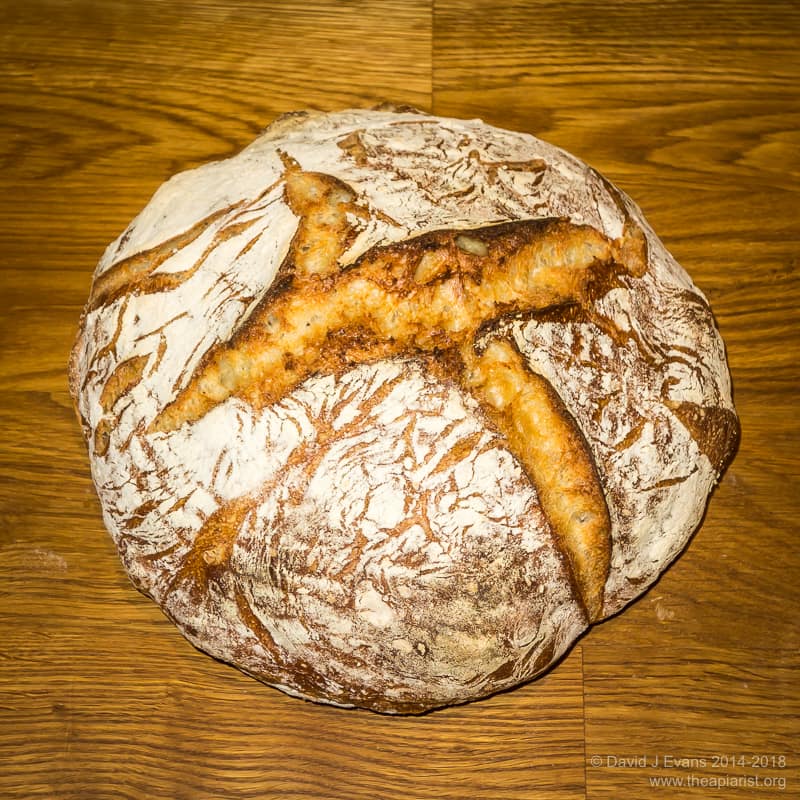
Overnight white loaf
Matthew 4:4
Man cannot live by bread alone … well, I’m not so sure.
This bread is really good.
The general principles promoted by Forkish are:
- Use high quality ingredients
- Carefully control temperatures and timings
- Use minimal amounts of mixing
- Use small amounts of yeast and long rise periods
- Bake in a very hot oven in a container to seal in the steam
Forkish earns his living writing and baking, so I’m not going to reproduce his recipes here – buy the book (or look for them online as some people have splurged them all over the internet).
What I will do is qualify some of points in the list above. Hopefully this will encourage you to have a go as well (and to learn from the few mistakes I made by either trying to cut corners or not reading the instructions).
Ingredients and environment
The flour you use has a big influence on the characteristics of the dough. I almost always use Bacheldre organic stoneground flours. These are strong, absorb water well and have a high protein content. They’re available direct from Bacheldre Mill and lots of places online. In my experience, the own-brand ‘strong bread flour’ sold by most of the supermarkets make a much sloppier dough than the Bacheldre flours. The resulting bread isn’t necessarily worse, but the dough is a lot harder to work with as it’s always trying to escape.
I use a thermometer to check the water temperature at the start. This ensures a uniform early development of the dough. I also check the temperature of the place I’m going to allow the dough to develop. If it’s much warmer or cooler than expected you might need to modify timings.
Mix, leave, mix, leave, mix …
One of the attractions of the breadmaking method promoted by Ken Forkish is that it involves very little work. For a standard loaf it probably takes no more than 8 minutes of mixing in total, in four blocks. And that includes rinsing your hands before and after working the dough.
All of the mixing is done in a large container.
A 30lb honey bucket is ideal.
How convenient 🙂
The flour and water are premixed to make an autolyse. This is allowed to sit for 20-30 minutes before adding the yeast and salt. Most of the recipes use very small amounts of yeast (much less than a gram for a 500g loaf) so the small, accurate scales used for weighing your oxalic acid (er, Api-Bioxal) are ideal.
After mixing the dough is allowed to develop with a further 2-3 quick ‘turns’ in the first 90 minutes or so. These ‘turns’ aren’t even really mixing. You just fold the dough over two or three times. It takes as long to write it as it takes to do it.
Then leave it overnight.
Cooking on gas
The following morning you turn the dough out, shape the loaf and allow it a final rise while the oven heats to a ‘serious-risk-of-burning-if-you-touch-anything-without-very-thick-oven-gloves-on’ 240°C {{2}}.
As well as preheating the oven you also preheat the container you’ll cook the bread in. I use a Lodge 3 litre cast iron Combo Cooker (or Dutch Oven for convenience). These are $56 in the USA, or an uncompetitive £90 in the UK.
I was robbed 🙁
However, I then checked out the Le Creuset prices and felt a whole lot better 🙂
Any heat-retaining covered ovenproof container should be suitable. Cast iron is probably best. The goal is to trap the steam inside while the bread cooks to give the crisp crust. As an alternative to the Lodge Dutch Oven I’ve also used a large Pyrex ‘chicken brick’ which work almost as well.
Cooking takes 30 minutes with a further 15 minutes uncovered to crisp up the crust.
You can of course use an electric oven 😉

Overnight 20% wholemeal loaf
Quick and easy
From start to finish a loaf takes about 16-18 hours.
Not quick.
However, during that period you’re only actually handling the dough for about 10 minutes. Almost all the time is a long overnight rise period while the yeast works its magic {{3}}.
So … very easy.
The proof of the pudding
The resulting loaf tastes excellent, with a very crispy crust and wonderfully textured crumb. Since the yeast has worked hard overnight the crumb is full of large holes (which conveniently fill with honey or butter or marmalade). Assuming it’s not devoured when still warm it keeps well. If anything, the loaf improves if allowed to cool properly before scoffing {{4}}. Once cold, just wrap it up in a plastic bag and you can use it up to 48 hours later, or perhaps longer as toast … though it never lasts that long in our house.
Final notes
The book Flour water salt yeast has about a dozen different bread recipes. Almost all use essentially the same steps I’ve outlined above. Some use an overnight starter (a biga or poolish) and these take a little bit more work, and a bit more time. Actually, with the exception of the ingredients, quite a bit of the book is rather repetitive as the mixing and cooking instructions are essentially the same for all the loaves.
The second part of Flour water salt yeast covers the preparation and use of levains or sourdough starters. These also make great bread, but take more work. With travel and other commitments I can’t always keep the sourdough starter in tip-top condition, so all of the comments here (and for at least half the book) are for loaves made with freeze-dried yeast.
For a standard weekend loaf you can’t go far wrong with a standard overnight white loaf, or a 10-30% overnight wholemeal loaf. These can be started on Friday evening, cooked early on Saturday and enjoyed all weekend.
Forkish explains each of the individual steps in the breadmaking process in a series of short YouTube videos. Of the 11 on his breadmaking {{5}} YouTube channel, the first 8 are relevant to loaves made without a levain, or sourdough starter. Watch them in sequence, ideally with the book to hand, and you’ll appreciate just how simple the process is.
{{1}}: I’ll qualify that term in a minute.
{{2}}: You have been warned. Normal oven gloves are only usable for very short periods at this temperature. Take care. It’s also worth checking your oven actually achieves this temperature … many run cooler and need to be wound up to ‘hyperspace’ to achieve the necessary temperature.
{{3}}: There are recipes in the book for bread that can be made within one day – starting at 9am and cooking it at 4pm. These work well, but I don’t think they’re quite as good as the recipes that rise overnight. The latter also fit into my timetable a bit better.
{{4}}: Scoff, meaning to eat quickly (the word can also mean to be scornfully derisive, which no-one will be about this bread) which has origins in the Scots scaff which, in turn, is derived from the Dutch/Africaans schoft.
{{5}}: You can also use the dough to make excellent pizza bases, but that’s a separate story altogether. He has another set of videos on pizza making.
Join the discussion ...