The new bee shed
It’s not often a backhoe digger and dumper truck are required for apiary construction. Certainly, most of the sites I’ve used over the years have needed little more than a few breeze blocks, Buster (my trusty hivebarrow), some sweating and swearing {{1}} and a spirit level.
And the spirit level is only required because I want my foundationless frames drawn out straight and true.
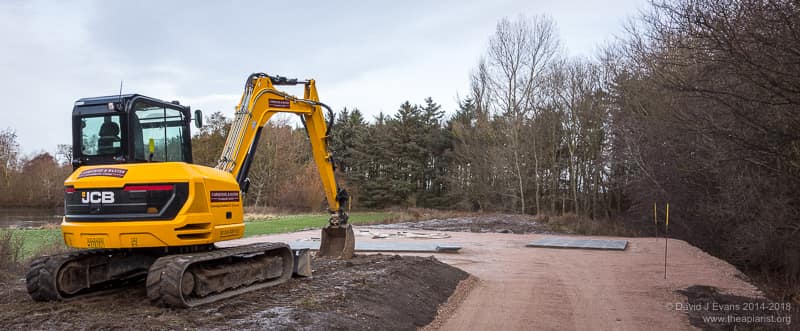
Mid December 2017 – foundations and base installed …
However, our new research apiary has involved some rather impressive ‘boys toys’. It is now nearing completion and we will shortly be moving bees onto the site.
One day all this will be under tarmac
Our original research apiary was located in an idyllic spot in the corner of open mature woodland. It was sheltered from prevailing winds, had water nearby – very nearby during some localised flooding – and housed the first ‘bee shed‘.

The bee shed in autumn …
However, a planned extension to the town, the relocation of a large school and the need to keep Council budgets to a minimum, meant that a ‘feeder’ road was proposed to be routed through this apiary in early/mid 2018.
Not near, not around … literally through.
Even if it had been near or around, the prospect of working hives next to a route used by hundreds of children was not appealing. I also didn’t fancy re-drafting risk assessments to include lots of sweaty roadbuilders and their heavy machinery during the construction phase.
So, sometime last year we started scouting around for a new location for the research apiary.
The water table
The one issue we’d had with the old site was minor flooding during winter … and spring, summer and autumn (!) rains. This never threatened the bees, but washed away an access footbridge several times and made wellingtons a necessity in most months I can remember.
To avoid this in the future {{2}} we opted for a site on a small mound of earth that would place the hives and the bee shed safely above the water table.
A small mound of earth …
‘Small’ if you have access to a backhoe digger that is … ? {{3}}
The site was extended and levelled, an access road installed, the base was prepared with a few (very large) lorry loads of hardcore and was then topped with compacted gravel. There’s probably a technical term for this sort of groundwork. It was completed with impressive speed just before an extended cold spell in mid-December.
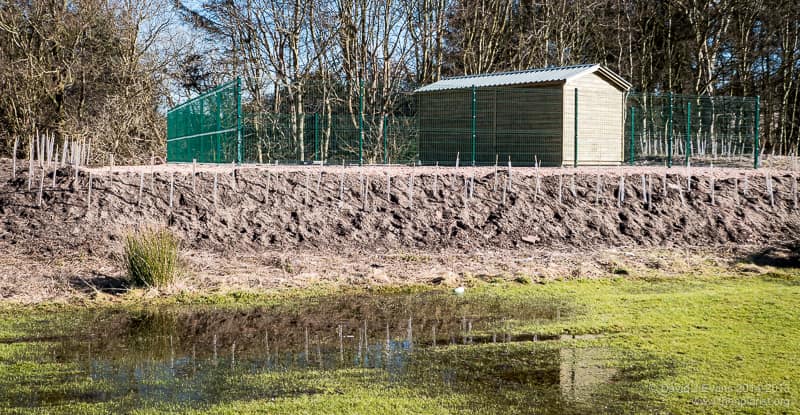
The frozen ground delayed the installation of security fencing {{4}} but this, and installation of the new shed, was finally completed a few weeks ago.
Bigger is better
I’m convinced of the benefits that a bee shed offers in solving some of our beekeeping problems. These are primarily security, storage and shelter in increasing order of importance. These might well not be problems you face, but the ‘shelter’ is likely to benefit many who keep bees in temperate and, er, damp climates.
With bees in a shed you can open the colonies and inspect them whatever the weather. This is a huge benefit if time is important; either your own or – and this is why it is critical for our research – so we can harvest larvae and pupae at particular times for experiments.
Before we used a bee shed I’d had to harvest brood during weather totally unsuited to beekeeping, including howling gales or thunderstorms. Now, other than periods when the colony is clustered tightly, hives can be opened whenever needed.
Our first bee shed was 12 x 8 feet and turned out to be a bit cramped at times. The new shed – at 16 x 8 – is the largest routinely supplied by the excellent Gillies and Mackay. Larger still would have been better, but there were some financial constraints and we needed to keep space on the site to relocate the old shed in due course.
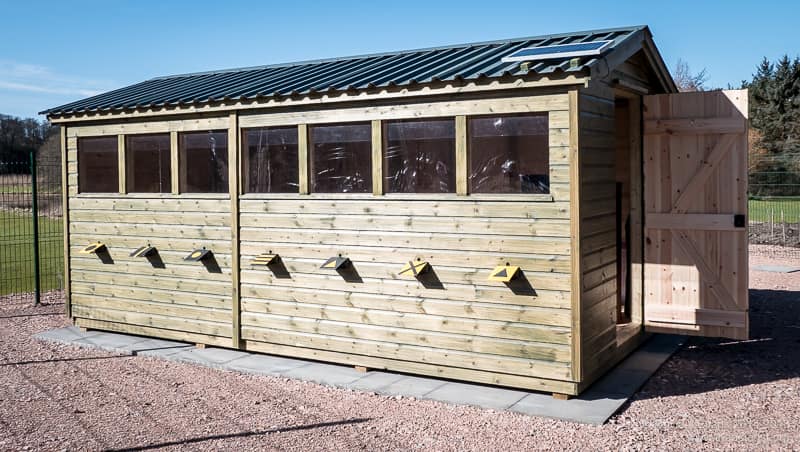
The new bee shed …
The new shed can house seven full colonies.
Fitting out
We’ve learnt a lot since building the first shed in 2015. The old shed suffered from poor lighting and a range of different shapes and styles of entrance. We’ve partly addressed the former by having windows all the way down the South facing side of the shed and we’ve fixed the latter by standardisation.
Where have you heard that before?
The bees enter the shed through a hole in the wall and reach the hive via a simple rectangular section tube (extractor fan ventilation ducting). All the entrances are now identical, consisting of a simple supporting bracket on the inner wall of the shed to cradle one end of the ducting. The other end of the duct is supported by a thin strip of softwood tacked to the front of the hive floor.

Standardised entrance …
The same entrance design, omitting the ducting, can accommodate nucs if needed.
All our floors are of one design {{5}} and compatible with most National brood boxes. None of the boxes are fixed to the stands and, unless the hives are badly bumped, this entrance arrangement is essentially ‘bee proof’.
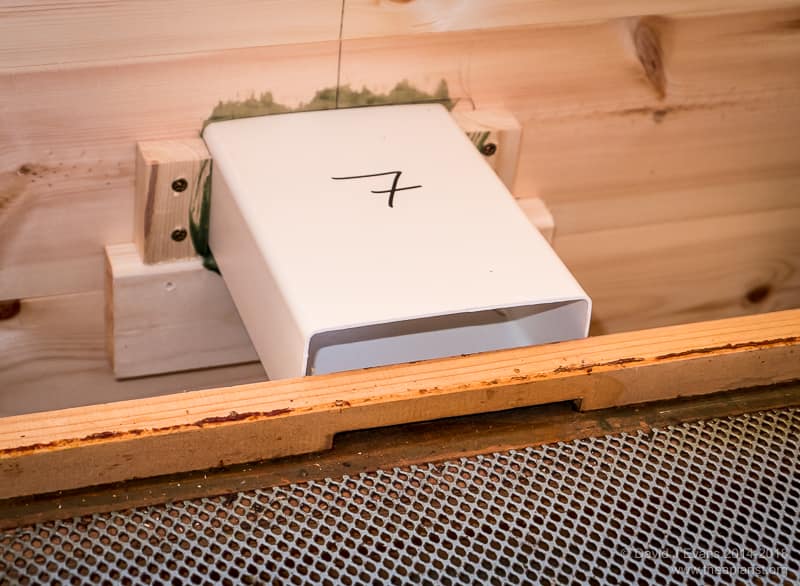
Entrance duct and hive floor …
Hive stands
The hive stands are very robust, separated into two (three and four hives respectively) and protrude through the floor to the rest on the slabbed foundations. Consequently, vibrations are minimised. Ideally, I’d have preferred individual stands, but that increases complexity and cost.
A significant change made with the new shed is to raise the height of the stands by 3-4″ making inspections a little less backbreaking. This will make working a double brood box topped with 3 supers a challenging experience, but the colonies very rarely get that big … and the nectar flows simply aren’t good enough.
Welcome home
I like landing boards. Of course, they’re largely unnecessary, but on what would otherwise be a uniform wall punctuated with seven 1″ holes, they provide a good opportunity to make the individual hive entrances readily distinguishable to returning foragers.
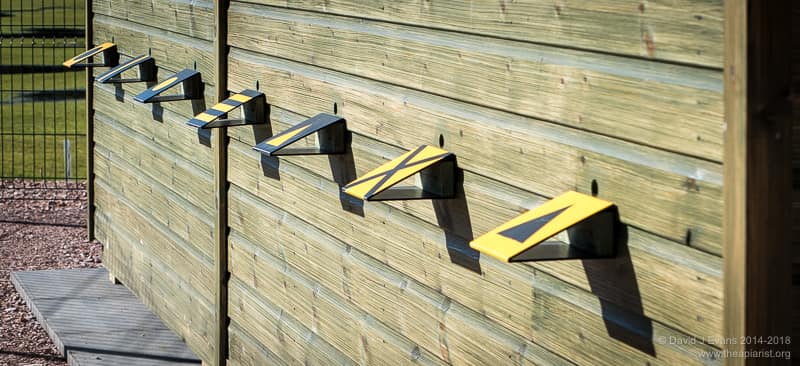
Landing boards …
The landing boards are folded black Correx painted with some surplus-to-requirements bright yellow Hammerite paint. Correx is tricky stuff to get glue or paint to adhere to, so I’m not sure this will have sufficient longevity. However, it’s neater than painting big patterns on the shed wall.
The distinctive colours and patterns were based broadly on the known abilities of bees to discriminate between shapes. The intention of course is to minimise drifting between colonies.
Lightening things up
The windows are of exactly the same design as those used in the first shed. These are formed of two overlapping sheets of polycarbonate, enabling any bees flying in the shed to readily exit simply by crawling upwards to the ‘slot’ at the top of the window. These are an excellent solution to a shed full of bees following an inspection. There’s nothing to open or close afterwards, it’s largely draught-free and totally maintenance-free. Result.
But they probably still don’t allow sufficient light in on a very dull, overcast day. Amazingly, these aren’t unheard of on the East coast of Scotland.
I’ve therefore installed a 12V solar-powered lighting system. This charges a large leisure battery which powers six LED bulbs. It’s like Blackpool illuminations when they’re all fired up. The final tests of this system – and the timer that (should … there are some teething problems here) automatically turn the system off – are currently underway and I’ll post about them separately.
The immediate environment
The apiary has the new bee shed together with sufficient space to accommodate at least half a dozen additional hives – for splits, nucs, queen rearing or teaching – as required. We’ve also installed a separate levelled base to take the old bee shed once the original apiary is vacated. This will primarily be used for storage, but can also accommodate four full colonies if needed.
The site is a little more exposed than I’d like, though it is sheltered from the coldest winds from the North and East. To improve shelter and, more importantly, early season pollen we’ve planted 150 native hedging plants around the site {{6}}. As 80 cm bare-rooted ‘whips’ they look a bit pathetic, but they’ll soon fill out. Two thirds are native goat willow (Salix caprea) which will be coppiced and should provide good quantities of pollen.
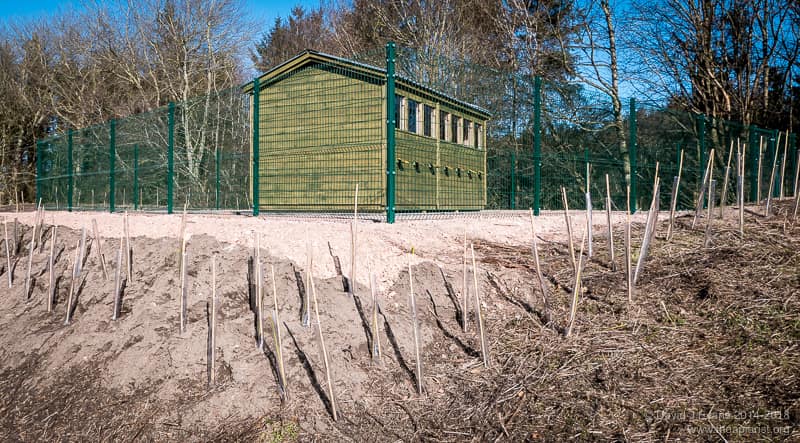
Willow and native hedging …
With the snow now largely gone and the temperatures slowly increasing I expect to move bees into the new bee shed in the next fortnight.
{{1}}: Not necessarily in that order.
{{2}}: Remembering that the addition of acres of tarmac will almost certainly increase the chance of localised flooding due to runoff.
{{3}}: The earth mound was already present … a leftover from previous development in the area. We just had it reshaped and flattened a bit.
{{4}}: An unfortunate necessity but offering the additional benefit of forcing the bees to fly high and wide when foraging.
{{5}}: We don’t use my preferred kewl floors in the bee shed. Instead, all the floors are built by Pete Little of Exmoor Bees and Beehives. These have a well-fitting Varroa tray and a full-size open mesh area that makes monitoring mite fall very easy. Again, the standardisation makes everything much more straightforward.
{{6}}: More accurately, I cajoled my research team into doing this and rewarded them with outrageously rich Fisher and Donaldson fudge doughnuts. These are so good they have their own Wikipedia page … and probably reduce life expectancy by a decade.
Join the discussion ...