The Hopkins method (and more)
Synopsis : Three short(ish) related topics; the spring honey harvest, queen rearing without grafting (the Hopkins method) and a brief mention of swarm control. And, if that wasn’t enough, a bonus discussion on keeping virgin queens in an incubator.
Introduction
I started writing this post at sunset on the longest day of the year. In my part of Scotland it’s light enough to work outside from about 3:30 am until 11:30 pm which means you can get a lot done … if you have the energy and distant, deaf or understanding neighbours.
With the good weather we’ve had for the last 2-3 weeks the bees have been out well before I’m drinking my morning coffee and don’t stop until after my evening glass of Barolo.
In my experience, some of the earliest to start are the scout bees that appear at bait hives before foragers are really busy. Some might even stay overnight, though perhaps these are scouts ‘lost’ from a swarm that had decided to occupy a different nest site {{1}}.
It’s lucky the days are so long as this is the busiest time of the year for beekeeping … at least for my beekeeping.
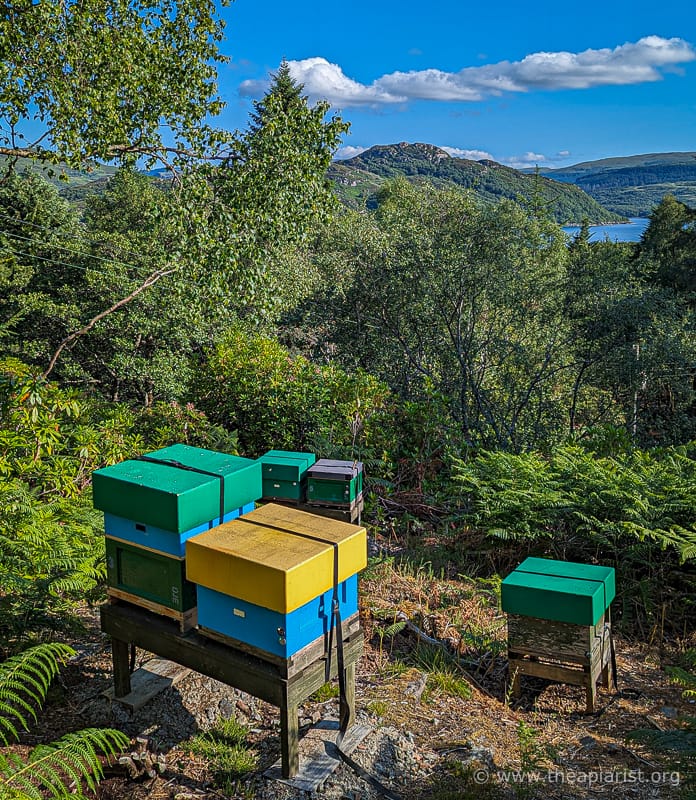
West coast apiary
I am, as the saying goes, ”running around like a headless chicken”.
Rather than write an in depth (well researched {{2}} ) post on an esoteric aspect of the coxa and trochanter of Apis mellifera scutellata or virus replication in drones (though I’d strongly recommend readers check out our latest paper on this topic, published today) I thought I’d write a few notes on three practical beekeeping topics that have been entertaining me recently.
I can’t promise something for everyone, or even anyone, and inevitably the focus will be on the trilogy of queen rearing, swarm control and the honey harvest.
If you’re a beekeeper and haven’t been busy with these three things over the last few weeks then either something has gone awry with your season … or you live in New Zealand.
Show me the honey {{3}}
The cold, late start to Spring had me concerned I was going to miss the oil seed rape nectar flow completely. Not because I was short of bees but because it was too cold to forage.
The colonies were certainly strong enough:
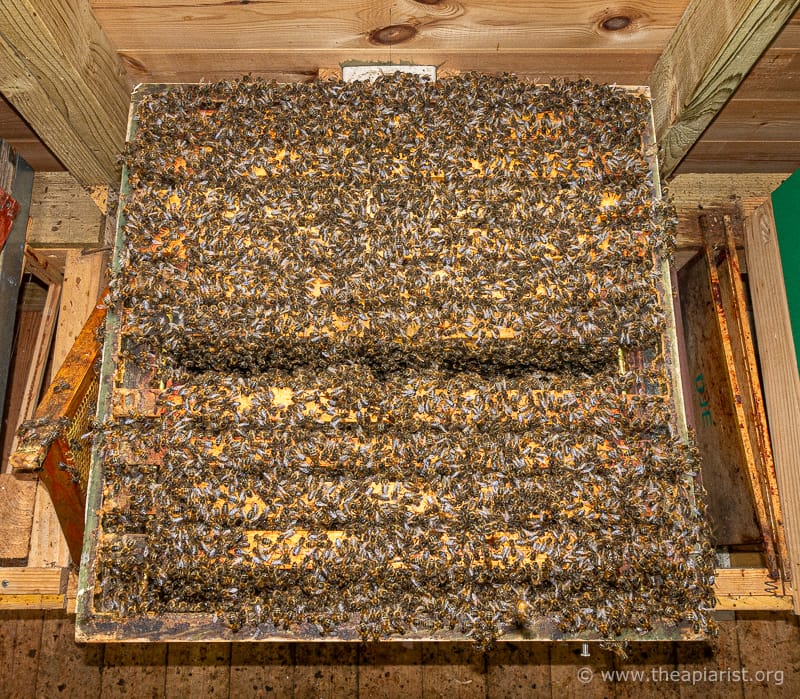
Bee shed colony, mid-April
Here’s one from mid-April in the bee shed. These colonies were booming and were the first to need supers, the first to have brood harvested for a cell raiser (see below) and the first to need swarm control … and – whisper it – the first to swarm 🙁 .
However, although the cold start delayed things, everything pretty much caught up in the good weather from the second week of May.
The honey was harvested in two batches in successive weeks in early/mid June. I have fewer honey production hives this year, but the overall harvest was within a few kilograms of the record crop last year.
For the first time I measured the honey produced per hive, rather than simply pooling weights per apiary.
The average was just over 28 kg per hive, with the best managing a bit over 45 kg {{4}}. If my maths were better I could determine the median, the standard deviation etc, but suffice to say most produced close to the average, with a few outliers yielding above 40 kg or below 10 kg.
I determined what each hive produced by labelling and weighing every super before and after extraction. Pretty consistently ~68% by weight of the full super was honey, yielding ~10.8 kg of honey per super.
The other thing notable about the honey harvest this season was that only one frame ‘exploded’ in the extractor {{5}} … noisy, messy and very wobbly 🙁 .
Queen rearing
For about the last 15 years I’ve mainly reared queens using one of two methods involving a queenright hive; the Ben Harden system or a Cloake board.
These methods offer a number of advantages to the small scale beekeeper wanting ‘a few’ queens – say 2-20, though you can produce more if needed (by repetition).
The Ben Harden system starts and finishes the cells with the queen present (below a queen excluder) all the time. The Cloake board (or the similar Morris board which I have also used successfully) renders the hive temporarily ‘queenless’ for the 24 hours when the cells are being started. This is achieved by simply sliding a solid board between the queenright lower and upper brood box, with the grafted larvae being added to the latter.
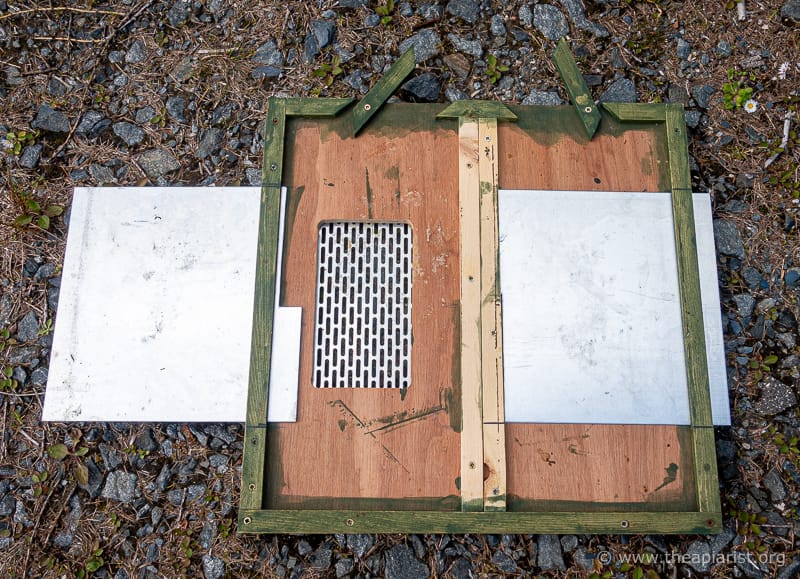
Morris board (upper face)
I use these methods because they work, they suit my bees and beekeeping and because I’m very confident they will yield results … but that doesn’t mean I’m averse to trying something new.
Eoghan Mac Giolla Coda’s “simple method”
This spring I used a method described by Eoghan Mac Giolla Coda in a BIBBA newsletter last summer ’A Simple Method of Simultaneously Raising Queens and Producing Nuclei’. You should read the original, but the basics are straightforward:
- Prepare a double nuc containing 10-12 frames of emerging brood harvested from at least 5-6 colonies
- It is vital that there’s no queen in this box 😉
- One week later go through the box and remove every queen cell the bees have produced from larvae in the harvested frames
- Add your grafted larvae in a cell bar frame
- Harvest capped queen cells 10 days later and split the 10-12 frame ‘cell raiser’ nuc box up to make individual nucs, each of which receives a near-mature queen cell
As I said … very straightforward.
And it worked reasonably well, with the brood harvested from strong colonies (such as that shown above) helping to hold back their enthusiasm to swarm.
Modifications to the “simple method”
A combination of rather low grafting success and a desire to try another queen rearing method meant I butchered the final stage of Eoghan Mac Giolla Coda’s “simple method”.
Due to time constraints I actually checked the grafts just 7 days after adding them to the cell raiser. Since I grafted day-old larvae (i.e. 4 days since the egg was laid) they were already capped (or rejected). Rather more were rejected than I would have liked ( 🙁 ) but there were half a dozen good cells. I used a couple immediately and placed the spares in my portable queen cell incubator … I’ll describe their fate shortly.
So I again had a queenless box overflowing with young bees.
What an opportunity 🙂 .
Having removed the grafted queen cells I again went through the entire box looking for any other queen cells.
There were two or three runty little cells that I suspect had been started on very old larvae after my previous run through the box a week earlier. It’s worth noting here that this box was packed with bees, so I again needed to shake the bees off every frame to find these stunted queen cells.
I destroyed these and filled the space previously occupied by the cell bar frame with another frame of emerging brood.
And then I was ready to try something new.
The Hopkins method of queen rearing
Many beekeepers like the idea of queen rearing but are put off by the emphasis placed on grafting day-old larvae. They are nervous about the fragility of very young larvae, or worry about their eyesight or being insufficiently dextrous.
They shouldn’t be, but that doesn’t mean that they aren’t.
Grafting is easier to do than to describe … but there are other ways of presenting larvae for queen rearing.
Roger Patterson is an enthusiastic advocate of cell punching. I’ve tried this and struggled, but intend to try again. I think the age of the comb has to be ‘just right’ for the cell punching to work well.
However, cell punching also involves manual selection of larvae by the beekeeper. Regular readers will – if they’ve done their homework – know that the colony is very selective in the choice of larvae it rears queens from. They preferentially select well nourished larvae and are biased towards the rarest patrilines in colony.
The Hopkins method of queen rearing involves presenting a frame containing suitably aged larvae to a queenless colony. The bees then select the larvae they want to rear queens from.
Manual dexterity and eyesight – or nervousness about grafting – are pretty much irrelevant.
So how does the Hopkins method differ from simply inserting a frame of eggs and young larvae in a colony suspected of being queenless?
The key difference is that in the Hopkins method the larvae-containing frame is presented horizontally above the brood box, with space below it for the queen cells to be drawn out into.
And it just so happens that I’d been doing a bit of winter DIY in preparation for this 🙂 .
Horizontal presentation of a frame of larvae
The obvious way to present a frame horizontally above a brood box was to modify an eke.
One of the Maisemore’s poly nucs – the model with the separate floor {{6}} – can be adapted to accommodate 14 x 12 frames using an eke which they also sell.
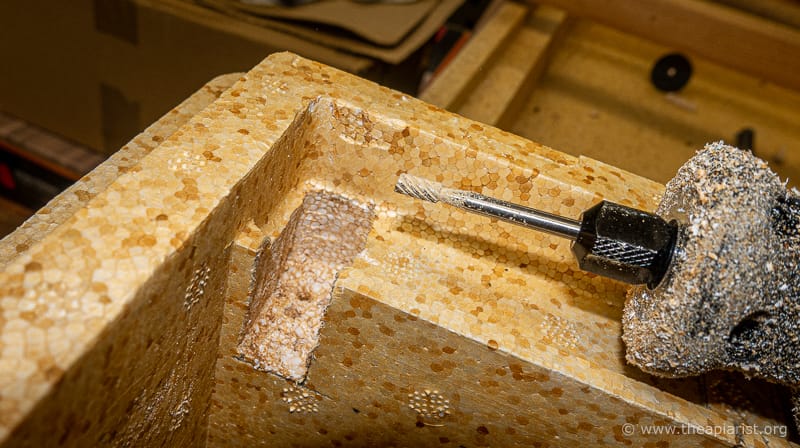
Butchering an eke for the Hopkins method
I bought a couple of these nucs in the winter, painted them a rather fetching green and used my Dremel to carve lug-sized spaces in the appropriate place in the eke.
To provide lateral support for the horizontal frame I also added a couple of screws on the inside of the eke. There’s surely a more elegant way to do this, but ‘DIY’ and ‘elegant’ never appear in the same sentence where I’m concerned {{7}}.
I carefully selected the correct position for the screw so that it would support either shallow or deep frames horizontally. That was a mistake. A screw close enough to the carved ‘frame lug hole’ to support a super frame doesn’t really provide enough support for a brood frame. Instead I recommend adding two support screws about an inch away from where the bottom bars of the frame would be (when horizontal).
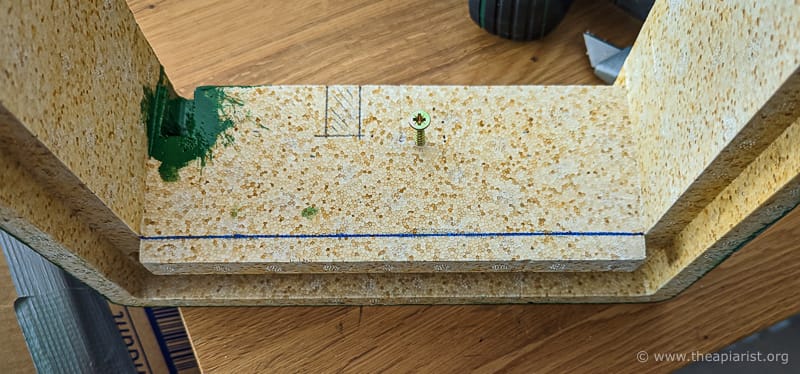
Modified eke (the bit below the blue line also needs to be cut off)
With a frame in position there is a gap of 40-50 mm between the top bars of the frames and the face of the horizontal comb … more than enough for the largest of queen cells.
But is it too far away for the bees to realise that there are larvae suitable for queen rearing ‘just above their heads’?
Here’s one I didn’t prepare earlier
The only frame I had from my selected larval ‘donor’ hive had a large patch of recently sealed brood in the centre, with eggs and young larvae at the periphery. This wasn’t ideal and reflected poor preparation on my part.
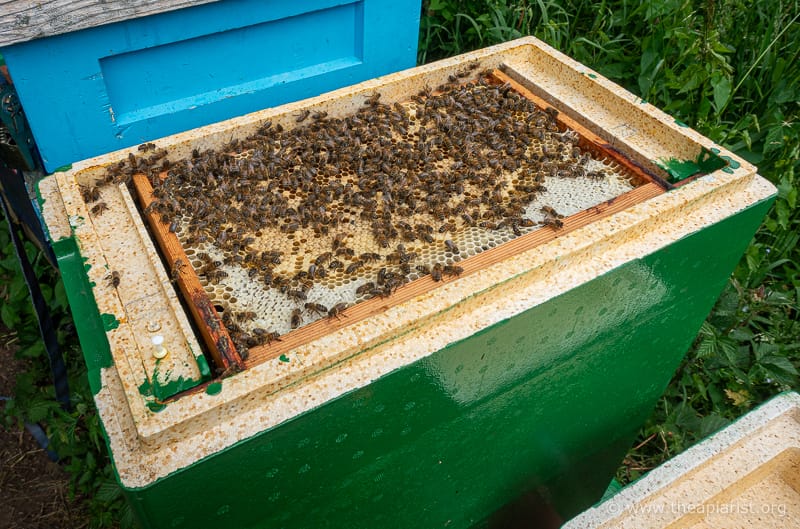
The Hopkins method – horizontal frame in situ
I should have added a frame of drawn comb to my larval donor colony to generate a uniform population of similarly aged larvae, and used four days after the queen had started laying in it.
However, I didn’t have this, so used what I’d got … preferring an iffy frame from a good donor colony rather than a perfect frame from an undesirable donor colony.
The Hopkins method
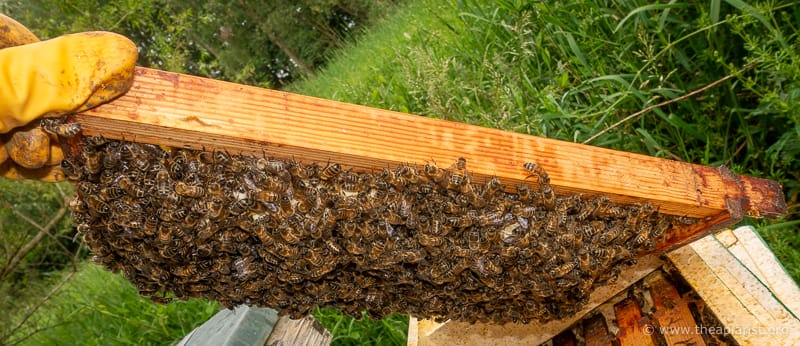
I checked the box a week later. I prised up the eke to find a 3 cm deep carpet of bees hanging onto the underside of the added frame … clearly they had no problem finding the larvae.
A gentle investigation by blowing (exhaling, not smoke!) onto the packed bees showed good numbers of queen cells protruding from the comb.
Lots of queen cells
Rather too many to be honest 🙁 … see below for ways of avoiding this situation.
I selected four of the queen cells based upon their size and separation from other cells, cut them from the frame using a scalpel and made up three frame nucs into which I inserted the excised cells.
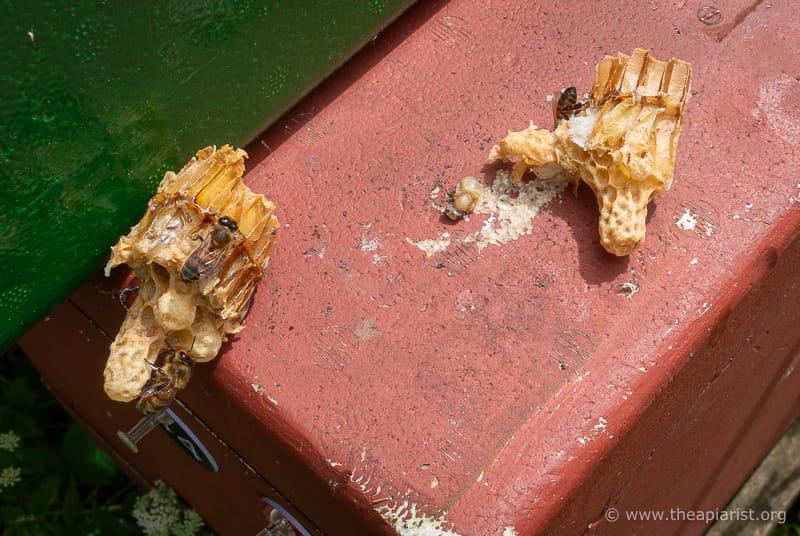
Excised queen cells
The cells were secured in place by simply making a thumb-sized indent in the face of opposing combs and then pushing the frames gently together, trapping the cells in place by the generous collar of comb I’d excised them with.
Next time I do this I’ll use cocktail sticks pushed through the empty comb above the protruding queen cell to secure things.
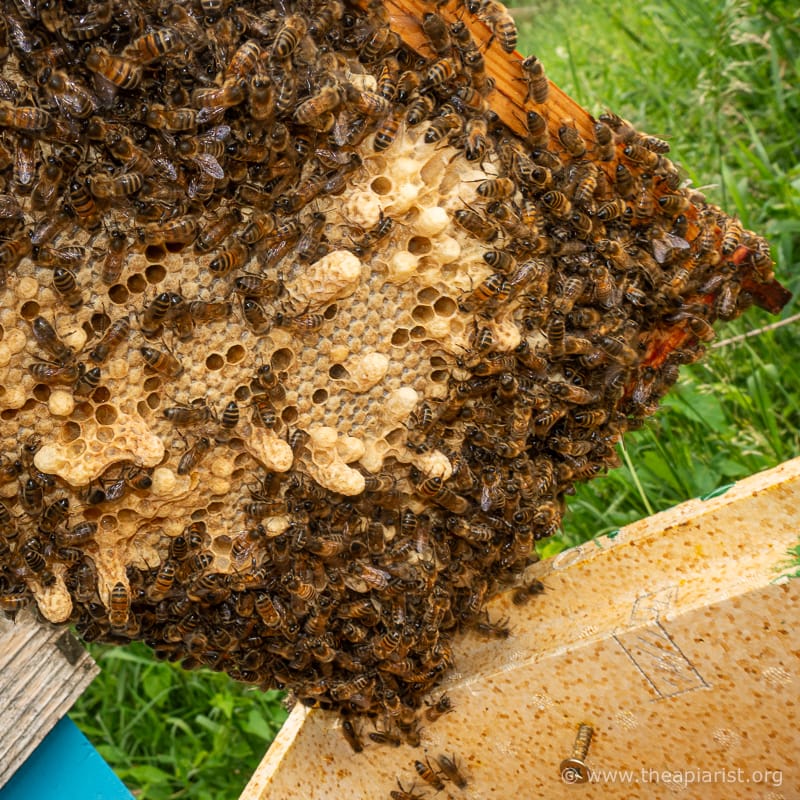
Too much of a good thing
By letting the bees choose the larvae to start queens from they started too many. Many queen cells were very close together making excision nigh on impossible.
There are two ways I’ve seen of avoiding this:
- destroying 2/3 of cells and their contents by drawing the sharp point of a hive tool through the comb (see the pattern below left).
- plugging the desired cells with a Q-tip (cotton bud) and shaking icing sugar over the rest of the frame (below right). The sugar-exposed cell contents are killed, the cotton buds are removed and the frame is inverted over the cell builder.
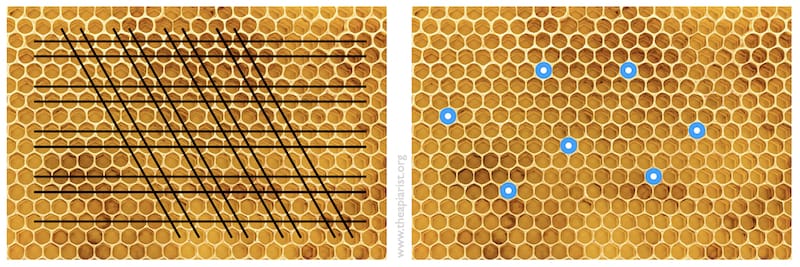
The Hopkins method – reducing queen cell numbers
I attempted the former but did a less thorough job than I should have. The idea is to leave individual well-spaced larvae of the correct age for queen rearing.
Of course, both these methods reduce the choice the bees have when selecting larvae … that’s the entire point. However, they may also result in the exclusion of larvae that the bees would have preferentially selected as the ‘best’ from which to rear new queens.
Swings and roundabouts … 😉 .
Inevitably some of the queen cells produced were immediately adjacent to others. Although I largely avoided these when making up nucs, I’m not too concerned that a 2-3 frame nuc would swarm if provided with two queen cells … much more likely is that one queen emerges first and slaughters the other in situ, leaving just one in the box.
Advantages and disadvantages
I think there are two very significant advantages of using the Hopkins method for rearing queens combined with Eoghan Mac Giolla Coda’s “simple method” of preparing the cell raising colony.
- Done at the appropriate time, the harvesting of a couple of brood frames from strong colonies helps hold these back and delays swarm preparation. Some of my strongest colonies were used to donate two frames for this and have subsequently yielded another two frames for nuc preparation. These colonies produced 28-35 kg of honey and still have not shown signs of swarming {{8}}.
- There’s no grafting or manually-demanding manipulations needed. No +4.00 diopter reading glasses are needed or propranolol to steady your ‘grafting arm’ 😉 . The exclusion of larvae using one of the two methods shown above should be manageable by anyone able to discriminate workers from drones.
You could add to this the advantage that a strong 10-12 frame nuc should be sufficient to rear 24-48 queens (at least) from a suitably prepared donor frame.
However, that might be too many and you could consider it overkill for a ‘small scale’ apiarist.
But you don’t need to use them all and there are always people wanting queens 😉 .
The other disadvantages I see are that:
- You need a reasonable number of hives to harvest brood from to make up the cell raiser.
- The resulting queen cells are more difficult to excise, handle and secure in the nucs you prepare.
These queen cells probably have to be used as soon as they are ready. In contrast, cells generated from larvae grafted into the Nicot cup system are a doddle to handle and you can even keep a few spare virgins ‘on tap’ if needed … as described next.
Here’s one I did prepare earlier
Finally I’ll return to the ‘spare’ queen cells that I removed from the cell raiser seven days after grafting.
These cells were relatively recently capped and I didn’t expect them to emerge for a few days. I placed them into my portable queen cell incubator on Monday evening and set off back for the west coast with them.
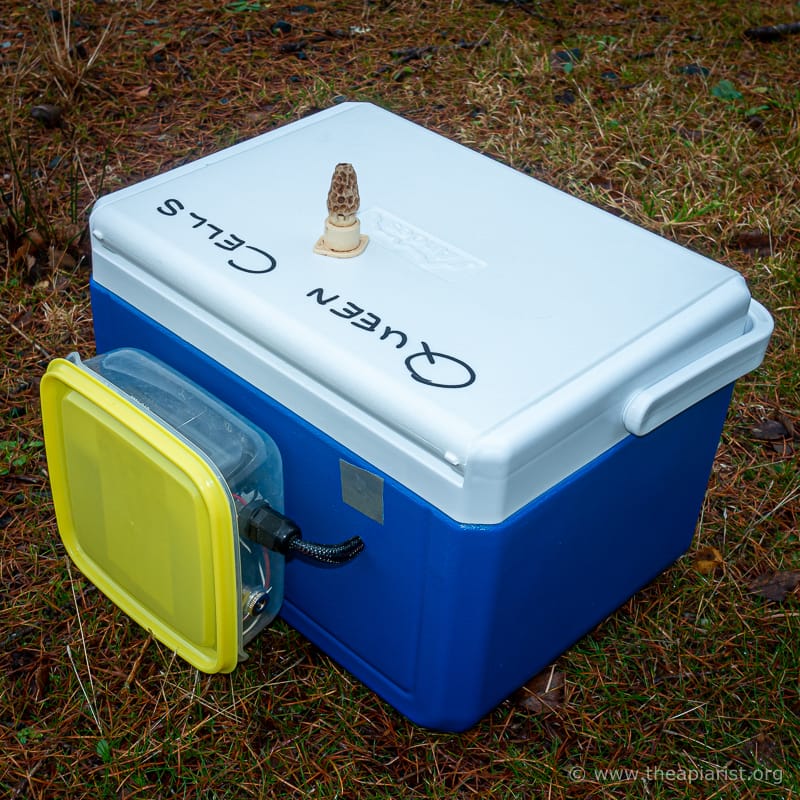
Portable queen cell incubator
They stayed in the incubator at a steady 34.5°C for the rest of the week and emerged sometime late on Friday, a few hours earlier than I’d expected (the larvae were presumably a few hours older than I’d thought).
In contrast to what many beekeepers think, virgin queens are able to feed themselves. I suspect they have to do this soon after emergence before hormone levels are sufficient to attract an attentive retinue of workers.
Next time you get the chance observe the different amounts of attention a mated and a virgin queen receive … it’s very striking.
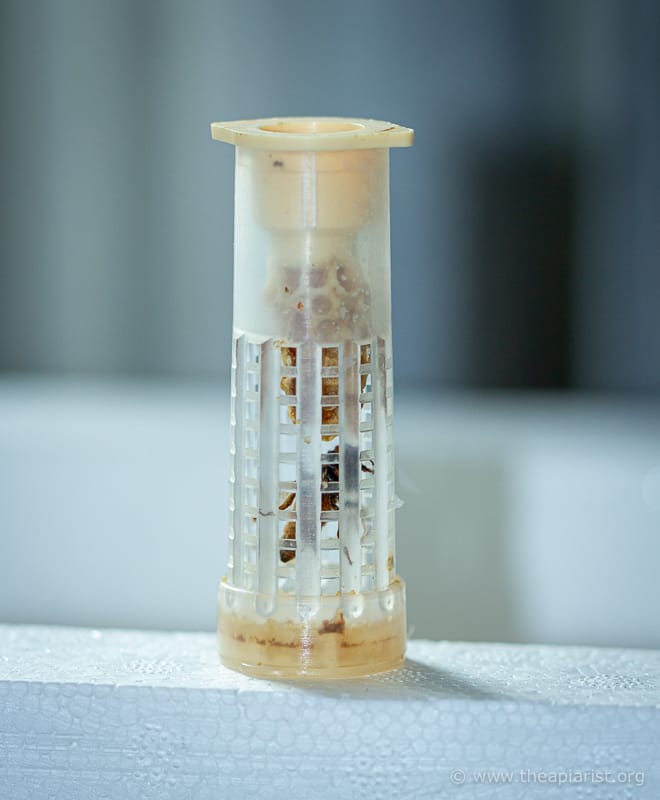
Here’s one I produced earlier
All of which means that if you provide a bit of diluted honey to a caged virgin queen and keep her in a humid atmosphere at ~34°C she will feed herself and be OK.
TLC {{9}}
I just add a small drop of diluted honey (~50/50 with water) to the inner side edge of the cap of the Nicot cage. Don’t overdo it … you don’t want her to get into a sticky mess during transport. In addition, make sure the environment is sufficiently humid by keeping a small piece of damp kitchen towel in the incubator. Don’t let the queens become desiccated.
I took the emerged queens back to Fife, transferred them to JzBz introduction cages and put them into nucs on the Monday. I hope they’re mated when I return early next week 🙂 .
These queens spent ~72 hours (after emergence) in the incubator. I also did this last year with a couple of queens that spent 4-5 days in the incubator. However, I’m aware that some report problems getting these ‘delayed virgins’ accepted and mated. I need to investigate this further.
My portable queen cell incubator has very accurate temperature regulation and high humidity. It provides little other protection. In particular, it’s not cushioned against the jolting and jarring encountered during the journey from Fife to the west coast, involving dozens of miles of some of the worst maintained roads Highland Council are ‘responsible’ for {{10}}. It was therefore encouraging that the relatively ‘immature’ sealed cells I transported (probably 2-3 days post-capping) yielded apparently healthy-looking queens.
Remember all that advice you get to ‘never shake a frame with queen cells on it’ ?
😉
Notes
I’ll write a more extensive account of the Hopkins method of rearing queens in due course. Beesource has a short article on the history of the method, which dates back to 1911, here.
I’ve considered building a modified cell bar frame to take grafted larvae positioned above the top bars in the same eke I butchered for the Hopkins method described above. It’s clear the bees have no problems finding the larvae and it would maximise the number of brood frames within the box for subsequent splitting up into nuclei. However, the head space is insufficient to add Nicot cages to the sealed cells, so negating one of the major advantages of grafting into cups. In a strong nectar flow I’d bet the bees would have a wild time building brace comb around them.
{{1}}: I’ve scored 0/3 with bait hives this spring.
{{2}}: In my dreams!
{{3}}: Has anyone seen this BBC series?
{{4}}: And I left this with a super half full of unripe honey.
{{5}}: I was making a cuppa!
{{6}}: Much better than the one with the circular entrance in my view.
{{7}}: Apart from that sentence, obviously!
{{8}}: Famous last words.
{{9}}: Tender loving care
{{10}}: Where the term ‘responsible’ means wilfully ignoring the appalling state of them.
Join the discussion ...