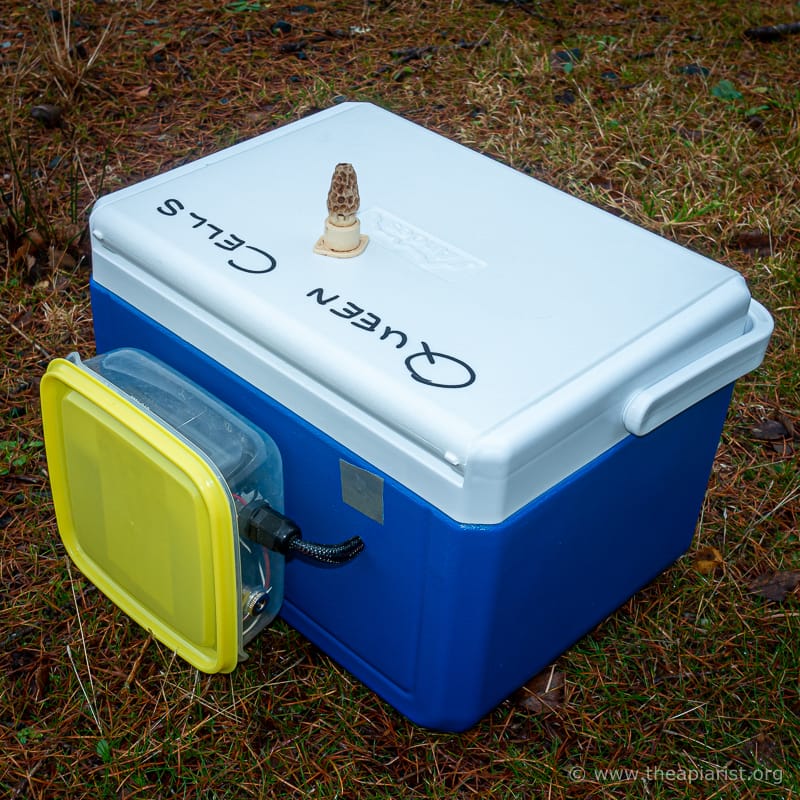
Portable queen cell incubator
One of the earliest posts on this site, back in January 2014, described my honey warming cabinet.
Both that post and the cabinet are still going strong.
The cabinet has been used to process a lot of honey … and the post has been read tens of thousands of times and still remains in the top 10% of most read pages (of ~450 now) in 2021.
I attribute the popularity of the post to two things:
it was an erudite article written in an elegant and entertaining style{{1}}the design reflected the sort of inspirational genius rarely seen outside a Dyson factory{{2}}- almost all beekeepers find that a honey warming cabinet is very useful
- similar {{3}} commercial honey warming cabinets are a daft price
Today’s post is on a niche DIY project … a portable queen cell incubator. However, like the honey warming cabinet, it is something that can be built for significantly less than a similar commercial model.
Portable queen cell incubator version 2
Unlike the honey warming cabinet, this is something that will be of interest to only a subset of beekeepers.
Or perhaps fewer.
The fraction of a fraction of a small proportion
Firstly, only a small proportion of beekeepers actively {{4}} rear queens. Quite how big or small that proportion is I don’t know … perhaps 10%.
Secondly, only a fraction of that 10% of beekeepers will want to use an incubator for queen emergence or short-term storage {{5}}.
And finally, only a fraction of that fraction might need the queen cell incubator to be portable.
But I’m one of them, and I know there are a few others who are regular readers … {{6}}.
It also seemed appropriate to balance the article on frames – of general relevance, if not interest – last week with something of very specialist interest … reflecting the wonderful diversity of our hobby.
Design criteria
I discussed some general features of a portable queen cell incubator when I described my first attempt at building one back in July.
Broadly the design criteria were as follows:
- automatic temperature controlled environment maintained at between 33.3 °C (92 °F) and 35.5 °C (96 °F) {{7}}
- ideally with the temperature controlled to between 34.4 °C to 35 °C (94-95 °F)
- high humidity
- able to accommodate at least 10 queen cells in Nicot cages
- portable and powered by a 5V or 12V supply so it could be used in a car (or from a battery)
Version 1 was a case of ‘close, but no cigar’.
It worked up to a point. Queens emerged in it and I successfully transported virgin queens across Scotland (including hotel stops), maintaining them for up to a week before introducing them (also successfully) into hives.
Version 1 … a bit primitive if I’m honest … but it did work (more or less)
But it was a bit of a botch-up.
It consisted of a polystyrene box with a 5 V vivarium heat mat. Temperature control was not automatic, but was more sort of ‘hit and hope’.
If at first you don’t succeed …
However, I’ve spent some time since then making version 2 which – remarkably – meets all of the design criteria listed above 🙂
I don’t intend to provide a step-by-step guide to building this portable queen cell incubator. You might want a bigger one, or one for mains power only, or to house bare cells rather than queens in Nicot cages, or one coloured red or whatever.
But what I will show are the general ways I met my design criteria, with a list of parts and lots of pictures showing how it was put together. I’ll highlight the critical features that actually made it work as intended. I’ll also discuss testing and performance, which are as important as the design and construction.
Overview
The portable queen cell incubator consists of an insulated picnic box with a 12 V 15 W heating element. Supported above the element is a block of foam insulation to hold the Nicot cages. Temperature control is automatic and a very stable temperature is achieved by circulating the air in the incubator with a small fan. Ten Nicot cages can be accommodated at a suitable temperature for hours/days at a time in ~90% humidity.
It’s winter … so this hasn’t been tested with queens or queen cells.
Caveat emptor.
A list of parts is followed by cross-sectional diagram and lots of photos, with comments, of some of the components. Towards the end of the post I describe the testing process and the results.
OK, for the six readers who have not already moved on … buckle up. Here goes.
Materials
This is what I used. I didn’t shop around much for bargain prices, so you might be able to do better. Note that I struggled to find anywhere other than RS Components that sold suitable heating mats.
- Insulated picnic box – e.g. an Andes 5 litre coolbox at £14.99
- Piece of wooden laminate flooring (from my spares bin)
- Silicone 15 W heating mat – e.g. one from RS Components at ~£30
- A5 6mm aluminium sheet – purchased from eBay for £4.50
- Offcuts of a cheapo plastic queen excluder (from my spares bin)
- 20 mm M4 roofing nuts and bolts (from my spares bin)
- Closed cell foam – the stuff they pack computers in when shipping (from my spares bin)
- 40 mm 12 V computer fan – e.g. a Noiseblocker BlackSilent Fan XM-1-40mm at ~£4.50 {{8}}
- STC-1000 12 V temperature controller – e.g. an Aideepen at £14. Make sure you choose a 12 V model.
- Plastic food container for the electrics –
stolen from the kitchen(from my spares bin) - Velcro tape, Sugru, zip ties, cable gland, thin bits of foam, some wire and a few electrical connectors (from my – yes, you guessed it – spares bin)
- 12 V mains power supply with 5.5 x 2.1 mm male connector (from a woefully poor BT broadband modem via my spares bin)
- 5.5 x 2.1 mm female power jack sockets (about £9 for half a dozen)
- 12 V car cigar lighter adaptor with 5.5 x 2.1 mm male connector (about £8) {{9}}
Testing, testing
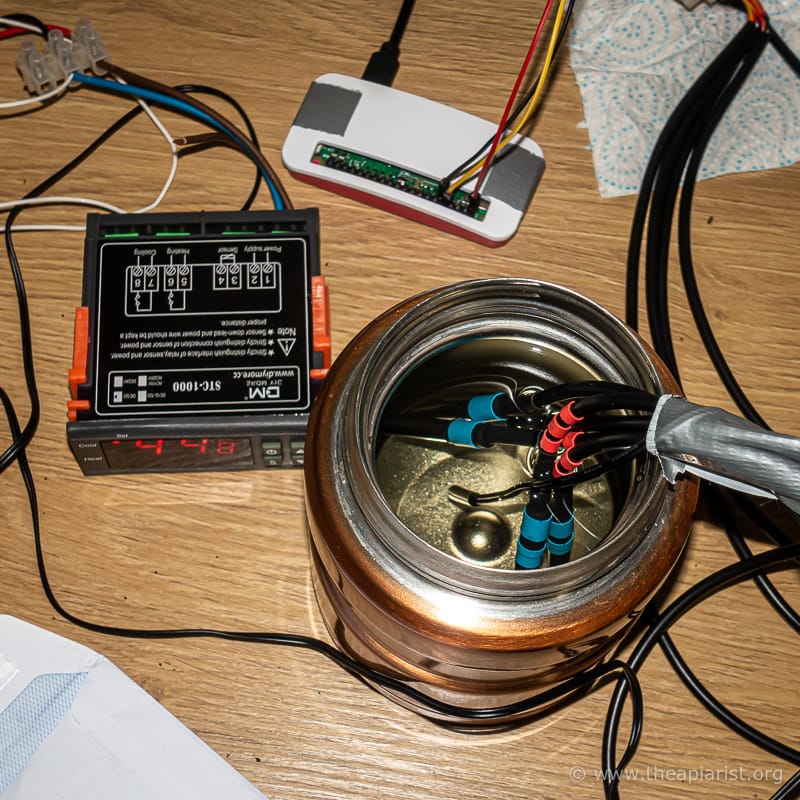
For development and testing I used a Raspberry Pi Zero with DS18b20 external temperature sensor(s) and DHT22 temperature/humidity sensor to monitor the environment in the incubator. For the technically-minded these recorded internal and external temperatures and/or humidity at 1 minute intervals, displaying the results via ThingSpeak. Perl or python scripts were run via cron jobs and data was saved to CSV-format files for subsequent analysis.
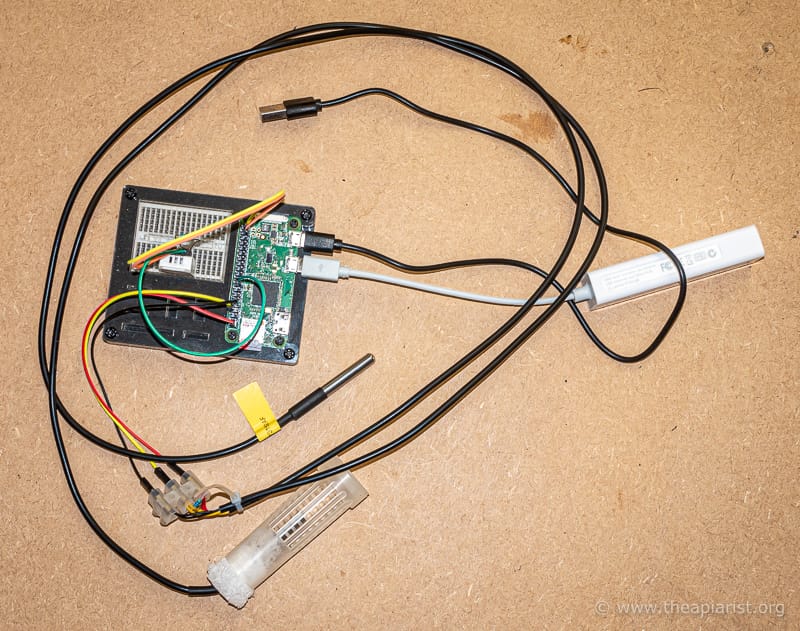
Computer geekery used for testing purposes – Raspberry Pi Zero, two DS18b20 and one DHT22 sensors
You don’t need this type of computer geekery, but you do need to be able to accurately determine the temperature (at least) inside the incubator and to calibrate the STC-1000 thermostatic controller.
Ideally you want a thermometer small enough that you can place it in different locations to determine how even the heating is within the incubator.
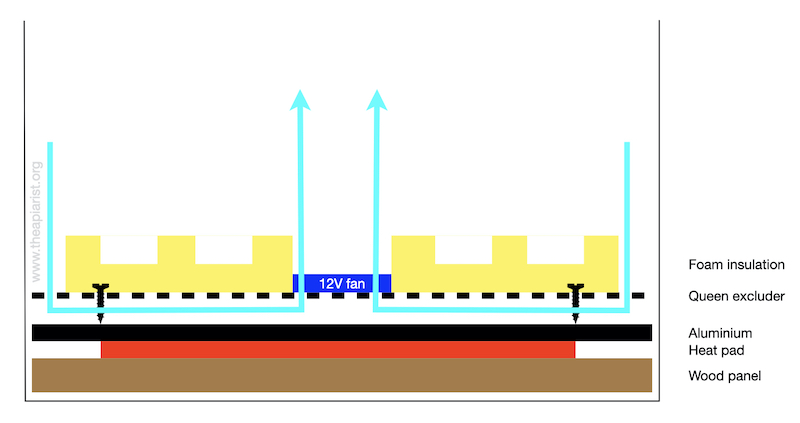
Cross-sectional diagram of the queen cell incubator
Early attempts just placing the foam (holding the Nicot cages) directly above the heating element were an abject failure. Temperature control was all over the place.
It turns out that you need a 1 cm gap between the foam and the element and you need a fan to circulate the air. That was the breakthrough … after which it was pretty much plain sailing.
Queen cell incubator schematic
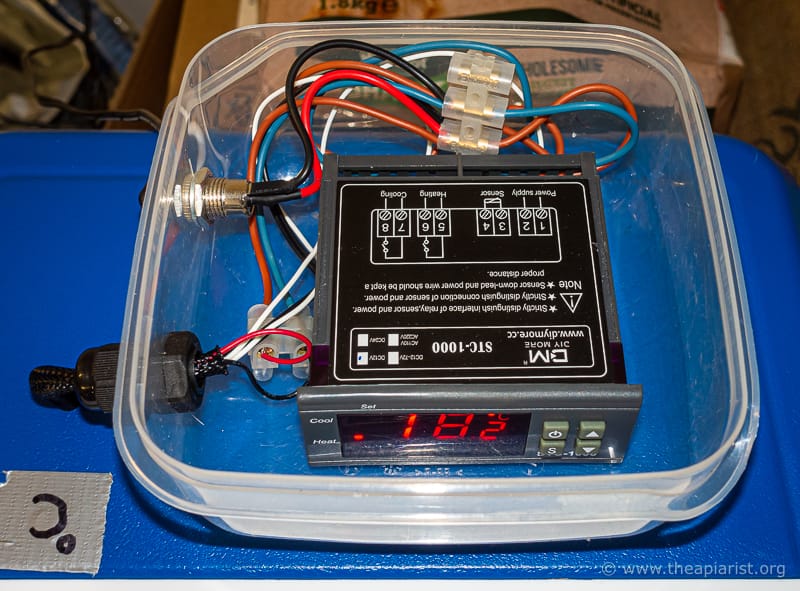
A very humid environment is not ideal for electrical things like fans or thermostats. I therefore opted to house everything except the fan in a plastic food container velcro’d to the outside of the insulated picnic box.
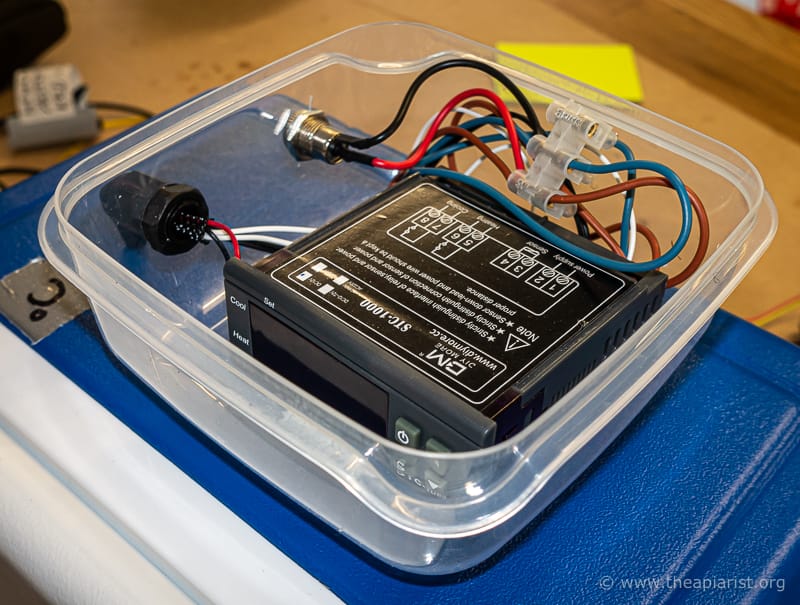
Mission control
Not pretty … but functional.
If I was doing this again I’d do exactly the same thing … it works perfectly well.
Calibrate the STC-1000
The STC-1000 is a widely used and inexpensive thermostatic controller. It has a power input, a temperature sensor (probe) and separate controllable heating and cooling circuits. Both 12 V and 240 V models are available.
You set the control temperature on the STC-1000 and a delta (offset) temperature of, say, 0.3 °C. Every time temperature drops below the set temperature minus delta the heating circuit switches on. When the sensor reports the temperature exceeds the set temperature plus delta the cooling circuit switches on. In the narrow range of set temperature ± delta the STC-1000 just keeps track of the temperature.
This project did not use the cooling circuit.
The STC-1000 temperature sensor is on a long piece of wire. It is almost certain that the displayed temperature is not the actual temperature.
Calibrating the STC-1000
I worked out the temperature difference by placing the sensor in a Thermos flask (no lid) of hot water (~50 °C), together with thermometer(s) I trusted. I then recorded the temperatures at 10 minute intervals as the water slowly cooled and plotted the results.
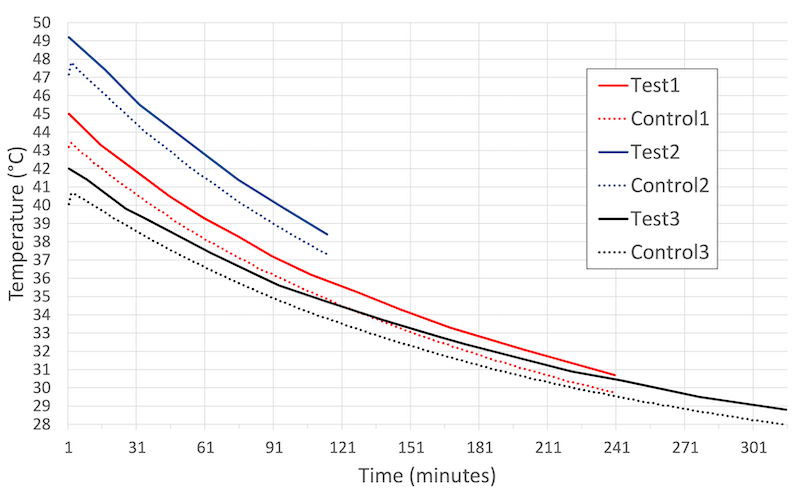
STC-1000 calibration
My STC-1000 consistently over-read by ~1 °C across the tested range (28 – 49 °C). The STC-1000 has a function (F4 in the menu) to calibrate the unit so that the display – and therefore the thermostat settings – reflect the accurate temperature.
It’s worth doing this before embarking on the build, though you will need to adjust it again later (see below).
The F2 function on the STC-1000 sets the temperature delta (offset) away from the set temperature. Set this to the minimum, which is 0.3 °C. You want the temperature to fluctuate over a limited range.
The heating element
This is the single most important and expensive component.
I used a 12 V 15 W 100 x 150 mm silicone heating mat from RS Components.
WARNING – these heat pads MUST be thermostatically controlled. Without thermostatic control these pads can reach ~200°C. Not only will this cook your queens, it will probably also melt your car, burn your house down and run off with your spouse. You have been warned!
Of course, I immediately wired it up (without a thermostat) to a 12V source and determined that it didn’t reach anything like 200°C particularly fast … though I dare say it would reach it eventually.
It did get too hot to touch, but you have to try these things, don’t you? {{10}}
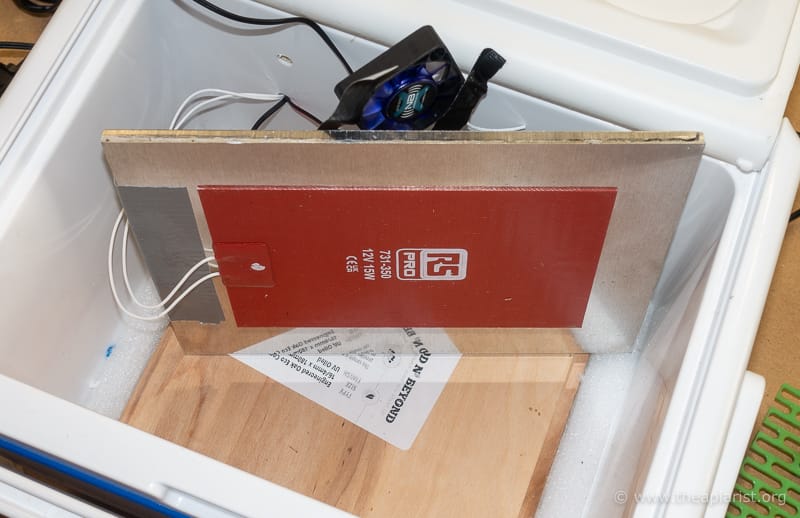
Silicone heating pad, wooden insulation and aluminium plate
To avoid damaging the inner floor of the box {{11}} I placed it on top of a ~1.5cm thick offcut of wood laminate flooring. I stopped this moving about with some fillets of closed cell foam.
To help dissipate the heat more evenly I stuck the heating mat to the underside of a 6mm thick piece of aluminium. The heating mat I purchased had an adhesive pad on one side of it.
Make sure the heating mat is central and stuck down with no air bubbles. Protect the wiring from the sharp edges of the aluminium pad with some gaffer tape.
With hindsight, a larger heating mat may work better. RS Components do a 30W version which is A5-sized (approximately) and would fit in the insulated picnic box I used. It should heat the box faster and may provide a more evenly heated surface {{12}}.
The box
I chose a small (5 litre) square-sided picnic box designed to take 6 x cans of beer (or Coke … or iced-tea or whatever). The sides and base are foam-filled. The lid appears to be just hollow plastic.
The box has a carry handle {{13}}. There is no lock or catch to keep the lid shut, but it is quite tight and should be secure enough.
The intention at the start was to mount the STC-1000 through the side-wall of the insulated box, hence the choice of a square-sided model. I quickly abandoned this idea when I realised the humidity level inside the box and just how limited in volume it was.
There are similar, and slightly bigger insulated sandwich/picnic boxes that might well be better insulated and/or a better choice {{14}}.
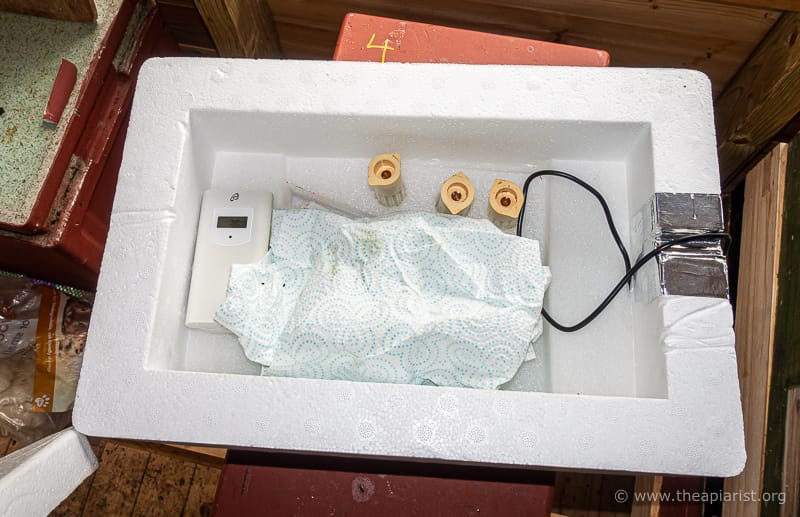
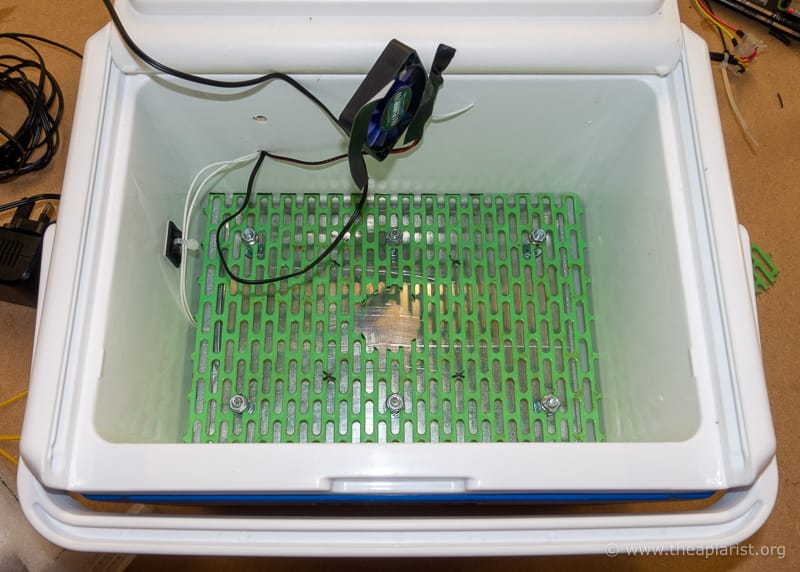
The internal bits {{15}}
I drilled a hole through the rear wall of the box to take the wiring for the STC-1000 temperature sensor, heating mat and fan. In addition, I drilled a hole for a thermometer for use when testing the unit (subsequently filled in with a bit of foam and taped over, but it’s there if I need it again).
The foam block to hold the Nicot cages needs to be supported ~1 cm above the aluminium sheet. I used an offcut of plastic queen excluder held in place with 6 ‘legs’ created from M4 roofing bolts. These are a reasonably good fit through the holes in the queen excluder, but require a nut and washer each side to hold them firm and square to the plastic.
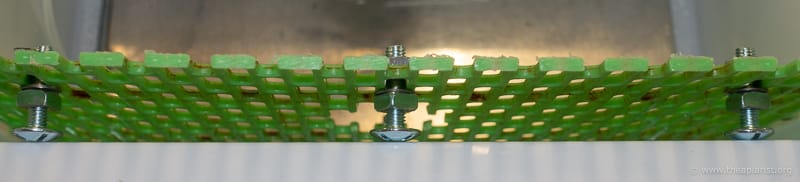
Legs for the foam support
This support was placed ‘screwhead down’ on top of the aluminium sheet.
Queen excluder support for foam block
The foam block goes on top of the queen excluder. I had to cut small recesses in the underside of the block to accommodate the protruding ends of the M4 roofing bolts. This is important as it keeps the queen excluder and foam properly aligned and flush fitting.
The foam block must be carefully shaped … this needs:
- the ability to visualise the finished item in 3D
- a sharp breadknife
- a steady hand … or Elastoplast
The idea is to maximise the area to accommodate the Nicot cages, but to allow good airflow around the four edges of the block. I achieved this by leaving protruding corners that fitted very snugly into the box, but cut ~1 cm ‘recesses’ in the block on all four sides.
Foam block corner detail
The foam block I started with was ~5 cm thick, but I thinned it to ~3.5 cm to provide space for the Nicot cages.
My greatest smallest fan
The fan is located centrally, supported at the corners on the queen excluder and attached to the underside of the foam block. I cut a 40 mm diameter central hole through the block using a holesaw and then, using a scalpel, cut a recess for the fan. The fan was just taped in place. The airflow is intended to push warmed air from the aluminium plate UP through the central hole, so make sure you get the fan in the correct orientation.
I discovered that it helps to cut away the queen excluder underneath the fan to maximise the airflow. These little fans are pretty puny … don’t obstruct them if you can avoid it.
The fan I purchased had a speed controller/reader wire which wasn’t needed, so I just cut it off.
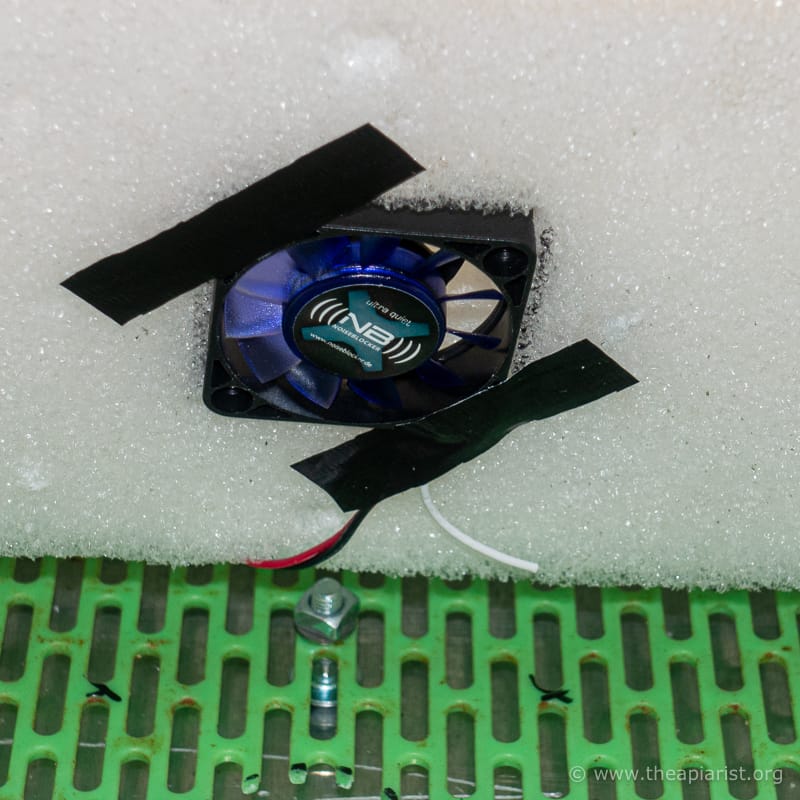
The fan fits centrally in a recess cut into the underside of the foam block
I cut eleven suitably-sized (~2 cm diameter) plugs out of the block using a holesaw for the Nicot cages. Rather than cut right through the foam I cut through partially (~2 cm deep) and then used a very thin and sharp scalpel through the side of the block to cut across the bottom of the plug, so releasing it.
The intention was to grip the Nicot cage, but to have the queen cells protruding into the airspace over the foam … where hopefully the temperature would be even and constant.
Almost finished …
Wiring it all up
I’m not going to embarrass myself or risk your electrocution by showing the gory details of the rats nest of wiring I ended up with.
What a mess … 12V makes this a whole lot easier and safer
Suffice to say that working with 12V probably saved my life more than once 😉
It’s worth remembering that the heating (and cooling) circuits on an STC-1000 are not powered but the temperature sensor is, so you need to take a spur off your power input to provide juice to the heating mat.
I based my wiring on the following diagram, ignoring both the yellow/green earth wires as I was using 12 V and the cooling terminals.
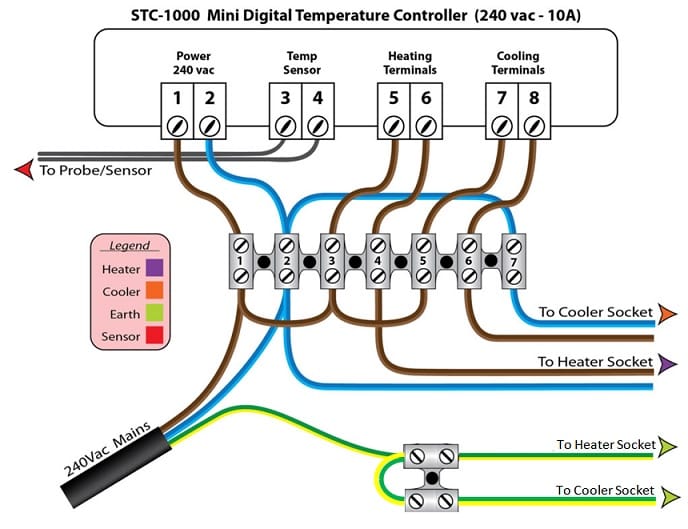
STC-1000 wiring diagram. For 12 V omit the yellow/green earth wires.
Actually, it was a little more complicated than that as I also wired the fan directly into the power so that it was always running. Preliminary tests showed that this gave reduced temperature fluctuations than when wired in parallel with the heating mat.
More ‘shockingly bad’ wiring
The temperature sensor and wires to the heating mat and fan are routed via a cable gland from the plastic box on the outside, through the hole in the sidewall of the picnic box. I sheathed the wires in some flexible cable sleeving I had from another project.
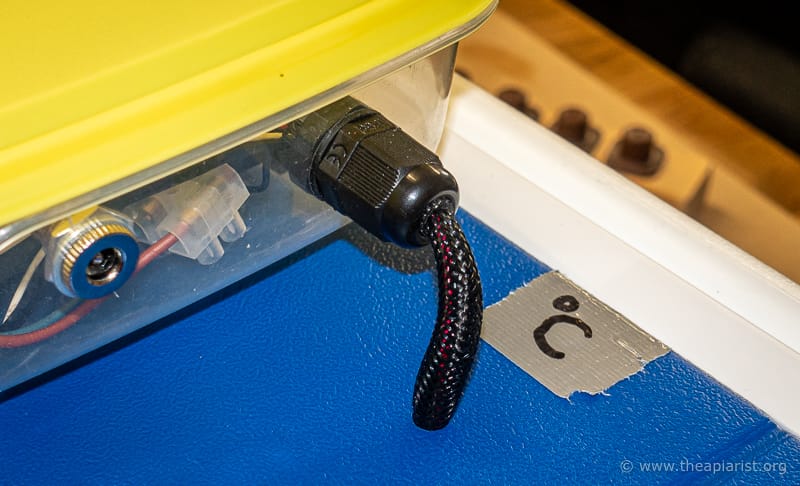
Cable gland and sleeve
The power supply feeds into the plastic ‘control box’ via a near-ubiquitous 5.5 x 2.1 mm socket (shown above).
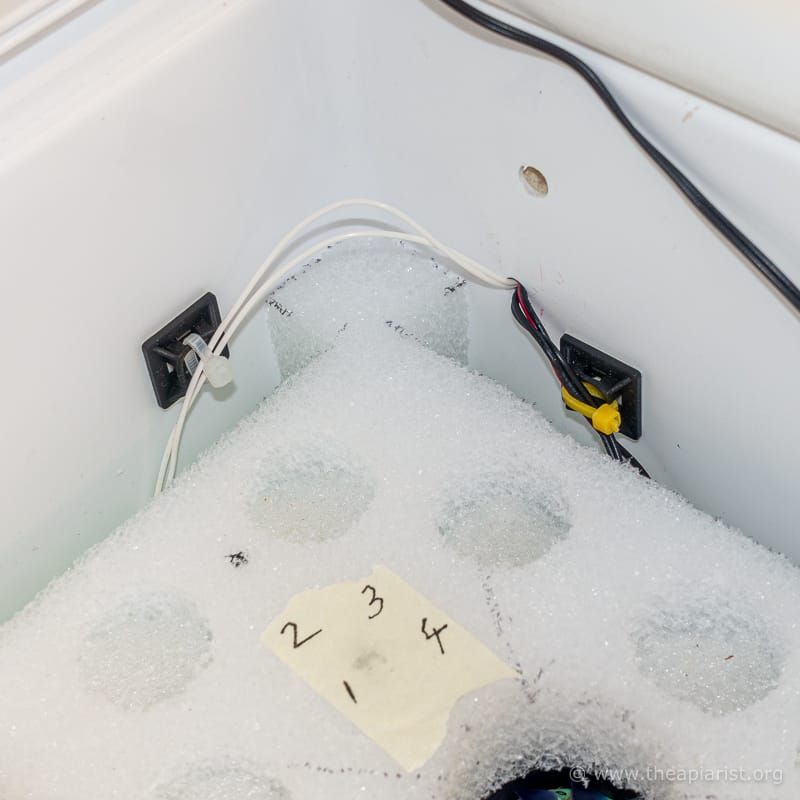
The temperature sensor needs to be fixed in a central location on the inside of the lid of the picnic box.
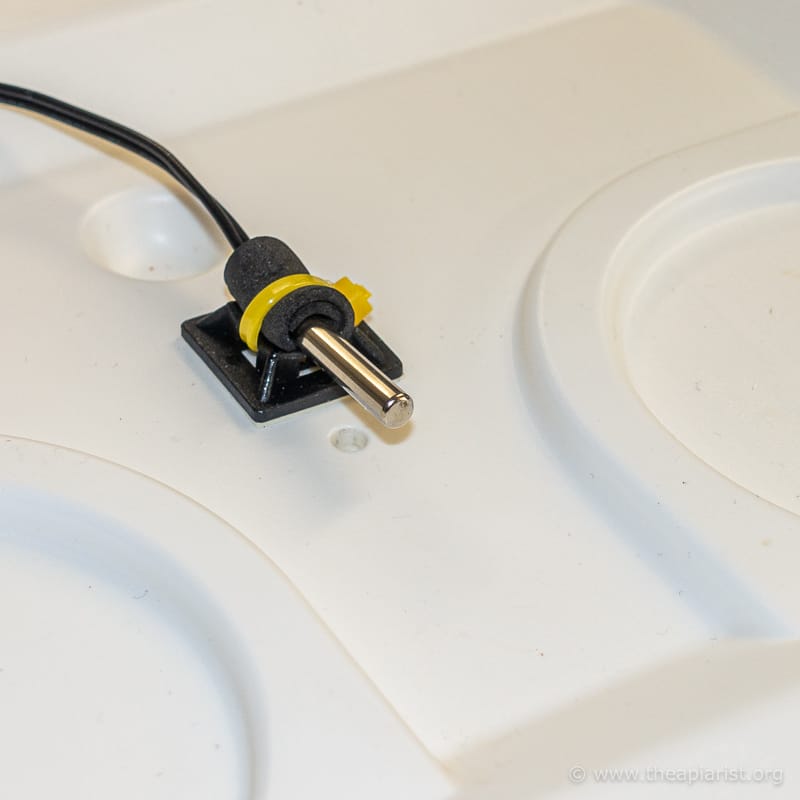
Temperature sensor
To ensure repeatable temperature control this sensor must be in a fixed location. Do not just leave it flapping around in the box {{16}}. Make sure you have sufficient wire free to the sensor to allow the lid to open easily, without fouling anything in the box.
Ready for testing
With everything assembled the inside of the box should look something like this:
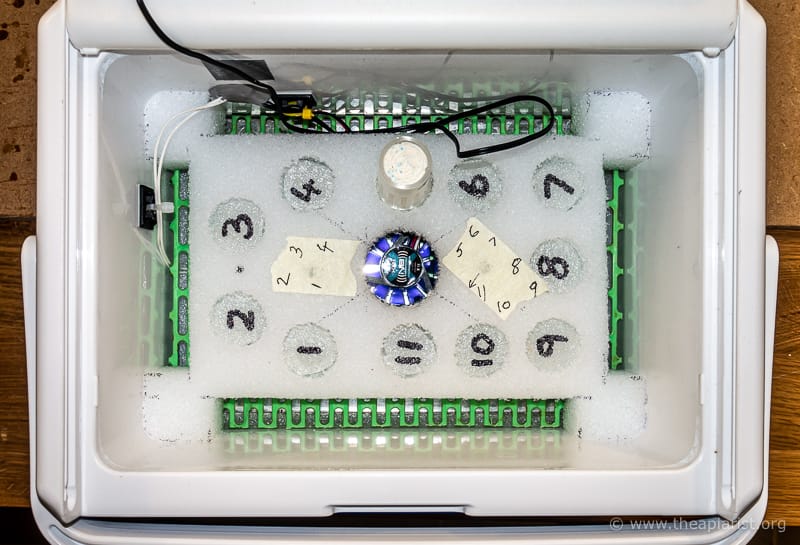
Almost ready to go
I still have a little more tidying to do with the wiring to the heating pad and the temperature sensor. They will both be held in place with zip ties and I’m intending to construct a smaller seal on the inner wall using Sugru mouldable silicone glue (which is extraordinary stuff).
The recesses to hold the Nicot queen cages are numbered.
Having put everything together I then tested it {{17}}.
Temperature testing
The temperature within the Nicot queen cages is not identical in every position in the box.
It varies, in a very reproducible manner, from position to position {{18}}. The variation between positions is mostly with 1°C, so the aim was to adjust the thermostat so as many of the Nicot cages as possible were within the optimum part of the temperature range.
In the following graph the temperature was measured for 1-2 hours with the Nicot cage containing my testing thermometer in each location, with positions #5 (light bars) or #9 (dark bars) occupied by the water source to maintain humidity. Error bars indicate the standard deviation in each position.
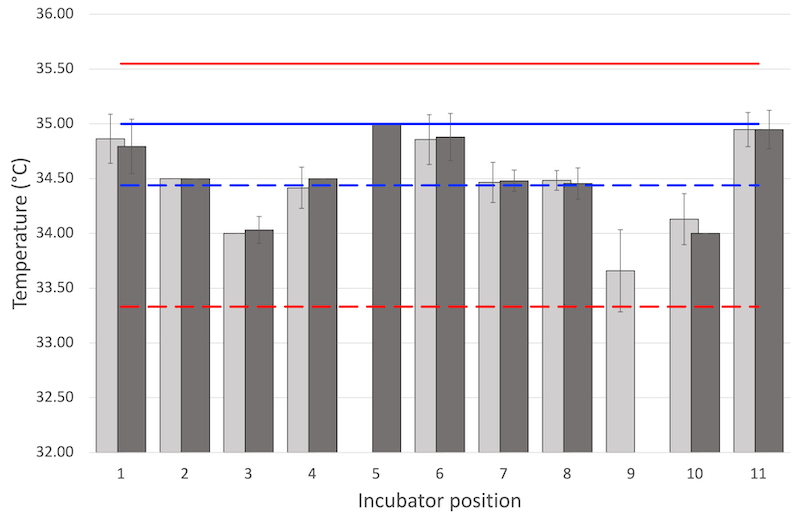
Temperature testing
Red lines indicate the lowest (dashed) and highest (solid) temperatures acceptable for incubating queen cells. Blue lines indicate the low and high limits on the optimum range.
Positions #5 and #11 were consistently warmer. The heating mat must have a ‘hotspot’ in this central region. Position #9 was consistently cooler (and was the most variable position).
Using position #9 for the water source, 8 of the remaining 10 positions maintain the temperature within the optimum range of 34.4 °C to 35 °C. The two outside this range (positions #3 and #10) are only ~0.4 °C cooler.
Nice 🙂
Calibration of the STC-1000 … what, again?
But you will not achieve figures like those above without again calibrating the temperature offset in the STC-1000.
With the temperature sensor suspended from the lid of the box there is a temperature differential between the sensor and the location of the queen cell within the Nicot cage.
You therefore need to work out this difference and then recalibrate – via the F4 function – the offset on the STC-1000.
Accurately measure the temperature where the queen cells will sit and then compare this temperature with that shown – once a steady temperature is reached – by the STC-1000. For example, if the STC-1000 is set at 34.5 °C, but your thermometer reads the Nicot cage temperature as only 33.5 °C, you need to adjust F4 by -1.0 °C.
This takes a little time, but the goal is to end up with the set temperature on the STC-1000 being the temperature at which you want to incubate your queen cells.
Frankly, I was delighted {{19}} I could get such accurate and reproducible temperatures 🙂
The ambient temperature in my workshop was 15-17 °C throughout these tests, but I also confirmed that the temperature did not fluctuate when the box was moved outdoors (8 °C).
Humidity
Queens need a humid environment. I used a folded up piece of kitchen towel fitted tightly into a Nicot cage and then soaked in water. This sits in position #9. Using this I could maintain humidity at a fraction over 90% as long as the lid of the box was closed.
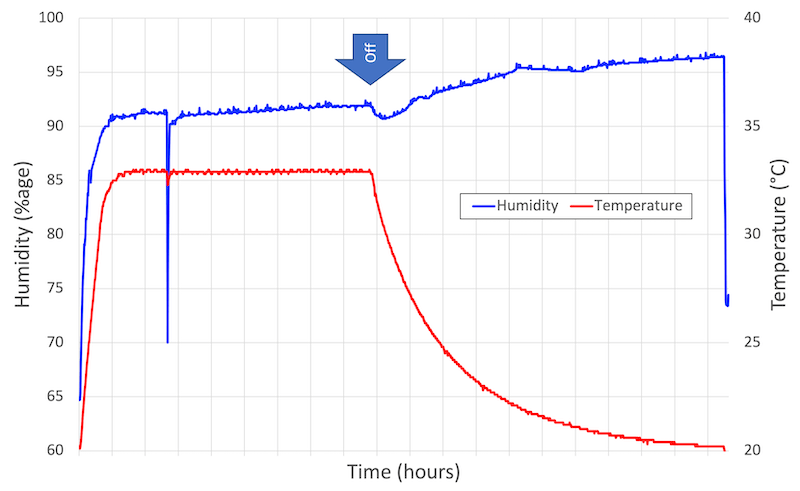
Humidity measurements
From a ‘cold start’ humidity increases to ~91% after one hour and remains high. The humidity drops to ~70% when the box was briefly opened (after 2 hours 40 minutes, above) but quickly returned to over 90%.
That’s good enough for me and should be good enough for my queens 🙂
Heating and cooling
The graph above shows that the box takes about one hour to reach working temperature. In repeated tests this was very reproducible from an ambient (workshop) temperature of ~17 °C.
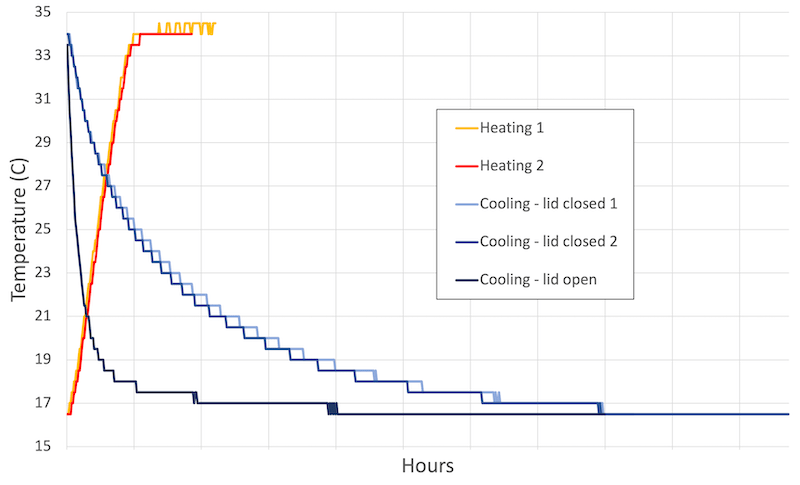
Heating and cooling
If the lid was kept closed the temperature drops from ~34 °C to ~25 °C in one hour when the power is turned off. The temperature drops much faster if the lid was left open {{20}}.
All of the temperature measurements shown in the bar chart above involved repeated opening and closing the lid to move the test thermometer about. This is not dissimilar to the manipulations when introducing, checking or feeding queens. Under these conditions the temperature fluctuated by only 1-2 °C and returned to the set temperature within a few minutes.
Again, that’s more than good enough for me and my queens 🙂
What’s in a name?
There is a commercial portable queen cell incubator, the Carricell, made in New Zealand.
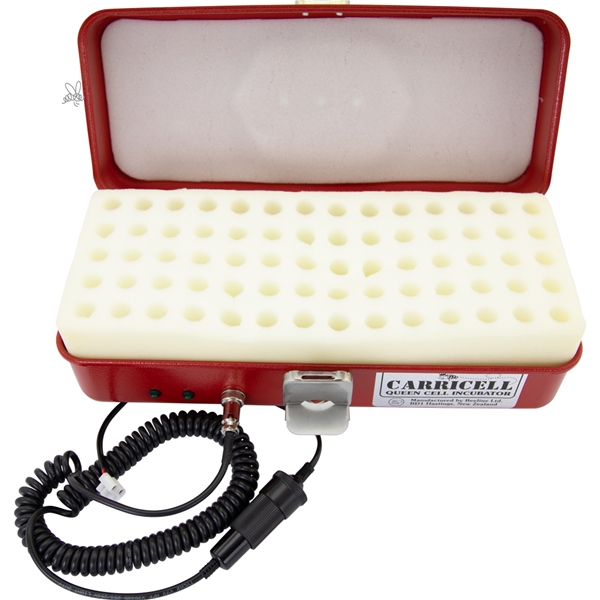
Carricell queen cell incubator
This is primarily designed to carry cells … hence the name. I don’t think it’s a queen cell incubator, despite what it says on the side of the unit. It keeps cells warm, but you couldn’t incubate sealed cells until they emerged … but what do I know, as I’ve never seen or used one?
I’ve also never seen any data on the temperature stability of the Carricell. However I do know they cost an eye-watering €636 from Swienty (for the mid-sized 70 cell model).
The Carricell is for professional bee farmers who want to transport lots of cells at a time.
My incubator is for a small number of cells only (but could be scaled up now the basic design problems are solved).
I need a name for the box I’ve described as ‘portable queen cell incubator’ is much too sensible and unwieldy.
I currently favour the name PortaQueen {{21}} … can you think of anything better?
In use
Unless you’re in the fraction of a fraction of a small proportion of beekeepers who actually need one of these you might have read {{22}} the last 3700 words and be wondering “That’s all very well, but what the hell is it used for?”
Here are the three things I expect to use this for next season:
- Incubating queen cells started and capped in my cell rearing colonies. This frees up the cell rearing colony to rear a second batch of queens. A capped cell just needs to be kept warm. The queen emerges and is then introduced to a colony for subsequent mating. Alternatively, the queen cell can be used just prior to emergence to prime a newly made up nucleus colony.
- Keeping virgin or mated queens warm and safe during transport between apiaries {{23}}. You can feed virgin queens with honey and water and keep them alive for several days prior to introducing them into a colony. It is always good to have a spare queen or two ‘on hand’ in case of emergencies, opportunities or stupidity.
- Transporting eggs or very young larvae for grafting in a distant apiary. I don’t have space to write about this more here, but may cover it in the future.
Here’s one I produced earlier
If you attempt to build one of these I’d be interested to hear how you got on.
Note
Almost forgot … this box needs a 12 V supply, but the heating pad and fan are about 16 W total (and the former is only on ~50% of the time). I calculate it could be powered by a 7 Ah sealed lead acid battery for a few hours if needed. Coincidentally (not) I’ve previously built solar powered battery boxes that house 7Ah SLA batteries to drive my trail cameras which could also be used with the PortaQueen.
{{1}}: Er, no it wasn’t.
{{2}}: No it didn’t.
{{3}}: Though less well designed … he modestly claims.
{{4}}: By which I mean deliberately generating more queen cells from selected stock for requeening or sale – irrespective of how they are actually produced … grafting, Miller method or whatever.
{{5}}: I discuss briefly why you might want to at the end of this post.
{{6}}: And since this is my site I can write about whatever the hell I want.
{{7}}: I’ve included temperatures in °F here for the convenience of US readers. I won’t keep on repeating them.
{{8}}: But I’m afraid the price has gone up since then. Both RS Components and CPC Farnell sell suitable models for a few quid.
{{9}}: I also had these last two items from previous projects, but quote indicative pricing.
{{10}}: My motto ‘Live fast, die young … and leave a good looking, albeit slightly charred, corpse’.
{{11}}: When heating its temperature will exceed the ~35°C temperature in the Nicot queen cages.
{{12}}: If the royalties from the sales of this design are sufficiently large I will plough some of them back into the R&D department and ask them to try a 30 W heating mat … don’t hold your breath.
{{13}}: Essential if it’s to be portable.
{{14}}: As before, if the royalties are obscene enough I’ll force the R&D elves to knock up some larger, better insulated versions for testing … don’t hold your breath.
{{15}}: I hope that’s not too technical for you.
{{16}}: Been there, done that … and I know it doesn’t work.
{{17}}: Actually, the only way I knew to put things together in the order described was by testing a load of unsuitable configurations first … but it still needs final testing and calibrating before use.
{{18}}: I think this is because the temperature is dependent upon heat from below – where there are hotspots – and the air temperature, which is pretty even, but this needs further testing.
{{19}}: And more than a little gobsmacked.
{{20}}: No sh1t Sherlock.
{{21}}: Like PortaPotti, but different.
{{22}}: But probably didn’t.
{{23}}: Remember that my apiaries are separated by 150 miles, a ferry and a hotel stay.
Join the discussion ...