Frames
How have I managed to write over 450 posts without having one specifically dedicated to the bane of every beekeeper’s life … frame building?
Actually, that’s not quite correct.
It’s sometimes the bane of my life {{1}}.
Building frames in the height of the season can be a rather stressful process.
I belatedly realise I need 20 frames for swarm control, or making up new nucs, or simply to replace some grotty old ones.
I’m short of time.
I can’t find the hammer … or the nails … or the foundation 🙁
Perhaps it’s only me that’s so disorganised?
But frame building isn’t always like that, and it doesn’t have to be like that.
When there’s no rush, when you have the right tools for the job and the time to do it properly, it can be quite a pleasant way to spend half an afternoon.
And the winter is the time to build frames, so this seemed a logical time to write this post.
Single use or reuasble?
Frames are a semi-disposable {{2}} consumable for beekeeping.
At least brood frames are. You’ll need new ones during swarm control and when making increase. These brood frames should then be replaced every 3-4 years, depending upon how dark and manky {{3}} they are getting.
‘Semi-disposable’ because brood frames can be recycled a few times through the steam wax extractor, but eventually the joints get a bit rickety and they should be consigned to the stove.
Super frames are a bit different because they can be reused year after year. I still have some (frames with drawn comb) in use from my first summer of beekeeping.
However, whether I’m making brood or super frames, I build them in essentially the same way. I also build my foundationless frames in a broadly similar manner.
If you build them properly they will remain square and relatively rigid even after a couple of passes through the steam wax extractor. This makes financial sense as frame costs can quickly escalate if you are not careful.
If you build them the way I describe below, you can put them through the steam wax extractor, push off the ‘nailed only’ bottom bar, scrape back any remaining propolis and wax, add a fresh sheet of foundation and refit the bottom bar.
Tools of the trade
You need somewhere with a reasonable amount of space to work and just a few very unspecialised tools. I like building frames in the garden if it’s warm and dry. The banging {{4}} is less intrusive for those indoors.
Of course, if you’re (sensibly) building them in midwinter – when you have time and little else to do – then you need to plan things accordingly i.e. not late in the evening, or when the crochet/poker club are meeting downstairs.
Tools of the trade
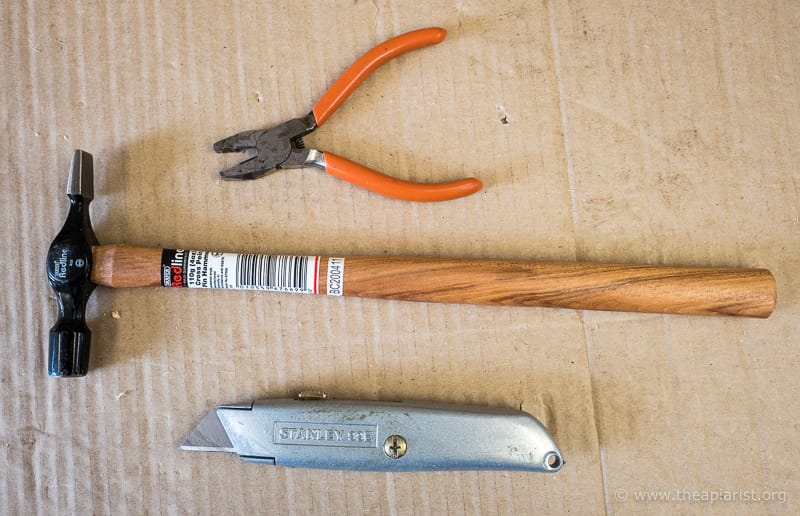
A sharp knife, a pair of pliers and a small lightweight hammer are the essentials. I use a 110 g (4 oz) cross pein hammer, though anything similar is suitable. Even if you end up using a nail gun for most of the work (see below) you will still need a hammer.
You will be surprised (I was) how much easier it is to build frames with a small hammer like this.
You don’t need force … you need accuracy.
Every frame requires 11 nails, so a brood box or super-full of frames will mean you’re going to be using it a minimum of 121 times.
So buy and use a lightweight hammer 🙂
And then, after a thousand frames, buy a nail gun and ask yourself “Why didn’t I do this years ago?”.
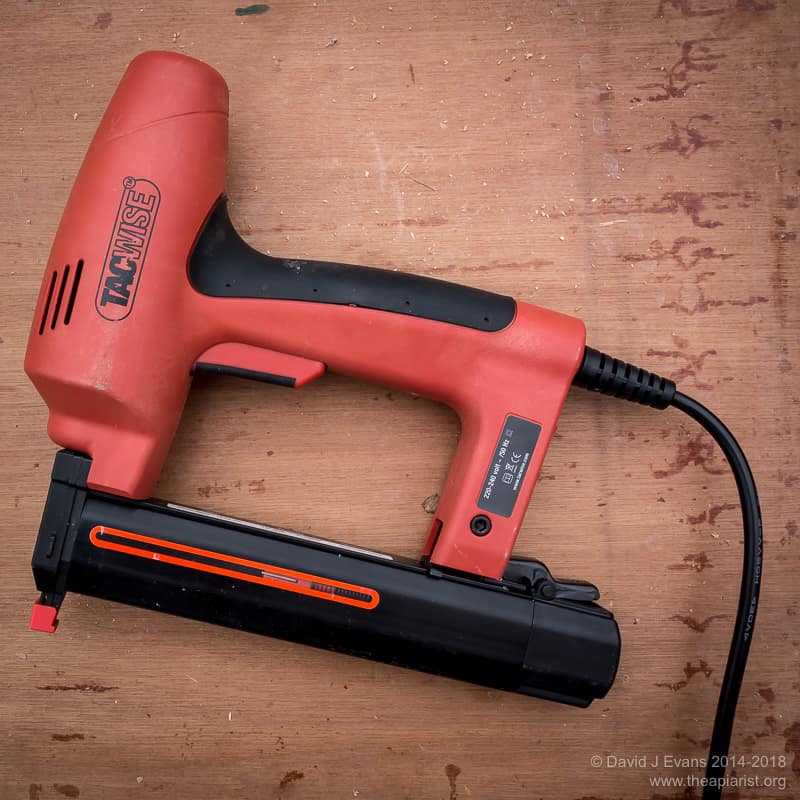
Tacwise nail gun …
The Tacwise model I use has worked well, but I know some prefer a compressed air (rather than ‘lecky) powered gun.
I wasn’t joking when I said make a thousand frames first. Frame building is a sort of rite of passage for a beekeeper. You won’t make better frames with a nail gun, but you will make them faster (and more noisily).
I also suggest you use some wood glue {{5}} such as the blue indoor/outdoor Evo Stick or the equivalent stuff from Gorilla.
Of the two, I prefer the Gorilla glue as the nozzle is more clog-free {{6}}.
OK … any readers who have made a few hundred frames up already can skip ahead to some of the concluding comments. You will know all of the following … or you should.
Building frames
Get organised first.
Make sure everything is to hand and logically arranged.
Put a hundred or so gimp pins (frame nails) into a container that has low sides and a wide open top, ideally quite heavy. You want them to be easy to pick up, but not easy to vibrate off the worksurface with all the hammering.
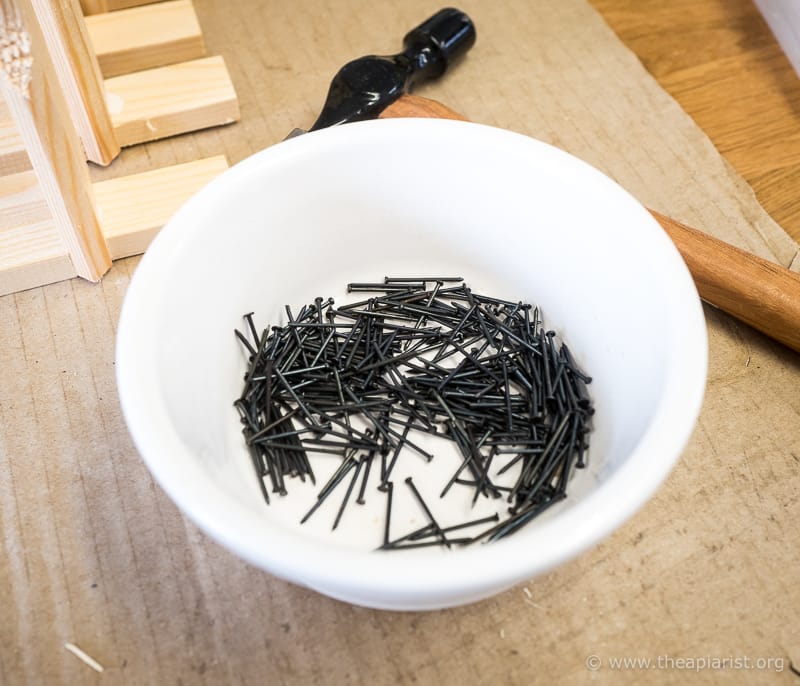
Gimp pins
And, if they do fall off, you only want to pick up a few dozen, not a 500 g box full.
I strongly recommend a Charlie Bigham’s pie container {{7}} for this purpose 🙂
How many frames should you make at a time?
I do them in batches of 10 as that number fits on the top of my Black and Decker Workmate. It’s also the number of sheets of foundation in a packet. And it’s a convenient number to put in a brood box so you don’t trip over them when building the next 10.
I usually make 5-10 batches and then give up from boredom {{8}}.
Seconds out
You can save a chunk of cash by purchasing second quality frames in the sales. Most of the major suppliers sell them in batches of 50.
You can expect that a small proportion of the frame bars will have defects – knots, shakes, splits or warps.
If any of these are significant, and particularly if there are defects near the frame lugs or warps or twists in the top bar, discard them. It will only be 1-2% of the frame bars and it will save you the hassle of a broken lug or an ill-fitting frame later in the season.
I learnt this the hard way, so you don’t have to 😉
Prepare the top bars
- Use the knife to remove the foundation retaining wedge from the top bars. Don’t just pull the wedge off as they sometimes break.
- Put the foundation wedges somewhere nearby but out of the way {{9}}.
- Tidy up the remaining sliver of wood that is attached to the top bar with another careful swipe of the knife.
- Lie the top bars – all in the same orientation – upside down on a flat surface.
Top bars – lined up and ready to go
- Add a small dab of wood glue to the recess cut into the top bar where the side bars attach. Do both sides at once.
Add the side bars
- Working down one side, then the other, of the aligned top bars, push fit the side bars in place.
- Make sure you orientate the side bars with foundation groove on the inside {{10}}.
- They will be a tight fit and don’t worry if they’re not all perfectly aligned or fully pushed down. They need to be a tight fit to ensure that the frames will be square once assembled.
- Once all the side bars are in place, take each frame and turn it over, standing on a hard surface and use the hammer to tap down on the top bar to ‘seat’ the side bars properly. Don’t hit the lug, just aim for the narrowest part of the top bar.

Properly ‘seated’ side bar
- Some frames won’t need this, others will need a couple of smart taps to ‘seat’ them properly.
- Return the frames to the inverted position.
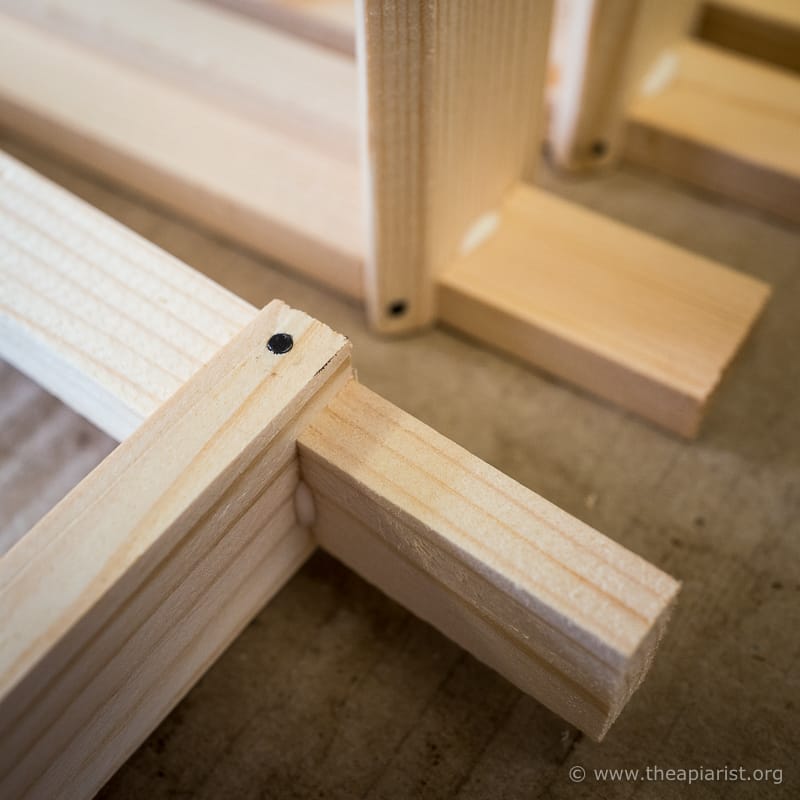
Add the bottom bars
- Add a dab of glue to the recess in the side bars that will take the bottom bar above the ‘non wedge’ side of the top bar.
Glue for one of the bottom bars only – note the orientation of the top bar
- Add one bottom bar to every frame in the glued recesses. If the bottom bar is a very tight fit then the frames are good quality. If it’s so tight that the side bar splits then they are not such good quality.
- A sharp tap with the hammer at the ends of the bottom bar before offering it to the glued recess will make it slightly thinner and so it may be easier to fit.
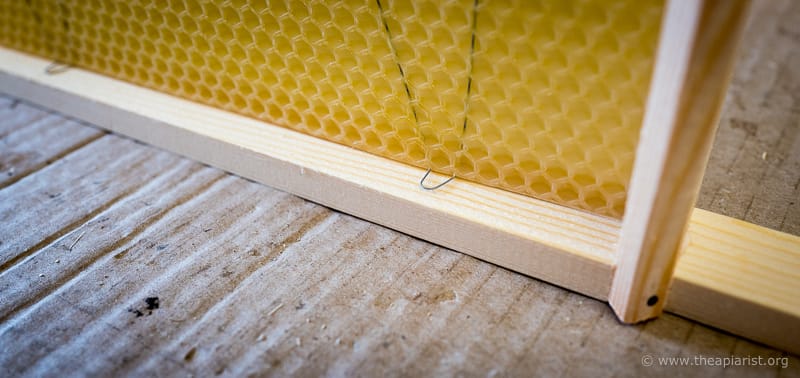
- It is important that the ends of the bottom bars are flush with the side bars. If they are not the frame will taper and you will struggle fitting the foundation.
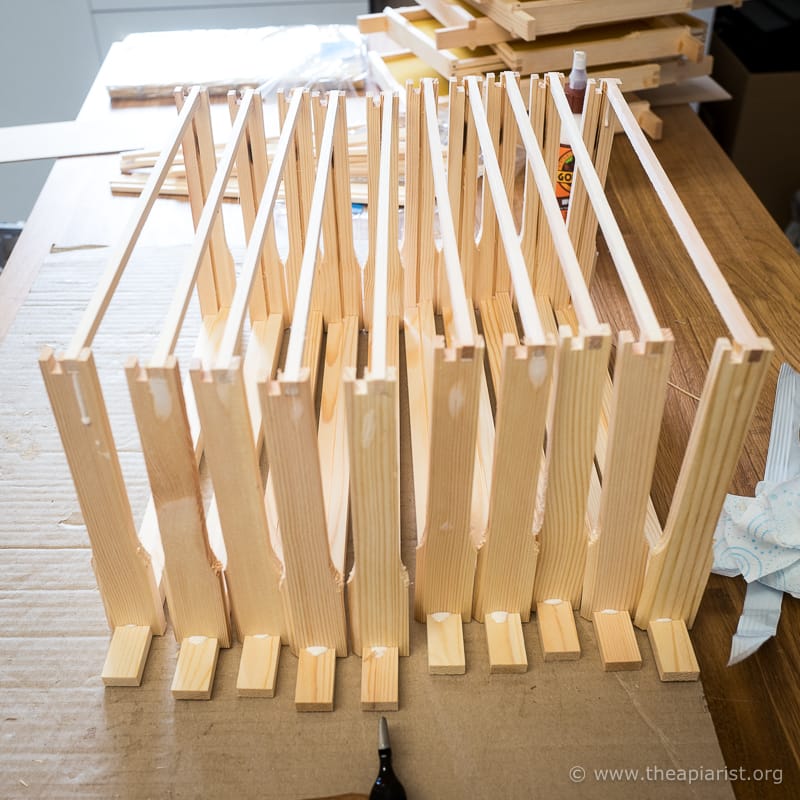
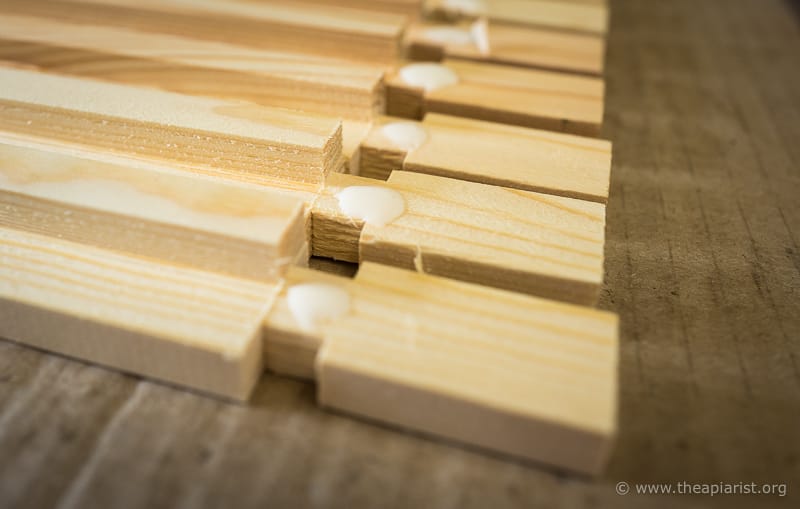
Check frame alignment
- Check the alignment of the frames. They should all be square, with equal gaps between the bottom bars as shown in the photo above.
- If any are wonky give them a twist to straighten them up.
Nail the frames
- I nail each frame in turn, rather than doing all bottom bar nails first, then all side bars. It involves less frame handling and so is faster.
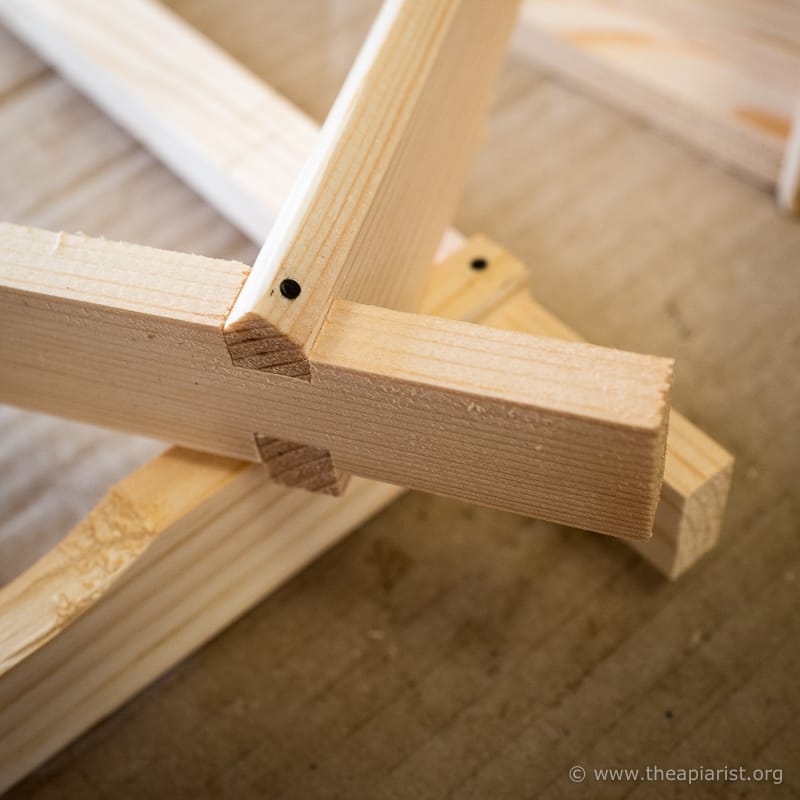
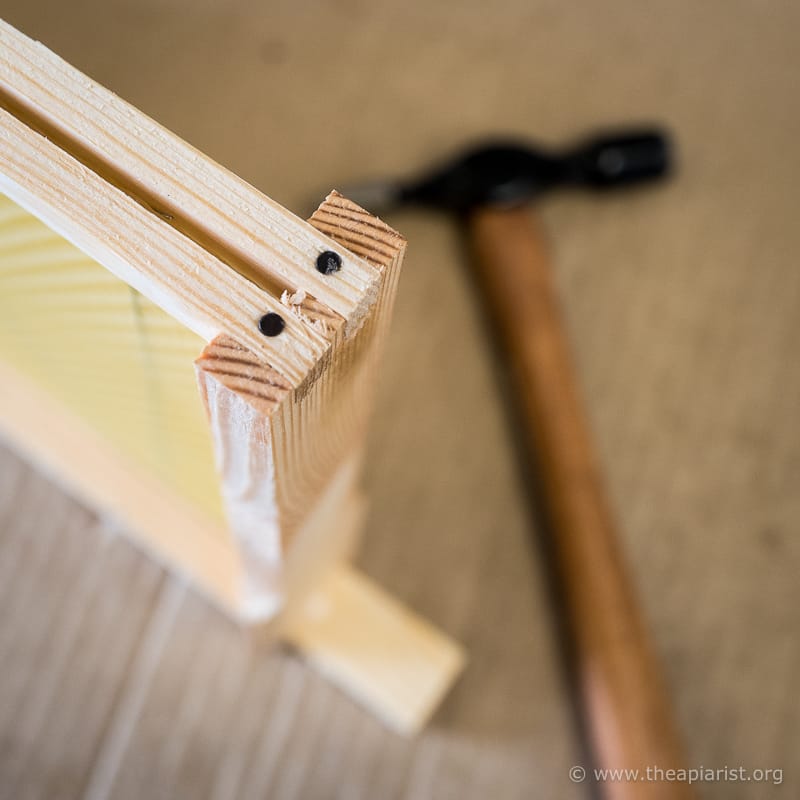
- Use two gimp pins, one each side, to attach the bottom bar to the side bar. Drive the pin in vertically through the bottom bar into the end grain of the side bar.
Bottom bar nailing
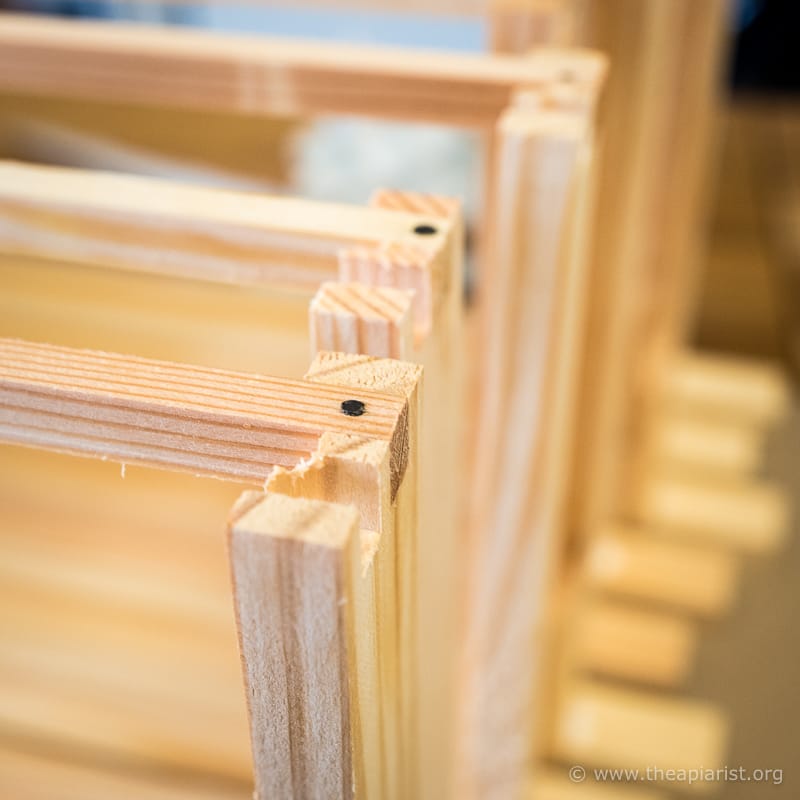
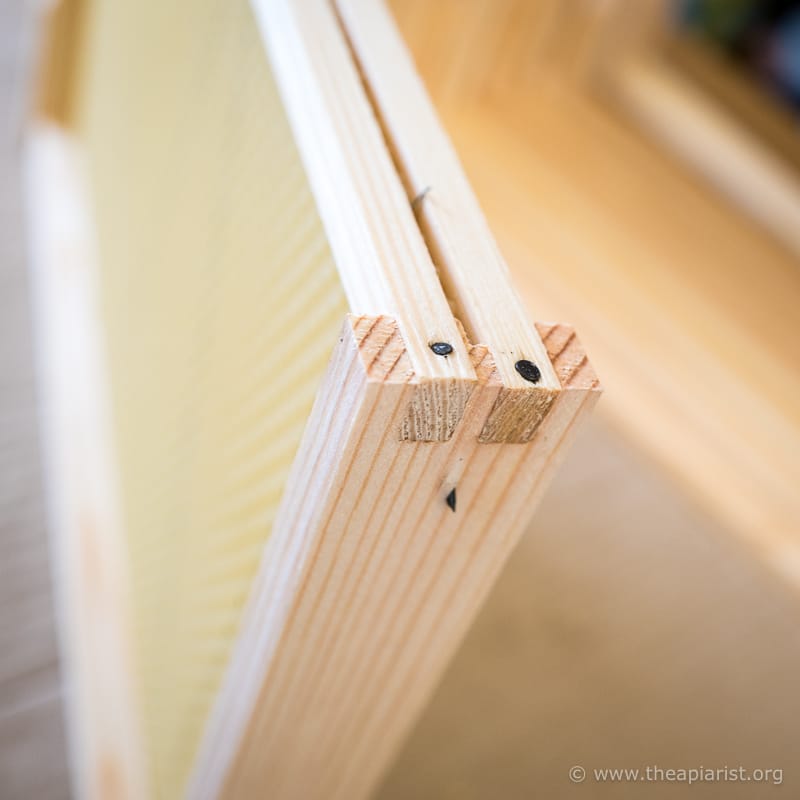
- Use four pins, two each side, to attach the two side bars to the top bar. One pin goes through the flat edge of the side bar.
One of four pins attaching the side bars and the top bar
- The other – assuming you are using Hoffman self-spacing frames – is driven through the angled wedge-shaped spacer. Alternatively, some drive it in to the apex of the wedge. Either way works.
And the other face of the frame
- All of the nails should be driven in flush with the wood. You do not want the heads protruding to catch on the hive tool when (if) you scrape the frames of propolis.
- Some gimp pins are poor quality and have ‘spade ends’. These tend to drive in at weird angles and are best avoided.
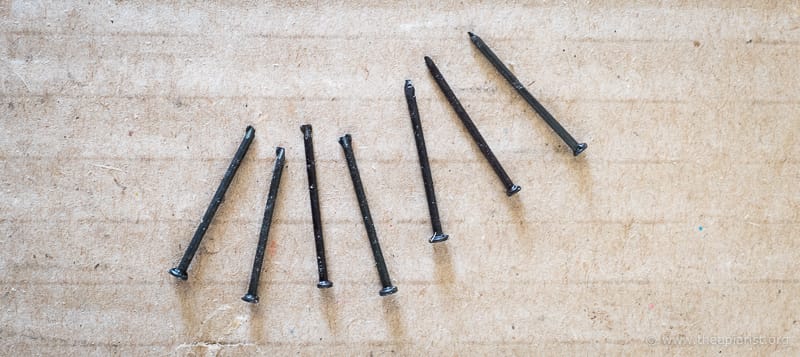
Some good and bad gimp pins – the four on the left might be tricky to drive in straight
- If the gimp pin does go in at an angle then don’t worry … unless it protrudes through the side bar or into the foundation groove.
Wonky pin … rip it out and start again
- In these cases replace the pin or you will inevitably catch it with the hive tool, or rip your vinyl glove on it.
Fitting the foundation
I only fit foundation shortly before I need to use the frames. Foundation is relatively fragile. It goes brittle in the cold and develops a white(ish) bloom on the surface which makes it less attractive to the bees.
If you are building frames in the winter {{11}} then wait until you need the frames before fitting the foundation.
I use diagonally wired foundation. If you remove a sheet from the packet you will see that there are small or large loops of wire on the long edge of the sheet. The large loop goes adjacent to the top bar of the frame, trapped under the foundation wedge.
- Fold the three large loops at 90° to the sheet and slide the sheet down the foundation grooves in the side bar so that the the wire loops lay flat against the underside of the top bar.
Placement of the wire loop against the underside of the top bar
- Refit the foundation wedge. You usually have to squeeze it into the gap between the side bars, trapping the wire loops underneath it.
- Fix the foundation wedge in place with three gimp pins driven through the wedge and each of the trapped wire loops. This stops the foundation from slipping down in the frame.
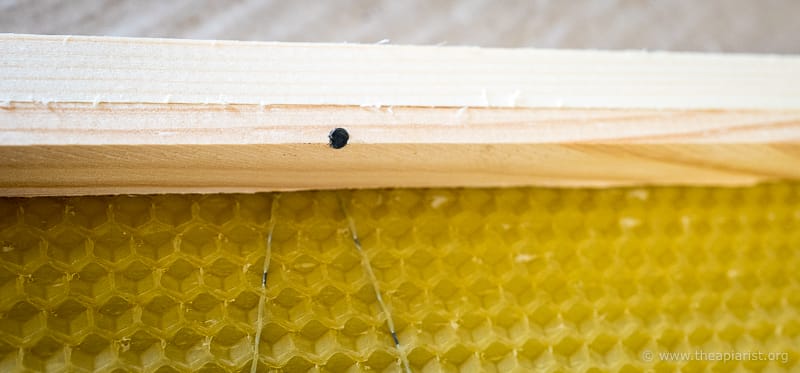
Pin through the foundation wedge and the trapped wire loop
- Add the second bottom bar to the frame. This should not be glued as you want to be able to remove it to replace the foundation. Just use one gimp pin at each end.
- Take care adding this second bottom bar as there is (or at least I have) a tendency to crumple the lower edge of the sheet of foundation. Push fit one end of the bottom bar and then offer it into position by prising it apart from the already fitted bottom bar, so making space for the foundation to fit. You quickly get the hang of this after messing up a couple of sheets of premium quality foundation 🙁
Second bottom bar fitted … do not use glue.
- Some sheets of foundation are fractionally too wide for the frames. I’ve only ever used Thorne’s DN/SN4’s and DN/SN5’s – both first and second quality – and their premium foundation, and still they are sometimes too wide. In that case lay the foundation on a flat surface and cut ~1mm off one of the shorter edges.
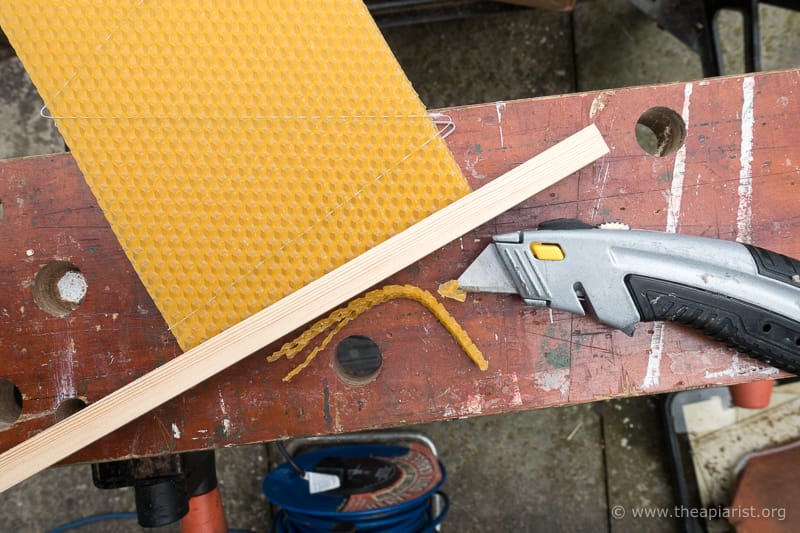
Trimming super foundation to fit the frame
- I suspect this poor fit is because the sheets of foundation ‘stretch’ slightly during storage {{12}}. Since I usually need to trim down every sheet in a packet I find I can do 3-4 sheets at a time.
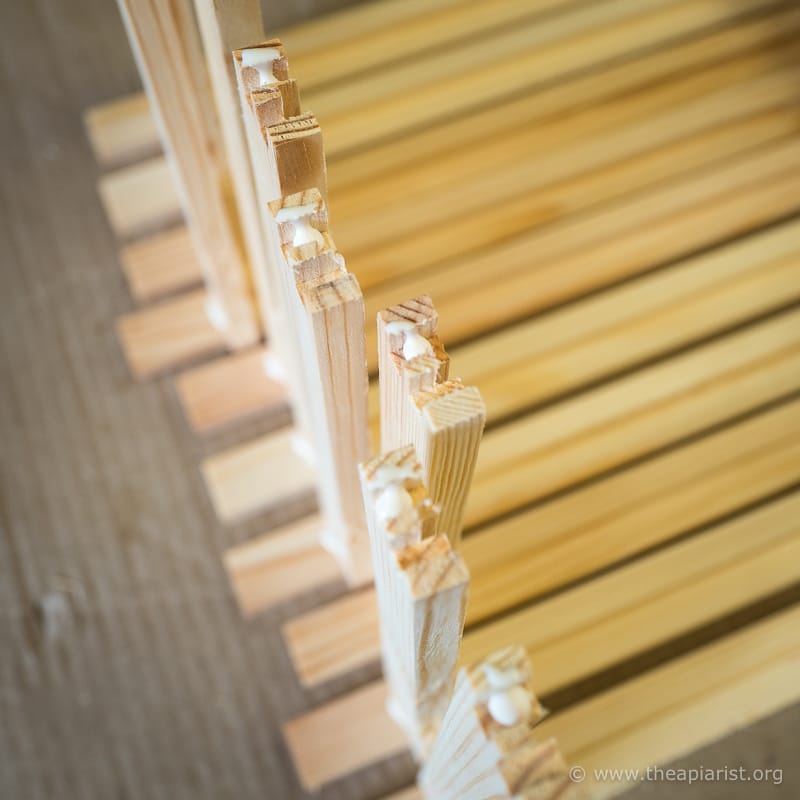
Foundationless frames
I’ve discussed these in detail before. I use a lot of them. I don’t have time or space or energy to justify their use again here … I’ve written lots about their construction and use previously which I hope should answer any questions you have.
I make these frames in the same way except for the addition of a couple of vertical bamboo supports. These are added after I fit both bottom bars. I then add back the foundation wedge to leave a narrow slot into which I glue a simple wooden ‘tongue depressor’ starter strip.
Why wood?
Why not a strip of commercial foundation?
Or a hand crafted wax starter strip?
Or at least a wax-painted wooden strip?
Because a plain wooden strip made from a tongue depressor works better and is less effort than any of the other ‘solutions’ {{13}} above.
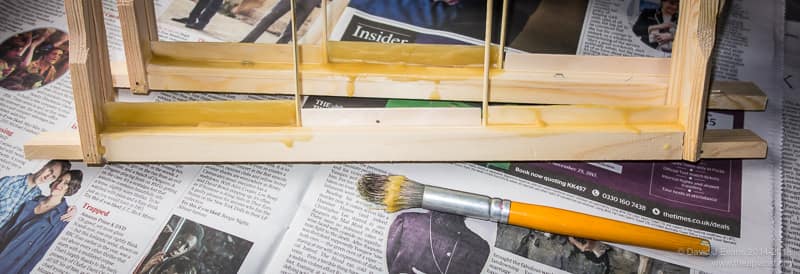
Take your pick …
And I know this because I’ve done a side-by-side comparison (see above) to determine which the bees preferentially use … and they simply do not care.
I made a dozen or so frames up like those above and added them to hives and observed which of the options the bees ‘chose’ to draw comb from.
They chose the plain wood as frequently as any others … and since that’s the easiest to prepare, that’s what I do.
Let the bees tell you … 😉
Storing frames
If you’re paying full price for the frames and foundation (rather than buying in bulk, or buying second quality) a frame will cost about £3.30.
Look after them!
Storing 10-20 frames is easy … just put them in empty brood boxes. Except these might get pressed into service during swarm control, or to make bait hives, so then where do you store the frames?
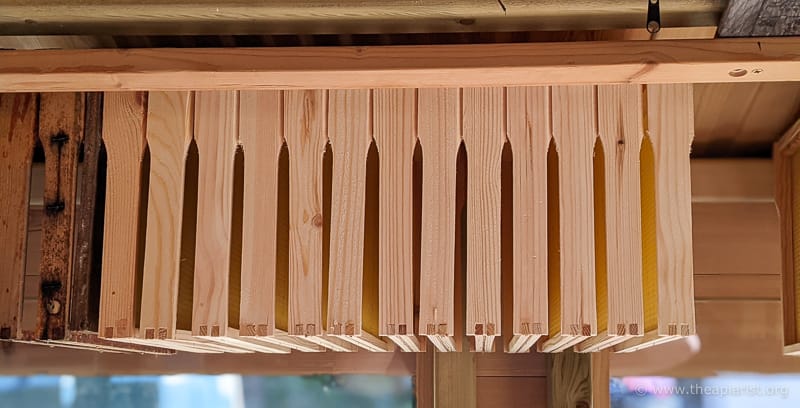
Foundationless frames are relatively easy as they are more robust than frames with foundation. Just stack them up in a pile and use as needed.
Bamboo foundationless frames
Ideally do the same with the built frames before you add the foundation.
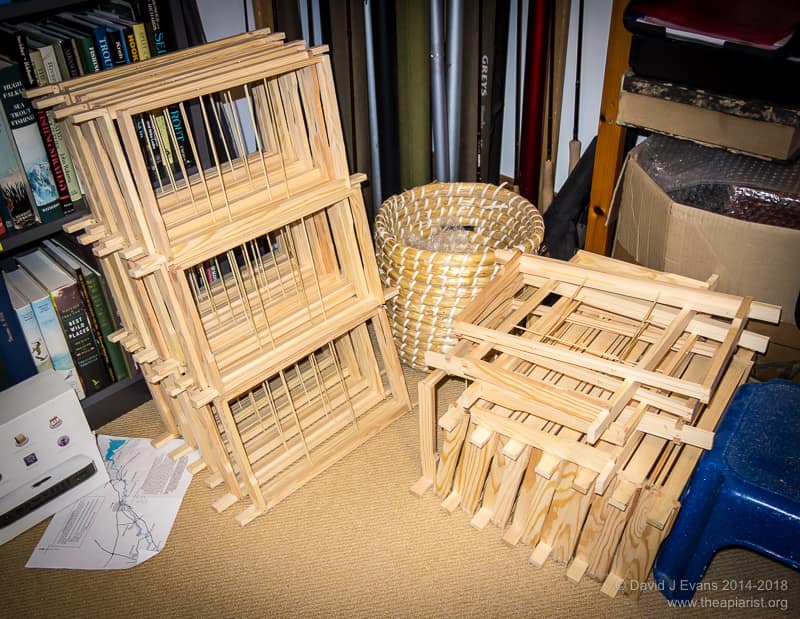
However, with a little ingenuity you can devise a solution … here’s mine.
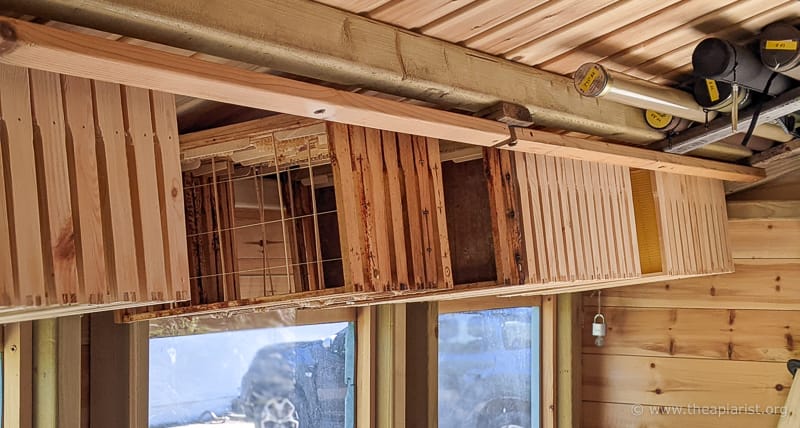
Frame storage
I can store a couple of hundred frames hanging from the shed roof. This has worked well, but needs a reasonable amount of ‘head space’ – either a high roof, or something underneath them (like a bench, or in my case a canoe) that stops you from walking/standing directly below them.
Here are some I made earlier
I’m sure there are lots of other equally good solutions …
Final thoughts
If you use a nail gun to assemble frames do not use it for the second of the bottom bars (other than for foundationless frames). The gun drives the nails in deep and they are very difficult to remove. Attach the unglued second bottom bar with gimp pins as described above.
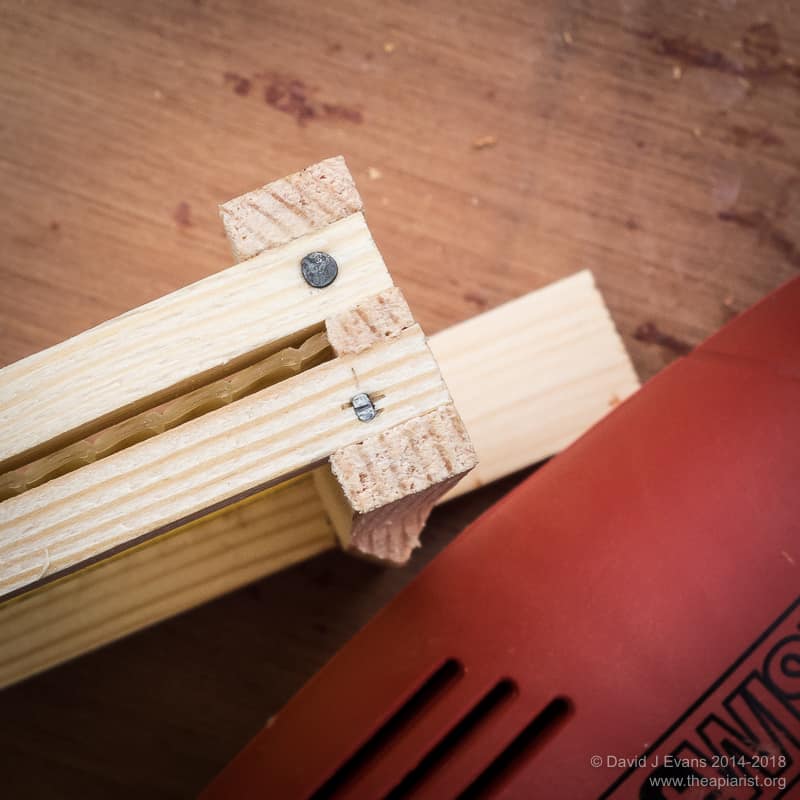
Nailed …
I use 20 mm 18g nails for the nail gun.
The nail gun speeds up frame building.
It can get quite competitive … can I build the next 10 frames in less time than it took the last 10?
Come on .. give me a break. It’s the winter and I need some sort of entertainment to get me through the dark days until I’m beekeeping again 😉
{{1}}: You might love making frames … which is frankly a bit odd.
{{2}}: Or semi-reusable if you want to sound more environmentally friendly.
{{3}}: Derived from the French manqué for dirty or filthy.
{{4}}: And inevitable swearing if I clip my thumb.
{{5}}: Many people do not bother glueing frames, and it certainly isn’t necessary. However, it takes only seconds extra and – I think – makes a slightly more robust finished product. Your choice.
{{6}}: Is that a term?
{{7}}: Your homework for the week is to test a range of Charlie Bigham’s pies to determine which is supplied in the best container for holding gimp pins. I recommend the chicken. Spoiler alert … all the pie cases are the same.
{{8}}: Or because my thumb and index fingers are so bloodied and bruised I can no longer hold the gimp pins securely.
{{9}}: Or store them safely if you don’t intend to add foundation for some time. Remember, the wedges are interchangeable … they don’t have to be fitted back to the top bar they were removed from. Just put them in a pile.
{{10}}: Don’t ask … just don’t.
{{11}}: Swot!
{{12}}: Or, more correctly, get thinner due to the stack of other packets they are underneath.
{{13}}: Which are solutions, but they are substandard ones.
Join the discussion ...