Jarring honey
Synopsis : Jarring is the final stage in honey production. Done properly it generates a good looking (and great tasting), high quality product for sale or gifting.
Introduction
For some beekeepers, honey production is the raison d’être for their beekeeping, everything is geared to maximising the crop. For others it is a sticky inconvenience that – indirectly – gives them a bad back and gets in the way of queen rearing.
But for me, it’s one of the very many benefits and pleasures of beekeeping that I periodically curse and wish there was a bit less of.
I love the look of pleasure that an unexpected gifted jar produces or the ’oohing and aahing’ at a dinner party when I produce a bottle of red and a ‘matched brace’ of spring and summer honeys.
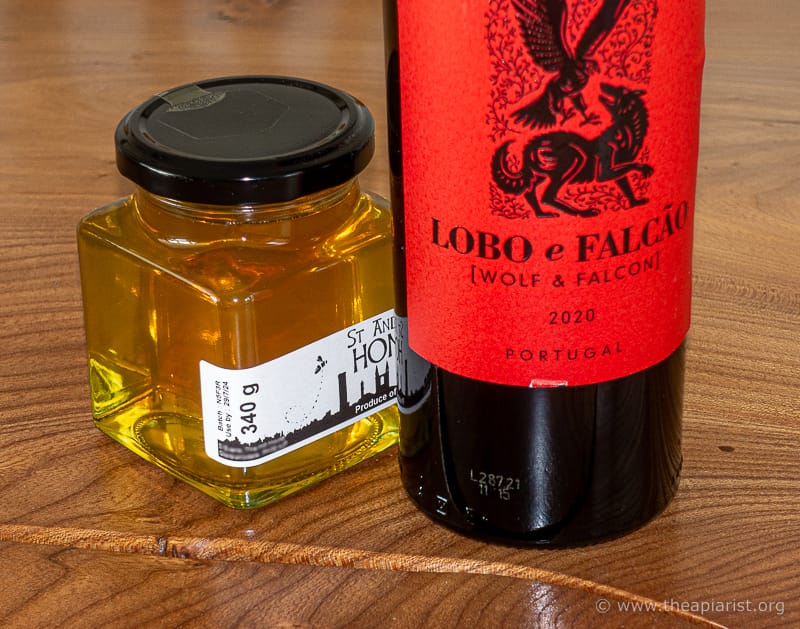
A winning combination
I’m a lot less keen on shifting half a ton of supers from the apiary to the car to the warming cabinet to the extractor {{1}}, or the interminable washing up after extracting … or, for that matter, the repetitiveness of jarring and labelling very large amounts of honey.
However, I do welcome selling a bit of honey to offset the cost of new nucs, or DIY bits for my queen cell incubator, or replacing the (many) hive tools I misplace.
And, as the adage goes, ”If a job’s worth doing, it’s worth doing well”.
So I do my best to produce good looking and great tasting honey, sold through local farm shops, organic cafes and similar artisanal outlets. I tend to prepare batches of 24-36 jars to order i.e. about a bucket at a time, 90% of which sells within 20 miles of my apiaries. This approach works for me; not too much repetitive boredom, no need to store large amounts of jarred honey and I can make a virtue of any hive to hive, or apiary to apiary, variation.
Extraction
I’m a small scale beekeeper. I’ve got ~8-12 production colonies, a 9 frame radial extractor and a slightly dodgy back. In a poor year I might produce 150 kg of honey, in a really good year over three times that amount.
If you’re semi-commercial, own a thermostatically controlled homogenizer/creamer or a filling machine this post isn’t for you 😉 .
Almost all of my honey is produced in Fife where there are spring and summer crops, usually harvested in early June and mid/late August respectively. I also get a (very) limited amount of heather honey on the west coast but am hoping this will increase as I learn more about colony management and good apiary locations. Everything in this post relates to east coast (Fife) honey.

Just imagine the noise and the wonderful smell!
Supers are collected from one apiary at a time and extracted. I try and extract individual supers into single buckets. The extractor is run with the gate open and the honey passes through coarse and medium filters, directly into 15 kg honey buckets. Inevitably there’s a bit of mixing in the extractor, but this can still produce honeys with distinctive flavours.
I’d prefer to try and maintain this variation than produce a single uniform product from everything merged together.
Storage
Each bucket is weighed (usually 11-14 kg), the water content measured using a calibrated refractometer, sealed and labelled. The buckets get a two letter code e.g. HN, for spring 2022 (H), bucket N, and are then stacked away in a cool location until needed. Labelled on the side of the bucket, they’re readable without sorting through the stacks … don’t label the lids 😉 .
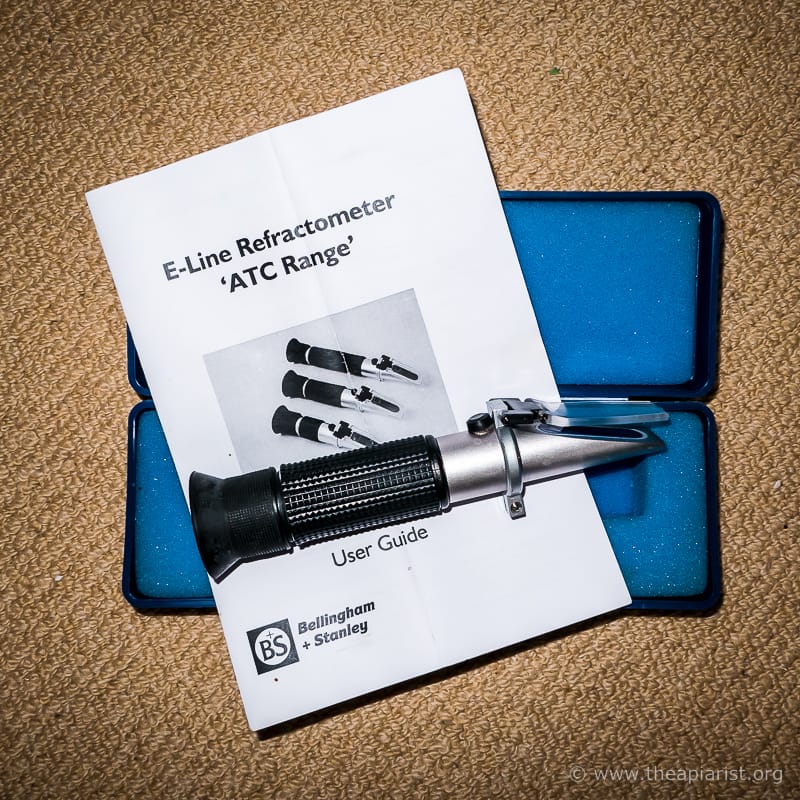
The accurate way to test the water content of honey
I’ve never needed to use the last few letters of the alphabet for any particular spring or summer harvest.
The weight, water content and code (together with additional notes such as apiary and extraction date) get added to a database so I can easily find any particular bucket wanted when needed for jarring.
Preparation
Over time almost all honey will crystallise. Glucose-rich spring honey, often rich in OSR nectar, crystallises very fast (weeks, or even days … or in the comb 🙁 ), whereas some summer honey takes months or more. A simple poke of the sidewall of the stacked bucket gives a good indication of the amount of crystallisation.
All of my spring honey is produced as soft set or creamed honey. This is produced using either an abbreviated Dyce method or a honey creamer.
- in the Dyce method the honey is melted, cooled to 33°C, seeded with a honey of a good crystal structure and allowed to recrystallise at ~12-14°C
- creamed honey is produced with a Rapido/Rasant creamer and a powerful drill
Neither of these methods require that the honey is filtered again. The medium filter used during extraction removes all but the smallest pieces of wax and – importantly – all the legs, wings and antennae.
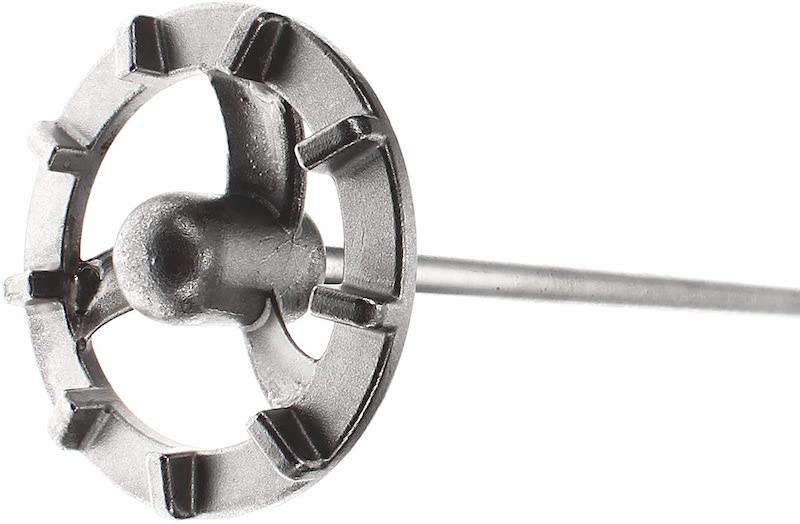
Rapido or Rasant honey creamer
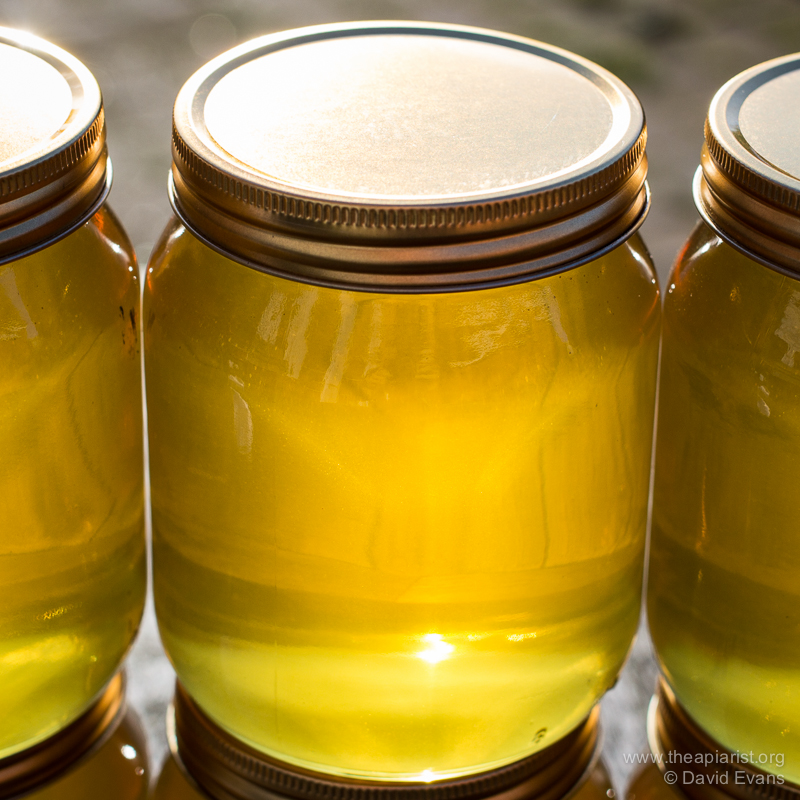
In contrast, to produce my clear, runny, summer honey I warm the bucket and filter it through a reasonably fine nylon filter. I don’t want to remove the pollen and other goodies, but I do want to exclude very fine granules of wax, or anything that’s going to make the honey ‘cloudy’.
Remember, I’m producing honey for consumption, not for show … this isn’t a 200 micron filter or anything daft like that.
All of the warming is done in my trusty honey warming cabinet which takes a couple of buckets at a time. I’ve built various filter holders and other things to make this preparation relatively straightforward.
The honey, whether soft set or clear, finally ends up in a bucket with standard 1.5” plastic tap and is then left to settle in the honey warming cabinet set at ~33°C.
Get rid of the ‘scum’
Inevitably all that mixing, filtering, stirring and decanting will have introduced air bubbles into the honey. These rise to the surface, leaving a ‘scummy’ layer floating on top of the honey. In my experience there tends to be more of this on prepared soft set honey and very little on my clear, summer honey.
Whilst you can leave the frothy scum there, it reduces the total number of jars you can fill from a single bucket as it is difficult to stop it from ‘contaminating’ the last few jars {{2}}.
Therefore, the best course of action is to remove the scummy layer before starting to jar the honey.
I simply lay a sheet of clingfilm on top of the scummy layer, excluding as many bubbles as possible and ensuring it reaches the very edges of the bucket. I then confidently lift it off and drop it into an adjacent bowl.
The critical word in that last sentence is ‘confidently’.
Like Radio 4’s ”Just a minute” any hesitation, repetition or deviation is fatal 😉 .
Yes, you ‘lose’ a bit of honey … but the final product will look much better. Do this just before you’re ready to jar the honey.
One fault I often make is not allowing the honey to settle for long enough before jarring it. It’s worth remembering that a temperature of 33°C is about the temperature of the honey in the hive and so it will not be damaged by standing for a day or two before jarring. I’ll return to this later.
Choices, choices, choices
There are a huge range of different type of honey jar to choose from {{3}}; round, square, hex, small, medium, large, gold lids, black lids etc.
Although I don’t think it matters too much which style of honey jar you choose I do think it matters that you use a honey jar as opposed to one more usually associated with jam or chutney or gherkins.

12 oz hex jar
I get all my jars from C Wynne Jones. They only list two ‘traditional’ honey jars together with squeezy bears (!), but they also list a range of hexagonal, octagonal, square and round jars. Separately they list preserve jars, and some of the round jars are described as pickle, jam or chutney jars.
You, of course, can choose whatever jar you want but it’s worth keeping three points in mind:
- some shoppers will associate a jar shape with particular types of contents; if you bottle your honey in a chutney jar it might be ignored
- you can sell any weight you want (as long as it’s labelled appropriately) but customers are often used to 227 g, 340 g and 454 g, both for honey and other types of jams and preserves; if a customer is price conscious an ‘odd’ weight will make comparisons difficult (this might work in your favour, but don’t depend on it)
- consider the other honey yours might share shelf space with; you want something distinctive and attractive in appearance
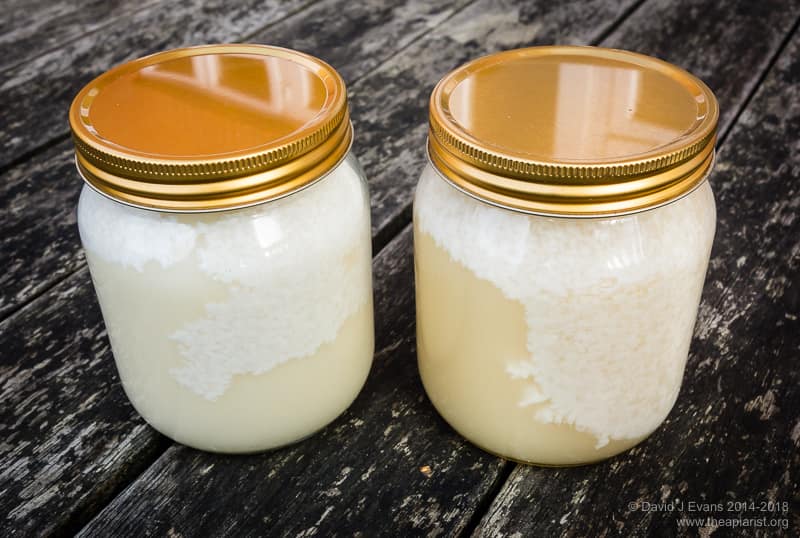
Several years ago I settled on square jars with black lids and now use nothing else {{4}}.
Weight
The jars I use are only available in 4, 8 and 12 oz (114, 227 and 340 g) sizes. This isn’t a problem as a 1 lb jar (454 g) would now be well over the psychological £10 barrier {{5}} so I just use the 8 and 12 oz size.
Although the proportional profit margin for 4 oz jars might be larger, the prospect of preparing large numbers of them fills me with dread. I once fulfilled an order for several hundred tiny hex jars and regretted it after the first 50 … and vowed ‘never again’ after a gross.
1 lb jar of honey …
The choice of jar size should probably be made having looked at what ‘competing’ honey sells in. If they’re all 227 g jars priced around £8-9 your 340 g jars priced at £12 might get overlooked.
None of this is a particularly exact science and I certainly don’t pretend to know much about marketing honey. My aim is to provide a recognisable product, distinctive, attractive and priced accordingly. The shelf price is dictated by the store, but will be influenced by the price you sell them the honey at.
Jars are expensive, heavy and take up a lot of storage space. Buy in bulk and, if you live anywhere vaguely remote, be prepared for a hefty shipping surcharge and factor it in to the cost price of your honey.
The last delivery I received came on a lorry too large to negotiate the very long, steep track to our house. The driver – to his eternal credit – walked up to the house to find me and finally left my pallets of jars by the roadside. It took me three return trips in the 4×4 to collect them.
Jarring honey
I only use brand new and washed jars. I know many beekeepers use the jars directly from the cardboard boxes but I always put them through the dishwasher first {{6}}. Washing the jars is probably unnecessary … however, the jars are stored in my shed (nominally in sealed boxes, but who knows where spiders get) and I’m always concerned of tiny glass chips resulting from the handling of boxes in transit to me (or by me).
Better to be safe than sorry.
Honey that won’t be sold, such as the dregs from a bucket or a reference jar (see later), goes into whatever recycled honey jars I’ve got at home.
If I’m jarring soft set honey I always prewarm the jars as I think it helps prevent frosting. I’m less certain of this than I used to be, but I’ve got into the habit of warming the jars and so still do. I should test this sometime …
Honey with frosting
In principle, jarring honey is straightforward … and it is when compared with doing a hip replacement or learning Swahili {{7}}. You put the jar under the tap, zero the scales, open the tap, close the tap once the right amount of honey is in the jar, and repeat … ad nauseam.
In practice of course there are a few tricks that make things even easier.
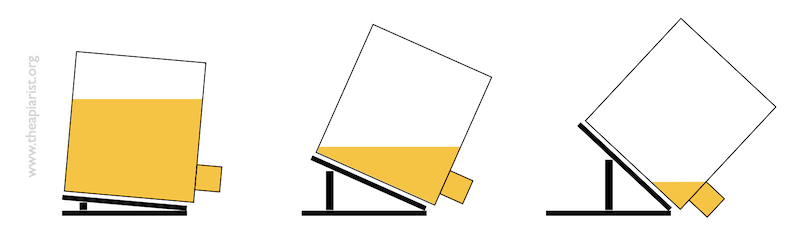
Honey bucket tipper
As the honey bucket is emptied you need to tilt it at an angle to get the last of the honey out. However, even with the best ‘scum removal’ (see above) you probably want to avoid the surface layer of the honey entering jars for sale.
Again, the way to achieve this is to gradually increase the angle at which the bucket is tipped the more jars you fill.
But there is a problem … some of those residual scummy bubbles cling to the sides of the bucket. Therefore, if you tip the bucket forward, then rest it back level, then tip it forward again, the surface layers of the honey get mixed with the bulk of the bucket.
You could try holding the bucket stably tilted with one hand. However that only leaves one hand for moving jars … and if your honey tap drips at all that’s a certain recipe for madness. You want to be able to remove one jar and replace it immediately with another.
Which is where a honey bucket tipper comes in. I built mine well over a decade ago and there are now commercial versions available. These are £40-55 … don’t bother.
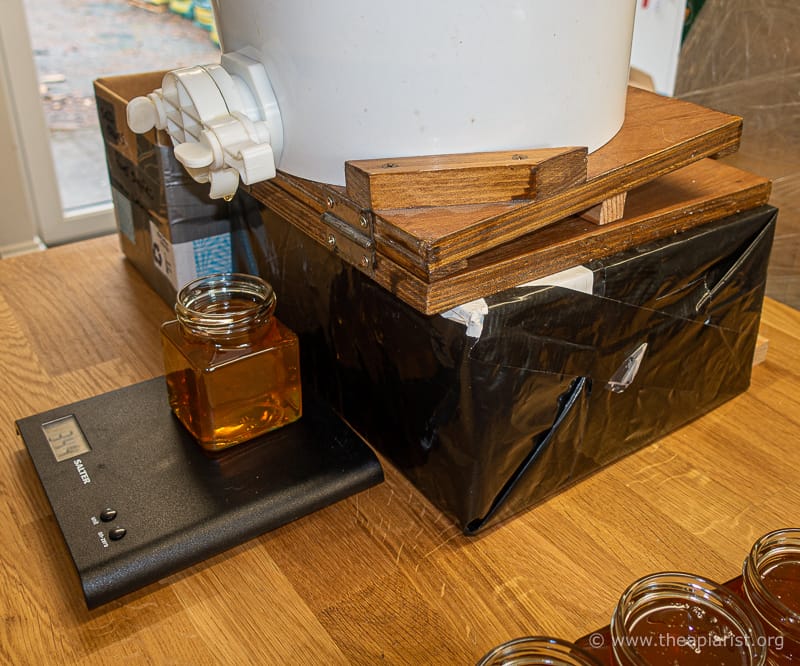
Honey bucket tipper
Mine cost £1.20 and that was only because I had to buy the hinges.
As the bucket is emptied into jars you simply slide in a larger ‘spacer’ to increase the angle of incidence. On a good day I can manage to leave no more than ~300 g of honey in the bucket.
Honey bucket tipper in use
This simple gadget is a game changer.
I won’t suggest it makes jarring honey a pleasure, but it does make the task less of a chore.
The dregs, reference jars and more jarring
If I’m emptying the bucket I usually run the last of the dregs into a recycled jar for home use. If the order is a large one (for me, not on the scale of a commercial beekeeper of course) I might prepare an additional ‘reference’ jar to put aside. It’s very rare there are any issues with properly prepared honey, but it’s sometimes useful to have ’one I prepared earlier’ for comparison.
I usually jar honey every week or two. To save a bit of time preparing soft set honey it’s possible to leave 1-2 kg in the bottom of the bucket and use it as the ‘seed’ for the next batch. If you’re going to do this tip the bucket with the tap up (‘backwards’ if that makes sense) to empty the tap before adding the melted bulk of the next batch. That ensures better and more even mixing right from the first jar. Remember to wrap the tap tightly with clingfilm to keep it clean and avoid any drips making a mess.
More bubbles
When jarring honey you can minimise the amount of mixing and aeration by holding the jar close under the tap until you’re approaching the final weight. Only then place it back on the balance to top the jar off.
However, particularly with clear honey, this still often leaves a few bubbles that mar the lovely golden translucence of the jar.

Recently jarred honey … with bubbles
I therefore put the lids on the jars and return them to the honey warming cabinet (still at 33°C) for a few hours. All the bubbles rise to the surface and … ’pfffft’ … disappear 🙂 .
Honey is a variable product, which is both a good and bad. It means that there is almost certainly batch to batch variation, depending upon its origin and preparation. My clear honey exhibits the most variation in flavour, often depending upon the amount of lime nectar the bees have had access to. To me, and seemingly to customers, this type of variation is welcome.
If they wanted a truly uniform product they’d buy some squeezy bears filled with the ’Produce of EU and non-EU countries’ 🙁 .
Bleugh!
However, the variation that causes me problems are the residual micro-bubbles in soft set honey (despite apparently preparing it in an identical manner). In many batches these remain invisible – if they’re present in the first place – in others they ever-so-slowly rise to the surface and get ‘stuck’ on the shoulders of the jar.
The solution is probably to allow the mixed soft set honey to settle for much longer before jarring, but even that doesn’t always solve things. Certain jar shapes are more or less susceptible to these, with hex jars being particularly prone in my experience.
Labels
I make my own labels and will discuss them again when I write something on the provenance of honey. Each jar carries two labels. The front label, which has all the important and required {{8}} information, and a clear anti-tamper label attaching the lid to the jar.
I make sure my labels are placed level and at a standard height on every jar. I expect them to be lined up on the shelves and want them to look good. For square jars (or hex’s) this is a trivial task; I just use a piece of wood (a sample of wood flooring) as a spacer and stand the jar on a non-slip foam surface so it doesn’t slide backwards as I press the label into place.

Makes level labelling of round jars easier
For round jars it helps to have a recess cut into a piece of wood of the right thickness … the photo above is of my, now redundant, ‘spacer’ to help me line up labels in ‘1 lb rounds’.
The one thing I try and avoid is tipping the jar so that the honey contacts the underside of the lid. Yes, it may drip off while standing on the shelf, but why not try and leave the inside of the jar as good looking as the outside? All my labelling is done with the jar horizontal.
There’s little to say about adding the anti-tamper label. If you use black lids make sure there are no greasy fingerprints or dust trapped when you attach the anti-tamper label.
Finally, do make sure the lid is on properly before adding the anti-tamper label … or selling the honey 😉 .
Alternatively, buy one of these …
{{1}}: And back, though they’re a bit lighter on the return journey.
{{2}}: It spoils the appearance, not the flavour.
{{3}}: I’m assuming you will be using a jar and not a squeezy bear … if not, like the commercial beefarmer, this post isn’t for you.
{{4}}: Other than 1.5 kg plastic ‘pails’ which some customers want.
{{5}}: Already breached by 340 g jars in several outlets.
{{6}}: Just filled with jars … no curry dishes, or garlic presses!
{{7}}: Kwa kweli, sio ngumu sana.
{{8}}: Not necessarily the same thing.
Join the discussion ...