How to : Queen marking

It must be the time of year. A few days ago, Steve Donohoe, aka The Walrus, mentioned queen marking, and a day or two after that, Thorne's weekly 'yet more essential stuff to clutter up the bee bag' email featured a press in cage which is one way to immobilise her while you apply the paint.
I can take a hint, and had already got the outline of this post started, so perhaps it's both timely and relevant.
“How to's” are usually for sponsors of The Apiarist. For things like a vertical split or Pagden's artificial swarm that means I try to write a definitive post, with a bullet point list that can be followed in the apiary (or, at least, in your head in the apiary).
But queen marking is a bit different. The end result is the same, but how you get there varies. Although there are lots of different ways to do it, I only ever use one.
Only one because, having tried others, I chose the one that I find quick, easy, safe and dependable.
All these are commendable features where handling the queen is concerned.
So, although I'll mention some pros and cons of other methods, this post is really about how I mark queens.
However, I'm lazy and (reasonably) efficient, so it might suit you as well 😉.
Love-hate relationships
Beginners have a sort of love-hate relationship with the queen; they love to see her, calmly walking about the frame, with her little retinue of helpers. They love the confirmation that the colony is queenright, and that everything is OK in the hive {{1}}.
However, they hate doing anything that might jeopardise this situation, like handling the queen, and the prospect of daubing her with paint or — worse still — cutting the tip off one of her wings, fills them with dread.
One clumsy move, one misplaced dab of paint, or snip of the scissors, and it's Goodnight Vienna … time to send a WhatsApp message to the local beekeeping association asking if anyone has a spare queen.
Please, pretty please.
Perhaps love-hate is a bit strong.
They are understandably reassured when they see the queen, but they are almost universally apprehensive at the prospect of handling or marking her.
If that's how you feel, then I hope this post helps.
I'm going to restrict my comments to marking the queen, though 99% of the time I also clip one wing as part of my swarm control strategy. It makes sense to do them at the same time, as it minimises the handling {{2}}.
And that's a good thing, because — rarely — stuff happens and everything goes wrong. Over the years I've made most of the common mistakes when marking queens (I'll mention a few below). I've added about 3 ml too much paint, I've dropped the queen, I've watched her fly around my head, and then disappear into the distance.
Been there, done that, bought the T-shirt.
However, although these are very much the exception, they do mean that — even after hundreds of successfully marked queens — I'm also still mildly apprehensive when doing it, especially when she's a valuable queen {{3}}.
So, being apprehensive is OK.
But, don't let this apprehension stop you marking your queens, the benefits far outweigh the consequences when, rarely, things go awry.
Seeing is believing
An experienced beekeeper can usually tell whether a colony is queenright when first opening the hive. Queenless colonies often 'roar' when disturbed, for example when the crownboard is lifted. It's a very quiet roar, more like a small handheld fan being turned on than Metro-Goldwyn-Mayer's Leo the Lion.
The aggressive/defensive behaviour of the colony is also characteristic, even more so if you have notes about the 'normal' welcome they give you.
The presence of eggs and the absence of queen cells (including very sneakily hidden ones) is also a pretty sure sign that the colony is queenright. Remember, eggs alone are not definitive; they take three days to hatch so only tell you there was a queen in the box sometime in the last 72 hours.
Assuming of course that they're queen-laid eggs.
Check for the number of eggs per cell, and their location within the cell. Queens almost always lay single eggs at the base of the cell. If there are more, and they are on the sidewalls of the cell, you need to consider whether there are laying workers present … but I'm getting distracted.
If you really want to be certain that the queen is present you need to see her.
Sponsors get more … posts, news, and information on the science, art, and practice of sustainable beekeeping. They also have access to over a decade of legacy posts, and ensure The Apiarist continues to appear every week.
Finding the queen
Finding the queen is an acquired skill.
She's not one in a million, but she might be one in thirty thousand, so spotting her takes practice.
The more hives you open, the more frames you examine, the better you get at finding the queen among all those thousands of other — generally smaller, but usually more mobile — bees in the hive.
On a calm early summer afternoon, with no time pressure, a strong nectar flow and placid bees, it's often pretty straightforward to find her.
The same cannot be said for a cool, grey, windy morning, with heavy rain forecast, where the entire workforce are at home (no nectar coming in), and eager to exhibit how much they resent your intrusion.
And, if your beekeeping doesn't sometimes involve days like that you either live in Spain, or you are flexible about the timing of your colony inspections … and probably lose a few swarms 😉.
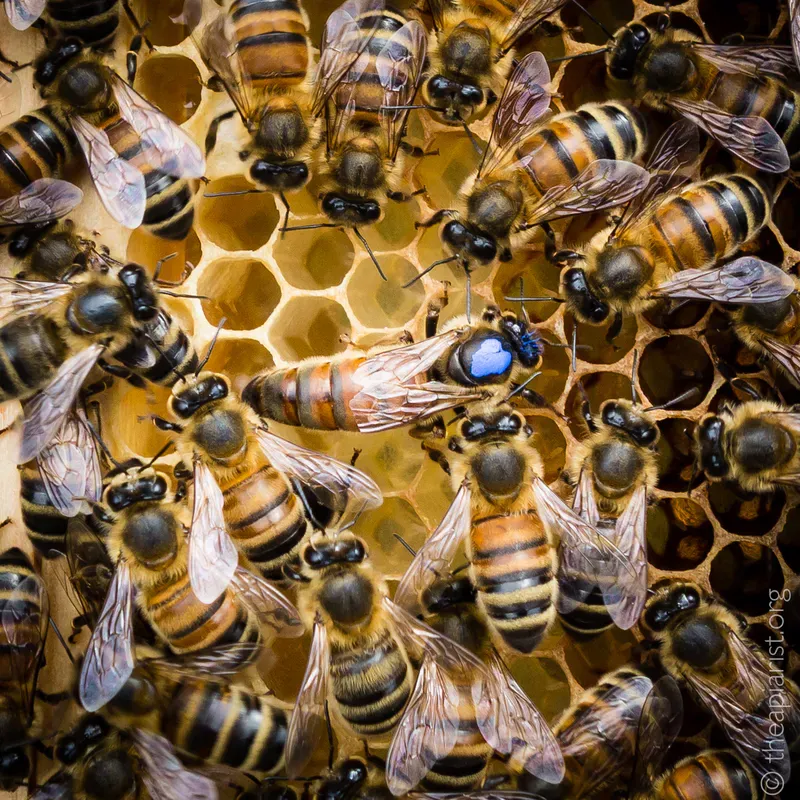
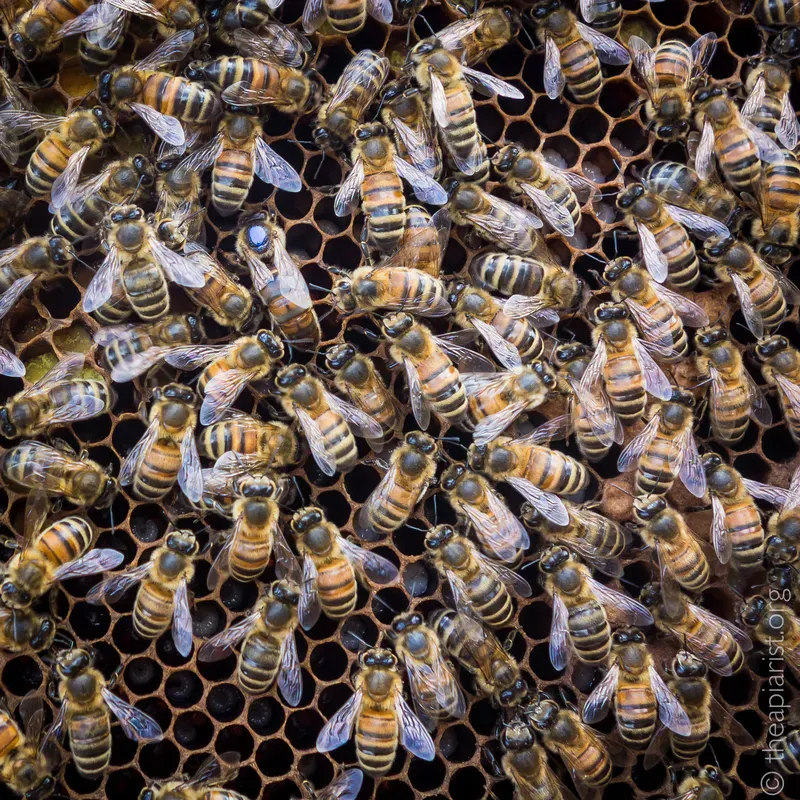
But finding her is a lot easier if she's marked with a distinctive splash of paint, something that contrasts with the orange/brown/black of the bees.
'A lot easier' is not the same as 'guaranteed', but it's usually the difference between a frustrating and potentially time-consuming search, and a confidence-inspiring “A ha! There she is … now, what next?”
Why do you need to see the queen?
With a few exceptions (e.g. to cage her when queen rearing 😄, or to cull her because her daughters are psychopaths 😞) there are ways of managing the colony that do not involve seeing the queen.
For example, it's relatively straightforward to conduct an artificial swarm even if you have no idea where the queen is.
But, almost without exception, the colony management methods that require knowing the queen's whereabouts are easier to understand, and to apply (at least for inexperienced beekeepers) … and this means that they are more likely to succeed.
Do not underestimate this. If you understand the theory and practice of a particular method, you are more likely to get it to work. And understanding the process is usually straightforward if you know that the queen is definitely 'in there' (wherever 'there' is).
So, the primary benefit of marking the queen — after the reassurance of more easily seeing her during inspections — is that it makes colony management easier.
In addition, it gives you some insight into what's been happening in your absence since you last inspected the colony:
- an unexpectedly unmarked queen at the beginning of the season is most likely a late-season supersedure queen. This happens more often than you think, but it's only obvious if the queen in March is unmarked when you left one marked blue in there last September {{4}}.
- if you find an unmarked queen in the hive during a mid-season inspection it's likely that the colony has swarmed and requeened itself. Think fast, is the timing right? Is she likely to have mated already? Do you need to make a tactical retreat … or is it time to mark her?
Anyway, enough preamble … how do you mark the queen, and what do you mark her with?
Let's deal with those in reverse order …
Paint etc.
The principle is straightforward.
You add a small spot of a contrasting colour to the thorax of the queen (though see below for alternative 'targets').
You don't want to have to repeat this, so the coloured spot should be long-lasting.
What are the options?
Tipp-Ex typewriter correction fluid works {{5}}, but the applicator brush is really too broad, so you need to apply it with a toothpick or match, or something similar. Tipp-Ex is cheap, but only comes in white. The fluid dries quickly, and the solvents (an aliphatic hydrocarbon) doesn't appear to adversely affect the odour of the queen.
Enamel or acrylic paint, either applied with a small paintbrush or — better — the wooden end of a match, or a frame building 'gimp pin' mounted in a wooden handle. I've used enamel paint; although it lasts well, it takes longer to dry than the Posca paint pens I prefer to use.
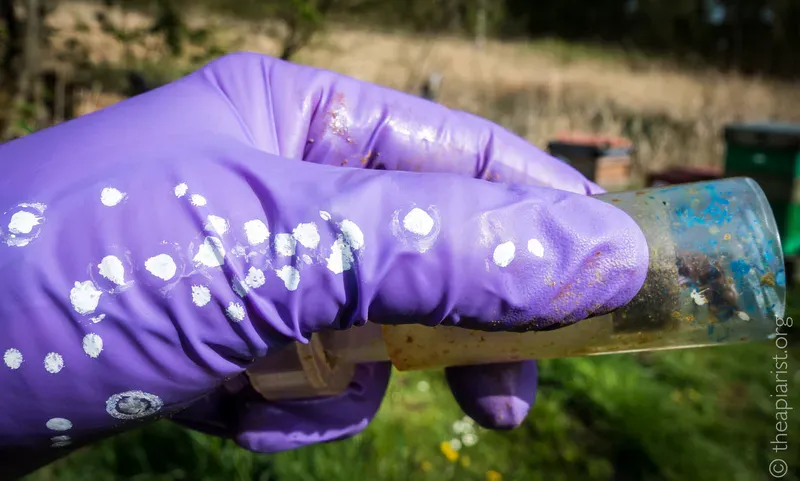
Posca (or similar) paint pens. These are water-based art pens, quick drying, and available in a variety of colours. I use size PC-5M which has a ~2.5 mm bullet tip. The two disadvantages of these pens are:
- the price beekeeping suppliers charge for them 😱, particularly in sets of five. Shop around, you don't need five colours (see below), and you can often find them at three for a fiver.
- they have a tendency (if not used regularly) to be very 'blobby', turning your queen (and the frame she's on) into a Jackson Pollock masterpiece. You can easily avoid this by shaking the pen before use, and then doing a series of tests on your thumb or a nearby hive stand or roof. It takes seconds, but saves her from a possibly catastrophic deluge.
There are other things you can use, including small numbered plastic dots stuck in place with SuperGlue, or — even more advanced — small numbered metal discs which, being magnetic, enable to queen to easily be picked up (using a metal wand) in the future. These are both more specialised, but often used by scientists or queen rearers who mark/handle large numbers of queens. I've used both, but they're outside the scope of this post.
Any colour as long as it's black visible
Unlike Henry Ford, you can have any colour you want to mark your queens, though it makes sense to use something that's highly visible.
So, not black.
Beekeepers use a colour scheme to indicate the age of the queen. Since a queen rarely lives longer than three years, the colour scheme is on a five-year rotation (and, amazingly for a group who so rarely agree, beekeepers — internationally! — use the same year/number scheme).
White for years ending 1 or 6, yellow for years ending 2 or 7, then red, green, and blue (you get the idea). There are not particularly memorable mnemonics to help you remember the order {{6}}.
This year, being 2025, means that queens should be marked blue.
However, I used white last year, and I'm using it again this year.
Or yellow.
Or whatever pen I can find in my bag that works well {{7}}.
I never use red or green as I'm colour-blind.
Since this affects ~1 in 12 males, that carefully thought out, internationally agreed, queen marking colour scheme disadvantages a lot of apiarists.
My advice is to ignore it completely.
The fact is, any colour you can easily see is suitable, and only exceptionally do you need more than one colour.
Queens don't move between hives (at least, not once mated and without the assistance of a beekeeper), so if you mark a queen white and make a note about the date and colour used, you've got all the information you need to determine her age and whether she's been replaced.
I've sold plenty of queens and nucs over the years. I always explain to the purchaser that I don't use the colour marking scheme, and it's never caused an issue {{8}}.
Is there ever a time when the colour marking scheme is useful?
If an early summer swarm arrives in my bait hive with a green-marked queen I'll know that she was from last year (or 2019, I don't think!). I suppose that's more useful than not knowing how old she is, though her performance is much more important than her age.
However, since 2024 was a green year, I'd not be able to see the mark anyway 😞.

Head, thorax, abdomen, wings?
I mentioned earlier that the paint is applied to the thorax of the queen. That's the bit between her head and her abdomen (the long, fat bit), that the wings are attached to.
Conventionally the paint is applied to her thorax, but you can apply it to other regions.
A recent study has looked at queen marking using paint applied to the thorax, abdomen or wings, recording the longevity of the mark, and any detrimental effects on the queen (Dolasevic et al., 2025). They used oil-based paint and checked the proportion of the paint still present after 5 months {{9}}.
Although the paint spot lasted better when applied to the thorax, the size of the abdomen meant that more paint could be applied, making the queen more visible. Paint applied to the wings was rapidly removed and/or was rubbed off.
There was one additional result that's of relevance to those readers who feel apprehensive about queen marking … queens marked on the thorax, wings, or abdomen exhibited no detrimental effects, and were accepted, survived and superseded at similar rates.
So, if you do miss when applying the paint, do not worry.
Paint on the wings, thorax, or upper side of the abdomen, is well tolerated.
But avoid her head, eyes and antennae … things almost never end well if you get paint on her head.
So, how do you hold the queen sufficiently still to apply the paint (and avoid her head)?
Hold still
Broadly there are three ways of achieving this:
- using your hand, trapped by the legs against your forefinger
- trap her against the comb using a press in cage
- use a plunger-type queen marking cage
All fingers and thumbs
Many experienced beekeepers will simply pick up the queen, position her against their left forefinger, using the thumb and middle finger to hold her legs, then apply the paint using the right hand {{10}}. It's simple, needs no additional equipment, and — performed confidently — is quick and easy.
Ted Hooper's book Guide to Bees and Honey has the best description I've read of it, and so I won't reproduce it here.
It's easier to do without gloves, though you can do it wearing thin nitriles. What you can't easily do is hold the queen if the gloves are already caked in sticky propolis.
Well, you can hold her, but you might not be able to let her go again 😉.
I always wear gloves. Getting a sweaty nitrile glove on again on a hot day is a frustrating and time-consuming process.
For these reasons I don't use this method. I don't want to spend valuable inspection time wrestling with a clammy glove that I had to remove because it was sticky with propolis.
Press in cage
Cheap variants are made of plastic, often with rather coarse mesh. Better quality press in cages are metal, with very sharp pins and a mesh made from very fine thread.
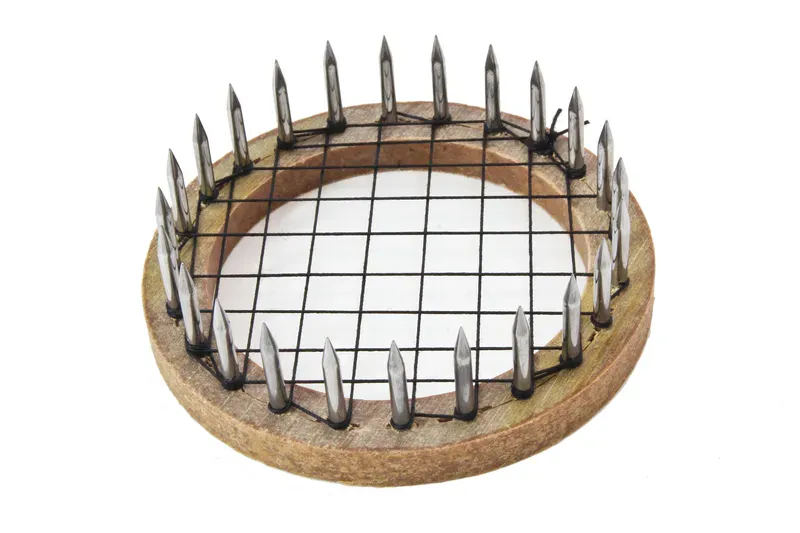
The metal ones are preferable, until you locate the one you misplaced (with your bare thumb) buried in the bottom corner of your bee bag. They will draw blood.
Ignore the potential blood loss … don't be mean, buy the metal one, they really are better. For years, I thought these were called a Crown of Thorne's, but I think that's just a missed advertising opportunity.
Those sharp points will also impale any bee you press them into, including the queen if you're not careful.
To use a press in cage you find the queen, wait until you have a relatively unobstructed view of her, place the cage over her and gently push it into the comb. The queen, trapped under the thread mesh is immobilised, so you can easily mark her. You then lift the cage slightly, to allow her to move about while the paint dries, before removing it altogether.
Easy.
Well, reasonably easy.
The queen is usually on a busy frame, and often moves faster on unpopulated frames. You risk impaling neighbouring bees or, if she's in a hurry, the queen.
You really need three hands to easily use one of these cages; one to hold the frame, one the cage and one the pen.
The frame can be placed horizontal on a neighbouring hive roof, but take care with the bees on the opposite side of the frame. If you place the frame down before trapping the queen there's a danger she'll sneak underneath the frame. Once she is trapped, it's not unusual for lots of bees to clamber over the upper side of the cage, obscuring your view.
Whatever, you'll probably be hunched over the frame, blocking the light and making everything more difficult to see.
And that's before I even mention how thin the thread is and the likelihood of inadvertently cutting it with your scissors when clipping the queen … but let's ignore that as this post is about marking the queen.
Frankly, I'm not a big fan of the press in cage.
Plunger-type cage
This is what I use. All work on a similar principle. The queen is trapped between a mesh/grid of some sort, and a foam-topped plunger. You control the up/down movement of the plunger, so determining how tightly the queen is held. The foam provides her some protection.
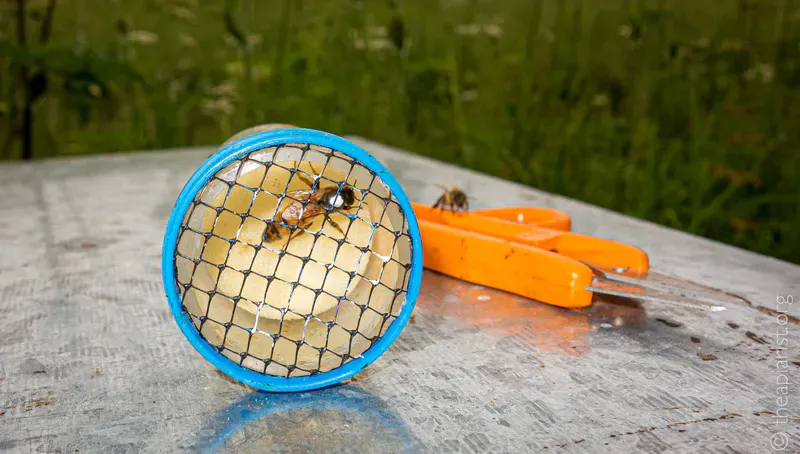
I prefer plunger-type cages in which the grid is composed of one or more horizontal gaps, approximately the width of the thorax of the queen. The queen cannot get between the bars, but — trapped between adjacent bars and the foam — you have easy access to her thorax. Some suppliers call these 'turn and mark cages'.
I'm right-handed. The cage is held in the left hand, between the fingers and thumb. The plunger of the cage is controlled, or at least held in place, by the little finger and palm. My right hand is free to wield the pen (and scissors, as needed).
But how do you get the queen into the cage in the first place?
The easiest way is to simply pick her up 😄.
Picking up the queen
Queens have 'handles', they're called wings.
Using a nitrile-gloved hand you pick the queen up by the wings, drop her into the plastic cage, add the plunger and then retire to a quiet corner of the apiary to complete the queen marking {{11}}.
I'm right-handed, and this is how it's done:
- place the plastic cage inverted on an adjacent hive roof, with the plunger beside it
- hold the frame containing the queen by the lug in your left hand, ensuring the face of the frame is well-lit to give you a good view of the queen
- with the queen well away from the edges of the frame and walking at an oblique angle towards you (easier to judge her speed), approach her from behind and use the finger and thumb of your right hand to gently grasp her by the wings
- lift her clear of the frame
- put the frame down gently, balanced on the bottom bars and one lug between the runners of the brood box, or on the hive stand
- pick up the plastic cage and drop the queen into it, placing your fingers over the top to stop her climbing out again
- add the plunger (you might need to shake her to the bottom of the cage first) and move away from the hive
Held by both wings {{12}} the queen will simply curl her abdomen up. If you only hold her by one wing she'll try to twist round, often then clambering onto your thumb. If you're not careful — of if you slacken your grip — she'll wriggle free and then walk up your wrist and end up somewhere difficult to see or impossible to reach.
Act promptly, pick her up with your other hand, or somehow usher her into the plunger cage.
It's as easy as that? Really?
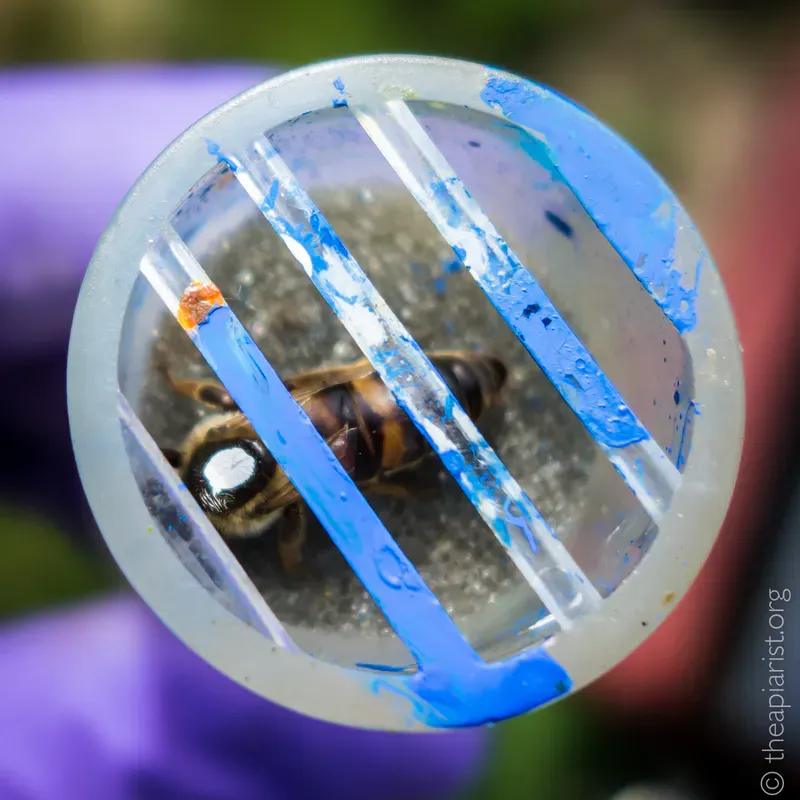
The beauty of the plunger-type cage is that she's safe in it for as long as you want. You can move to an area of the apiary untroubled by other bees, ideally some light shade. You then gently turn and lift, or lift and turn, the plunger until the queen is aligned with one of the gaps, hold the cage as described in the section above, and apply the paint (after testing it to ensure you're not going to do a 'Jackson Pollock').
Once marked, you then lower the plunger slightly to give her space to move while the paint dries, leaving the cage somewhere safe in the shade, while finishing the inspection and/or other manipulations of the hive.
You can then reintroduce the queen to the colony.
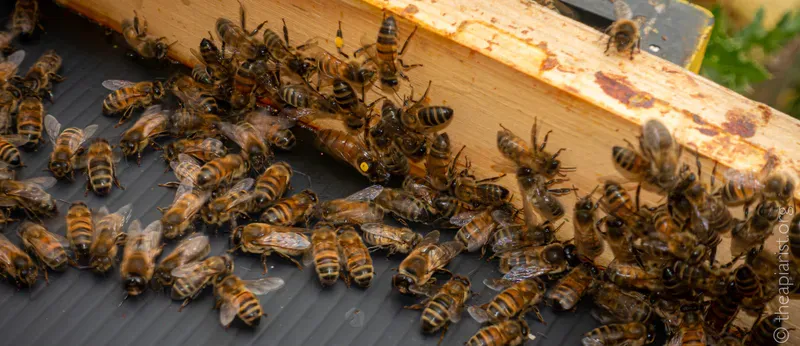
Slow motion introduction of a marked queen (note the somersault at the start)
Again, this is easy … making sure the queen has had sufficient time for the paint to dry, I remove the plunger and lay the cage between the top bars of the hive, along a seam busy with bees. They'll enter the cage and, within a minute or so, shepherd the queen back into the body of the hive.
Job done 😄.
When things go wrong
This is beekeeping so, of course, stuff sometimes goes wrong.
Here are a few obvious things to try to avoid:
- virgin queens : Marking unmated queens can be done (and there are studies to show that their mating success is unaltered), but clipping an unmated queen is unwise 😉. The problem with virgin queens is that they're flighty. You're more likely to end up with them scampering around madly when trying to pick them up, and they sometimes fly off. Don't bother (unless there's a compelling reason to).
- invisible queens : the longer it takes to find the queen, the more likely it is that she will be disturbed and so difficult to pick up. This is one time when to 'Try, try, and try again' is counterproductive. Withdraw and have another go next week. It makes sense to mark queens early in the season (or when in mating nucs) rather than during midsummer in a full hive.
- running queens : if your first couple of attempts at picking her up fail, and she's charging around madly, barging other bees out of the way … stop! It will not end well. Return the frame to the hive and try again next week.
- flying queens : rarely you'll have a queen fly off when trying to pick her up. She rarely flies far, or well. Don't bother looking for her. Just close the hive and calmly withdraw. She usually gets back OK.
- dropped queens : if you can see her, pick her up and take more care next time (!). If you can't, stop moving your feet, close the hive up, and leave the apiary by levitation. Or, failing that, one or two large paces. Again, dropped queens usually manage to get back to the hive.
And finally, because it doesn't really fit anywhere else, if I'm clipping a queen I always do so before marking her. It's unlikely that anything will go wrong, but a slip with the scissors is to be avoided, and I don't want any traces of wet paint getting in the way of my microsurgery, or ending up on her wings, legs, antennae, or head.
A transferrable skill
Having the confidence to handle (and mark) your queens is an important beekeeping skill.
Not essential, but surprisingly useful.
I was using the nucleus method for swarm control a couple of weeks ago. The frame with the best queen cell on it inevitably was also the one that the queen was on.
The queen cell was to be left in the original hive, whereas the queen was destined for the nuc box.
I could have placed the frame back in the box and waited, but I think we can all guess how that would have worked out. Instead, I simply picked up the queen, placed her on the adjacent frame and moved it to the nuc.
'Simples' as those irritating meerkats would say.
It's not often you need to handle the queen, but when you do, it's a very useful skill to have … and if she's marked it's much easier to find her in the first place.
Go on, give it a go, you know it makes sense 😄.
More like this?
That's over 3,000 words you've just read on bees and beekeeping. If you want more of this every week, then why not sign up as a sponsor of The Apiarist? At least 50% of posts are now for sponsors only, and sponsors ensure that there will be comprehensive, well researched and entertaining posts on sustainable beekeeping written (not rehashed and regurgitated by ChatGPT 😉) every week.
Notes
Subscribers using TalkTalk email addresses may not be receiving notifications of new posts. Many (most?) appear to be bouncing off the TalkTalk mailservers. I have no control over TalkTalk, but you might. Contact your IT support and read the FAQ. If you need to change your email address, contact me.
References
Dolasevic, S., Delic, N., Petricevic, M., Keskic, T., Pavlovic, R., Stevanovic, J., and Stanimirovic, Z. (2025) A New Technique for Marking Queen Bees (Apis mellifera) for Better Visibility and Easier Spotting. Agriculture 15: 645 https://www.mdpi.com/2077-0472/15/6/645.
{{1}}: They have yet to learn that the presence of the queen does not mean that everything is OK … there might be a cluster of queen cells on the adjacent frame, and the colony could swarm later that afternoon.
{{2}}: No, I don't want to get into a discussion about how you consider queen clipping to be a barbaric technique. I'm convinced of the benefits to my beekeeping and my bees. Over 75% of swarms perish, and queen clipping reduces the chances of me losing a swarm (and the bees dying). Several studies have shown that clipped queens are as productive, and live just as long, as those that are unclipped. I clip my queens, it's your choice whether you clip yours. End of discussion.
{{3}}: To me, even if not measured in $$$.
{{4}}: And it's even more definitive if the blue marked queen was also clipped, but the March queen has intact wings. Paint wears off, wings do not grow back.
{{5}}: Who still uses this stuff for its intended purpose? And yes, I've heard the joke about the blonde and Tipp-Ex on the computer screen. It wasn't funny then, and it's not now.
{{6}}: Don't bother!
{{7}}: And I know I've only got white and yellow, and — unusually — marked two queens in the same hive a month ago, one white and one yellow, and they're still both there.
{{8}}: As an aside, I don't remember a customer ever asking for the queen not to be marked, but some prefer that they are not clipped. If you're selling bees, ask before getting the scissors out.
{{9}}: No, not very long … I blame the never-ending pressure to publish.
{{10}}: I'm assuming the beekeeper is right-handed, as are 90% of the population. Left-handers will know how to translate, and it saves me from using the — accurate but wordy — 'dominant hand' and 'non-dominant hand' terminology.
{{11}}: Because of the way I seem to handle frames during inspections, the fingers of my left hand are usually more exposed to propolis. It's therefore unusual to not be able to pick up the queen with my right hand … remembering also that many queens are marked relatively early in the season, before propolis levels build up, or at temperatures below which it gets very sticky.
{{12}}: Yes, I know she has four, but it's the longer forewings that you typically grasp
Join the discussion ...